Install an Inspection Port in a Sunfish Sailboat


Introduction: Install an Inspection Port in a Sunfish Sailboat

So, you want to install an inspection port (also called a deck plate) in your Sunfish deck? They can help you dry out the hull and also make interior repairs such as fixing loose backing blocks for your halyard cleat or other hardware. Sometimes there aren't backing blocks if they fell off or the previous owner added hardware without doing a proper backing. Without backing, the screws could pull out of the fiberglass and damage your hull (and lead to disaster on the water!). It also gives you access to properly install a hiking strap if your sunfish is too old to have one already. These instructions show installation of the port fore of the footwell, but if you are upgrading your very old sunfish from the old rudder style to the new one, you can add a port near the transom to help with that upgrade. On one of these boats, we added a total of 3 ports because it needed repairs in several places!
I have helped a few friends put ports in their sunfish/minifish and we took pictures along the way to help show you what to do. This instructable has photos from 3 different boats to show you how it might vary, but don't worry that the boat color or port locations change a little between steps, we did all of them the same way.
- Sunfish or Minifish sailboat
- drill and bit that is as wide as your jigsaw blade
- 100% silicone sealer (clear)
- inspection port (I used Sea Dog 337150-1 Screw Out Deck Plate, 5-7/16" / White")
- 6 small stainless steel screws
Step 1: Prepare the Sunfish and Choose Location for Hole

On a sunfish, most people seem to prefer putting the port centered in front of the daggerboard slot and behind the coaming. The advantage is that you can access the front of the footwell if you need to add backing to screws holding in a hiking strap, and you can also reach the hardware for the halyard near the mast step tube. This also lets you inspect the daggerboard slot and mast tube for any damage, and repair it from the inside if needed.
Step 2: Tape the Hole Location and Trace the Outline

Once you choose the location, put down tape to protect your deck from the jigsaw. It also helps minimize chipping of the gelcoat.
Once you have it taped, use the deck plate itself to trace out the hole. Turn it over and lay it on the tape so that you have the threads facing up. Use a thick marker to trace the outline so you can easily see it while using the jigsaw.
Step 3: Drill a Pilot Hole for the Jigsaw Blade

Next, you need to drill a pilot hole so you can insert the jigsaw blade. Choose a drill bit that is the same size as your jigsaw blade, and then drill a hole on the INSIDE of the circle that you drew in the previous step.
Step 4: Use the Jigsaw to Cut Out the Opening

Next, insert your jigsaw blade into the hole before you turn it on. Go slowly and cut carefully on the circle. It doesn't have to be perfect, you will have the flange on the outer ring of the deck place that will cover any small errors in your cutting. If you go too small, though, the ring won't fit in the opening without some extra trimming later. Once the hole is cut all the way around, remove the fiberglass circle. You can save this in case you need to make any hull patches in the future.
It can be a good idea to wear a face mask during this step to avoid breathing in any fiberglass dust!
Step 5: Remove the Tape and Clean Up the Edges

Now you can remove the rest of the tape and lightly sand the edge if needed. Clean up any pieces of interior foam block that might overlap your hole.
Step 6: Test Fit the Port Ring to Make Sure It Fits

Put the ring in the hole to see if any trimming is needed. Don't use sealer yet!
Step 7: Look Inside the Hole and Check for Damage or Loose Blocks

Now that you have an opening in your sunfish, use a flashlight or your phone camera to take some pictures inside the hull. Look carefully at the mast tube and daggerboard slot to check for damage. You can also do this when it's in shallow water to see if these locations have any leaks.
Next, look up at the underside of the deck and check the backing blocks near your halyard hardware. Depending on the year you'll have a turning block and cleat, or maybe a fairlead and cleat. Both of these should have backing blocks! Note in one of these photos that there are screws coming through the fiberglass without a backing block. These screw held in the turning blocks for the fairlead, and if the halyard was pulled too hard these might have come out. We added a backing by removing the screws and then epoxying a small wood block there before reinstalling the screws.
Next, notice in the picture that the backing block for the cleat was loose and fell off after we removed the screws for the cleat. This needed to be epoxied back to the hull after the wood block was removed and allowed to dry out. These steps are very important to protect your hull, and also to avoid disaster if they pull out during stress while out on the water.
Step 8: Add Silicone Sealer to the Ring and Put It in the Hole

Now that you've done your repairs, it's time to add a continuous strip of pure silicone sealer around the outer ring and then insert it gently into the hole. Be careful with the silicone and don't get it on your clothes. Wearing disposable gloves can help too- it doesn't wash up very easily. Press it down lightly so that the silicone oozes out a little, but you want some to stay in and form a gasket all the way around so don't press down so hard that it all comes out! If you look closely at the photo you'll see a little bit oozing up in each screw hole. This is fine, it will form a seal for the screws. Make sure to press evenly all around so that you see a seal formed around the entire circumference of the ring. Let this cure overnight.
Step 9: The Next Day, Drill Pilot Holes and Add Stainless Screws to the Ring

Once your silicone has cured, you want to take a small drill bit and drill pilot holes in the fiberglass through the holes in the deck plate outer ring. Don't make them too large! Use a drill bit that is much smaller than your screws. Screw in the screws by hand, being careful not to tighten too much. The silicone will do a good job as an adhesive holding in the plate, these are just to give it extra strength but do not need to be so tight that you risk stripping the fiberglass.
Make sure you use stainless steel screws! You don't want them to rust.
Once the screws are in, screw in the deck plate by hand.
You're done! Now you have an easy way to do repairs inside your sunfish, and also check for leaks or easily dry it out. I usually leave the cover open in warm weather to let the hull air out.
Step 10: Repair Any Hull Cracks With Fiberglass

Once last step - check the bottom of your hull for any stress cracks that can leak. In this photo we show 2 spots where there were cracks in the hull where water leaked in while sailing.
First we sanded down the area around the cracks to get rid of dirt and loose fiberglass. Then we used a Bondo "stage 2" fiberglass repair kit (fiberglass cloth along with a 2-part resin that you mix and brush on the cloth). It can be found online and in walmart or auto stores for around $10-15. Cut the cloth a little larger than the area needing repair. Brush resin on the cracked area, then add cloth and use the brush to pat down the cloth and remove any air bubbles. Brush on more resin, overlapping the cloth by about 1/2". Add another layer of cloth and repeat. We used 3 layers of cloth for these cracks, and when it cured we lightly sanded the area and then used Rustoleum Topside white paint. It's hard to see the repair!
We didn't get more pictures of this step - sorry!
How To Properly Reinstall The Coaming On A Sunfish Sailboat
- Last updated Dec 09, 2023
- Difficulty Intemediate
- Category Sunfish

Have you ever found yourself staring at a broken or missing coaming on your Sunfish, wondering how to fix it? Well, fear not, because in this guide, we will show you step by step how to reinstall a coaming on your Sunfish sailboat. Whether you are a seasoned sailor or a beginner, this is a task that you can easily tackle with the right tools and a little bit of patience. So grab your toolkit and let's get started on restoring your Sunfish to its former glory!
| Characteristics | Values |
|---|---|
| Material | Vinyl or rubber |
| Size | Approximately 26 inches long |
| Shape | Curved or semi-circular |
| Attachment method | Screws, rivets, or adhesive |
| Color | Various options available |
| Durability | Resistant to UV rays and water |
| Flexibility | Should be able to bend and follow the contour of the boat |
| Ease of installation | Can be installed by the boat owner with basic tools and skills |
What You'll Learn
What materials are needed to reinstall the coaming on a sunfish sailboat, are there any specific measurements or guidelines to follow when reinstalling the coaming on a sunfish, what tools are required to properly reinstall the coaming on a sunfish, are there any tips or tricks for easily reinstalling the coaming on a sunfish, are there any common challenges or issues that may arise when reinstalling the coaming on a sunfish, and how can they be overcome.
Reinstalling the coaming on a Sunfish sailboat is a relatively simple process that can be done by anyone with basic DIY skills. The coaming, also known as the cockpit rim, serves as a boundary between the cockpit area and the rest of the boat. It provides support for the sailor and helps prevent water from entering the cockpit.
To reinstall the coaming on a Sunfish sailboat, you will need a few materials and tools. Here is a step-by-step guide on how to properly reinstall the coaming:
- Remove the old coaming: Start by removing the old coaming from the sailboat. This can usually be done by unscrewing the fasteners that hold it in place. Make sure to keep track of all the screws and other hardware so you can reuse them later.
- Clean the area: Once the old coaming is removed, take the time to clean the area where the new coaming will be installed. Use a mild soap and water solution to remove any dirt, grime, or residue. Make sure the area is completely dry before proceeding.
- Measure and cut the new coaming: Measure the length of the old coaming and transfer the measurements onto the new coaming material. Sunfish coamings are typically made from flexible PVC or similar materials. Use a sharp utility knife or scissors to cut the new coaming to the desired length.
- Pre-drill holes: Before installing the new coaming, it is important to pre-drill holes for the screws. This will help prevent the coaming from cracking or splitting when the screws are inserted. Use a drill with a bit slightly smaller than the diameter of the screws.
- Install the new coaming: Position the new coaming over the cockpit area and align it with the pre-drilled holes. Insert the screws through the holes and tighten them until the coaming is securely attached to the boat. It is important not to overtighten the screws, as this can damage the coaming material.
- Finishing touches: Once the coaming is installed, check for any gaps or areas that may need additional sealing. You can use marine-grade silicone sealant or adhesive to fill any gaps and ensure a watertight seal. Follow the manufacturer's instructions for proper application and curing time.
By following these steps and using the right materials, you can successfully reinstall the coaming on your Sunfish sailboat. Remember to take your time and work carefully to ensure a proper fit and finish. With a little bit of effort, you can have your Sunfish looking and performing like new again.
The Ultimate Guide to Catching Pumpkin Sunfish: Tips and Techniques for Success
You may want to see also
Reinstalling the coaming on a Sunfish sailboat is a necessary task that ensures stability and safety on the water. The coaming, which is the raised rim around the cockpit of the boat, plays a crucial role in keeping the sailor protected and preventing water from entering the cockpit. While there are no specific measurements or guidelines to follow when reinstalling the coaming, there are a few general steps and considerations to keep in mind.
- Remove the old coaming: Before reinstalling a new coaming, it is important to remove the old one. Use a screwdriver or a drill to remove any screws holding the coaming in place. If the coaming is held in by adhesive or sealant, carefully pry it off using a putty knife or scraper. Take care not to damage the surrounding fiberglass or gel coat while removing the old coaming.
- Clean the surface: Once the old coaming is removed, thoroughly clean the surface where the new coaming will be installed. Remove any residual adhesive or sealant, and ensure the surface is dry and free from debris. This will provide a clean and stable base for the new coaming.
- Measure and prepare the new coaming: The measurements for the new coaming can vary depending on the specific Sunfish model, but generally, the coaming should be measured to fit snugly around the cockpit opening. Use a tape measure to measure the length and width of the cockpit, and transfer these measurements to the new coaming. Take into account any curves or angles in the cockpit opening to ensure a precise fit.
- Cut and shape the coaming: Once the measurements have been made, cut the new coaming to size using a jigsaw or a similar cutting tool. Take care to cut the coaming with clean and straight lines. Smooth any rough edges with sandpaper and shape the coaming to match the contour of the cockpit opening. This will ensure a flush fit and prevent any water penetration.
- Install the new coaming: Apply a marine-grade adhesive or sealant to the underside of the coaming, spreading it evenly. Carefully position the coaming over the cockpit opening, making sure it aligns properly. Press down firmly to ensure a good bond between the coaming and the boat. If needed, use screws or clamps to hold the coaming in place while the adhesive or sealant cures. Follow the manufacturer's instructions for the specific adhesive or sealant being used.
- Allow for proper curing time: Depending on the adhesive or sealant used, it is important to allow for sufficient curing time before using the boat. This can vary from a few hours to a few days, so make sure to check the product instructions for specific guidelines.
By following these steps and taking proper measurements, the coaming can be successfully reinstalled on a Sunfish sailboat. Remember to use marine-grade materials and techniques to ensure a secure and watertight seal. If you are unsure about any specific measurements or installation techniques, consult a professional or refer to the boat's manufacturer for guidance.
The Fascinating Anatomy of Redear Sunfish: Exploring the Presence of an Operculum
Reinstalling the coaming on a Sunfish can be a challenging task, especially if you are not familiar with the process. However, with the right tools and a little bit of patience, you can successfully complete this task. In this article, we will discuss the tools that are required to properly reinstall the coaming on a Sunfish.
Before we get into the tools, let's briefly discuss what the coaming is and why it is important. The coaming is the raised edge that surrounds the cockpit of the Sunfish. It serves as a barrier to prevent water from coming into the cockpit and also provides support for the hiking straps. Therefore, it is crucial to ensure that the coaming is securely installed to ensure a safe and dry sailing experience.
Now let's move on to the tools that you will need for this task. Here is a list of the essential tools:
- Screwdriver - You will need a screwdriver to remove the existing screws from the coaming. Depending on the Sunfish model, there may be different types of screws used. It is important to have a screwdriver set with multiple sizes and heads to accommodate different screw types.
- Drill - In some cases, the coaming may be secured with rivets instead of screws. In this scenario, you will need a drill to remove the rivets. Make sure to use the appropriate drill bit size to match the rivets.
- Pliers - Pliers will come in handy to remove any staples or nails that may be holding the coaming in place. They can also be used to bend and shape the coaming to fit properly.
- Sandpaper - After removing the old coaming, you may need to sand down the surface to ensure a smooth and clean area for the new coaming. Sandpaper with medium grit is recommended for this task.
- Epoxy or adhesive - Once the coaming is sanded and prepared, you will need an adhesive to secure the new coaming in place. Epoxy or marine-grade adhesive is commonly used for this purpose. Make sure to choose a high-quality adhesive that is designed for outdoor and marine applications.
- Clamps - Clamps can be useful to hold the coaming in place while the adhesive cures. They help to apply pressure evenly across the coaming, ensuring a secure bond.
- Caulk gun - If you are using adhesive that comes in a caulking tube, you will need a caulk gun to dispense the adhesive evenly.
Now that you have gathered all the necessary tools, it's time to start the reinstallation process. Here is a step-by-step guide to properly reinstall the coaming on a Sunfish:
- Remove the old coaming - Use the screwdriver, drill, or pliers to remove any screws, rivets, staples, or nails that are securing the coaming in place. Take care not to damage the fiberglass or any other components during this step.
- Clean the surface - Use sandpaper to sand down any remaining adhesive or residue from the old coaming. Make sure the surface is clean and free from any debris.
- Test fit the new coaming - Place the new coaming on the cockpit and check if it fits properly. If necessary, use pliers to bend and shape the coaming to match the contour of the cockpit.
- Apply adhesive - Apply a generous amount of adhesive to the backside of the coaming. Make sure to distribute the adhesive evenly to ensure a secure bond.
- Install the coaming - Carefully place the coaming on the cockpit, aligning it with the screw holes or rivet locations. Use clamps to hold it in place if necessary.
- Secure the coaming - Depending on the type of adhesive used, allow it to cure according to the manufacturer's instructions. This may involve leaving the boat undisturbed for a certain period of time.
- Clean up - Once the adhesive has cured, remove any excess adhesive and clean the surface around the coaming. If necessary, touch up the surrounding area with matching paint or gel coat to ensure a seamless finish.
By following these steps and using the appropriate tools, you can successfully reinstall the coaming on a Sunfish. Remember to take your time and pay attention to detail to achieve the best results. Happy sailing!
The Diet of Pumpkinseed Sunfish: Can They Satisfy Their Appetite With Snails?
The coaming on a Sunfish is an important component that helps to protect the cockpit area and provide structural support to the sailboat. Over time, the coaming may become damaged or deteriorate, requiring it to be replaced. Reinstalling the coaming can be a relatively simple process, but there are a few tips and tricks that can help make the job easier.
First, it's important to gather all the necessary tools and materials before starting the reinstall process. You will need a drill with the appropriate size bit for your screws, a screwdriver or impact driver, screws, and a replacement coaming. It's also a good idea to have some silicone sealant on hand to seal any gaps between the coaming and the deck.
Before removing the old coaming, take note of how it is attached to the deck. There are typically screws or rivets that hold the coaming in place. Carefully remove these fasteners, being mindful not to damage the deck or the surrounding area.
Once the old coaming is removed, clean the deck area thoroughly. Use a mild detergent and water solution to remove any dirt or debris. Allow the deck to dry completely before proceeding.
Next, position the new coaming on the deck and align it with the existing holes or mounting points. This step can be made easier by having a helper hold the coaming in place, or by using clamps to secure it temporarily. Once the coaming is aligned, mark the screw or rivet holes on the deck using a pencil or marker.
Now, it's time to drill the holes for the screws or rivets. Start with a smaller drill bit, then gradually increase the size until the holes are the correct diameter for your fasteners. Be careful not to drill too deep, as you don't want to damage the deck.
After drilling the holes, you can apply a thin layer of silicone sealant around the edges of the coaming. This will help to prevent water from seeping underneath the coaming and causing damage. Use a small bead of sealant, and spread it evenly with your finger or a tool.
Finally, attach the new coaming to the deck using screws or rivets. Start by inserting the fasteners into the holes, then tighten them down using a screwdriver or impact driver. Be sure not to overtighten, as this can cause the deck to crack or become damaged.
Once the coaming is securely attached, take a moment to inspect the installation for any gaps or areas that may need additional sealant. Apply more silicone as needed to ensure a watertight seal.
In conclusion, reinstalling the coaming on a Sunfish can be a relatively simple process if you have the right tools and follow a few tips and tricks. Taking the time to properly align the coaming, drill the holes, and apply sealant will help ensure a successful installation that will protect your Sunfish for years to come.
Uncover the Length of the Sunfish Pond Hike on this Adventurous Trail
Reinstalling the coaming on a Sunfish sailboat can be a daunting task, especially if you're not familiar with the process. However, with the right tools, knowledge, and a little bit of patience, it can be a relatively straightforward process. In this article, we'll discuss some common challenges or issues that may arise when reinstalling the coaming on a Sunfish, and provide some tips on how to overcome them.
One of the first challenges you may encounter is removing the old coaming from the boat. Over time, the coaming may become brittle or damaged, making it difficult to remove. To overcome this issue, you may need to use a heat gun to soften the old coaming, making it easier to pry off. Be careful not to overheat the coaming, as this could cause damage to the surrounding fiberglass.
Once the old coaming is removed, you may notice that there are holes or cracks in the deck where the coaming was attached. These holes will need to be filled and repaired before reinstalling the new coaming. You can use an epoxy filler to fill in the holes and smooth out any rough spots. Be sure to follow the manufacturer's instructions for mixing and applying the epoxy filler.
Another common challenge when reinstalling the coaming is aligning it properly with the existing holes in the deck. If the coaming is not properly aligned, it can be difficult to attach securely. To overcome this issue, you can use a template or guide to mark the position of the holes on the deck before drilling. This will ensure that the holes are properly aligned and spaced.
When attaching the coaming to the deck, it's important to use the correct hardware and fasteners. The coaming should be attached using stainless steel screws or bolts, as these will provide a secure and durable connection. Be sure to use the appropriate size and length of screws or bolts for your specific boat and coaming.
It's also important to seal the edges of the coaming to prevent water from getting inside the hull. You can use a marine-grade sealant or adhesive to create a watertight seal between the coaming and the deck. Apply the sealant or adhesive evenly along the edge of the coaming, and use a putty knife or your finger to smooth it out and remove any excess.
Lastly, give the coaming ample time to dry and cure before using the boat. This will ensure that the sealant or adhesive has fully set and will provide a reliable seal. Follow the manufacturer's instructions for the recommended drying and curing time.
In conclusion, reinstalling the coaming on a Sunfish sailboat can be a challenging task, but with the right tools and knowledge, it can be overcome. By addressing common challenges such as removing the old coaming, repairing any damage, aligning the coaming properly, using the correct hardware, and sealing the edges, you can ensure a successful coaming reinstallation. With a little bit of patience and attention to detail, your Sunfish will be ready for your next sailing adventure.
The Intelligence of Sunfish: Are They Smarter Than They Seem?
Frequently asked questions.
To remove the old coaming on your Sunfish, start by removing the screws or bolts that hold it in place. Then carefully pry the coaming away from the hull, using a flat-head screwdriver or a putty knife to help loosen it if necessary. Be sure to take note of the placement of any reinforcement plates or brackets.
To reinstall the coaming on your Sunfish, you will need a new coaming kit, which typically includes the coaming strip, screws or bolts, reinforcement plates or brackets, and a waterproof adhesive such as marine-grade epoxy.
The best method for reinstalling the coaming on your Sunfish is to first clean and prep the hull surface where the coaming will be attached. Then apply a thin layer of the waterproof adhesive to the back of the coaming strip and press it firmly onto the hull, making sure it is aligned properly. Secure the coaming in place by reinstalling the screws or bolts, using any reinforcement plates or brackets as necessary.
The drying and curing time for the adhesive used to attach the coaming to the Sunfish hull can vary depending on factors such as temperature and humidity. It is important to follow the instructions provided with the adhesive for specific drying times. In general, it is advisable to wait at least 24 hours before putting any stress or strain on the coaming to ensure it is fully secure.

- Caesar Hargraves Author Reviewer Veterinarian

- Mark Terry Author Editor Reviewer
It is awesome. Thank you for your feedback!
We are sorry. Plesae let us know what went wrong?
We will update our content. Thank you for your feedback!
Leave a comment
Sunfish photos, related posts.

- Dec 09, 2023

Where to Find Sunfish for Your Aquarium: Top Places to Buy

Exploring the Debate: Sunfish as Potential Invasive Species
- Dec 08, 2023

Bringing the Right Equipment: Can I Take an Oar on My Sunfish?

Will a Sunfish Ever Stop Growing? Unveiling the Size Limitations of this Remarkable Species

The Nutrient Intake Process of a Sunfish: How Does It Receive Nourishment?

Forgot Password?
Thumbnail Filmstrip of Sunfish Coaming Images
Sku: 91080 sunfish coaming.
- Description
Laser Performance Part #91080
Replace or refresh your Sunfish Coaming with this new splash rail. Only available in white but can be painted. Compatible with all years of Sunfish.

Your shopping cart is empty!
Sunfish Sailboat Configuration
| Your Sunfish will come custom packaged in a box designed to keep it safe in transit. Because the Sunfish sailboat is oversized we currently quote the delivery of each Sunfish on an individual basis. Once you place your order we will contact you to give you details about delivery time. Shipping costs WILL exceed the shipping amount shown in your cart and your order confirmation. Because of the oversized nature of this product, the customer is fully responsible for any shipping costs related to returns as well as a restocking/packaging fee if you choose not to keep your new boat. Using this tool, you will be getting a complete sailboat with all necessary parts, ready to sail after minor assembly. | ||||||||||||||
| Class Legal Sails | ||||||||||||||
| --> | ||||||||||||||
| Recreational Sails | ||||||||||||||
| --> |
| | ||
| Keep your new Sunfish in great shape with a custom fitted deck cover: Protect the underside of your Sunfish with a custom fitted hull cover: Easily lift and store your Sunfish overhead using a system: | |||
| | |||
Destination guides
Download free Russia travel guides
St Petersburg
Golden Ring
Lake Baikal
- Murmansk (Kola Peninsula)
Moscow & St Petersburg
- Russia River Cruises
Expedition Cruises
- Trans-Siberian Tours
Northern Lights Tours
Siberia Tours
- Winter Tours
- Students Trips
- Luxury Tours
- Plan My Tour
Start planning my tour
Your Russia, your dates, your mates
- Destination Guides
- Russia Travel Tips
- Russian Visa
- Travel Insurance
- Why 56th Parallel
- Traveller Reviews
FIND ARTICLES BY CATEGORY
- EXPERIENCES
- TRAVEL TIPS
- CULTURE & ETHNOGRAPHY
- FESTIVALS & EVENTS
- WEIRD & WONDERFUL
Karelia Travel Guide - Russia's Most Inspiring Region
Home / Russia Travel Experiences / Karelia Travel Guide – Russia’s Most Inspiring Region
For those planning a trip to Russia and wanting an experience that goes beyond the walls of Moscow ‘s metropolitan kingdom and St. Petersburg ‘s splendid palaces, consider extending your holiday to Karelia !
With the help of this Karelia Travel Guide, you won’t have to travel as far as Siberia to be surrounded by the authentic taiga. One night by train and you will find yourself in a land of white nights, boundless forests and crystal-clear lakes.

Bordered by Finland to the west and the White Sea to the east, Karelia is rapidly becoming one of Russia’s top destinations for travellers all around the world to visit. With a fantastic mix of untouched nature, outdoor adventure and cultural discovery, every traveller can (and will) find a reason to fall in love with this near-magical frontier country.
Our Karelia Travel Guide will take you through everything you need to know about this spectacular Northwestern region of Russia. Whether you’re searching for the best time of the year to visit, the top attractions or how to travel to Karelia, we have you covered.
Table of Contents
Who Should Travel to Karelia?
Karelia for nature lovers and active adventurers.
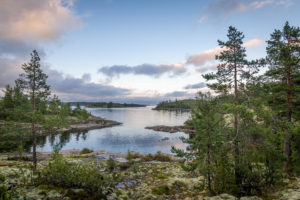
Densely forested and gloriously remote, Karelia is a paradise on Earth for any nature lover. Be enthralled by the region’s untouched wilderness and diverse wildlife, from picturesque hills and winding rivers to lush green forests and idyllic lakes, such as Europe’s two largest lakes – Lake Ladoga and Lake Onega.

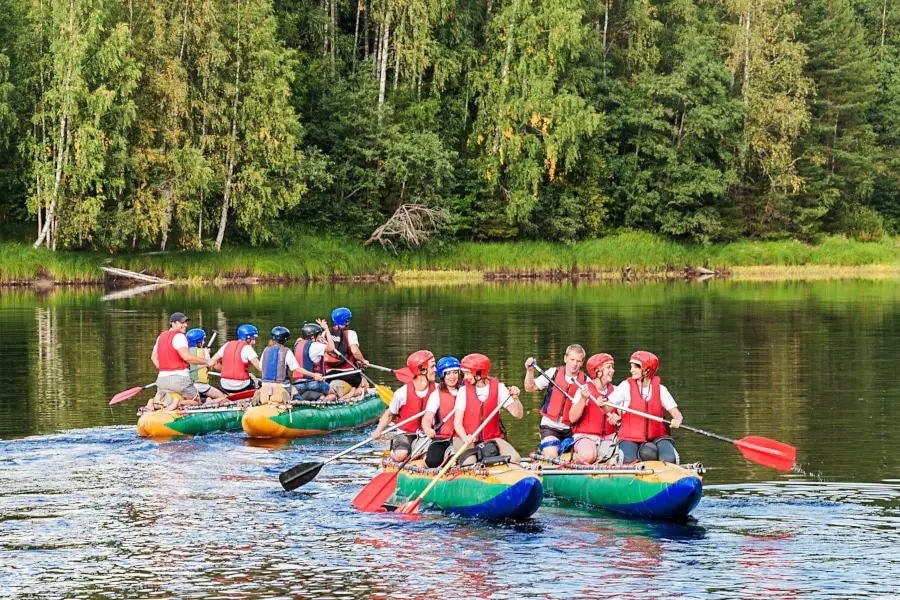
For those seeking an exciting and action-packed holiday, Karelia has a wide range of summer and winter activities to get the blood pumping. Water tourism is highly sought after during the summer months. Navigate your way around the region’s vast waterways on a canoe, kayak across crystal-clear lakes, go on a whitewater rafting adventure or try your hand at fly fishing.

The landscape is also threaded by hiking routes, and its forest roads are ideal for bicycle or quad bike tours during this time of the year. In winter, you will have the opportunity to engage in all types of skiing, embark on a dog or reindeer sledding adventure or speed across the lands on a snowmobile. Other outdoor pursuits include snowshoeing, ice fishing and sledding.
Karelia For History and Culture Buffs
While a large portion of Karelia’s appeal is its untouched wilderness, it is by no means a simple no-mans land. Instead, Karelia can be considered a living museum of human history. Inhabited by the Scandinavians for 6,000 years, Karelia has been intermittently contested by the Finnish, Swedish, and Russian forces over the centuries. Today, despite having much of its territory ceded to the Soviet Union in 1939, the region still retains a strong cultural connection with eastern Finland.

Those interested in history and archaeology can discover some of the most complex and expressive prehistoric stone carvings on the shores of the White Sea and Lake Onega, which also keep the secrets of the ancient Sami’s labyrinths on the islands.
Karelia For Architecture Enthusiasts
Karelia houses some of the best-preserved traditional wooden architecture in the country. The intricate beauty and unique architectural framework specific to Northern Russia would make even the most experienced traveller stand in awe.
From ancient villages and banyas to collections of 17th and 18th-century churches skillfully crafted entirely out of wood, anyone with even the slightest bit of appreciation for architecture must visit Karelia at least once in their lifetime. Noteworthy architectural jewels include the Church of Transfiguration and the Assumption Cathedral on Kizhi Island.
Karelia Travel Attractions
Karelia travel destination #1: petrozavodsk.
Petrozavodsk is the capital and the largest city of the Karelia, stretching along the western shore of Lake Odega for around 27km. While travellers mainly use Petrozavodsk as a launching point for Karelia’s main attractions (Kizhi, Solovki and Valaam Islands), it has so much more to offer.
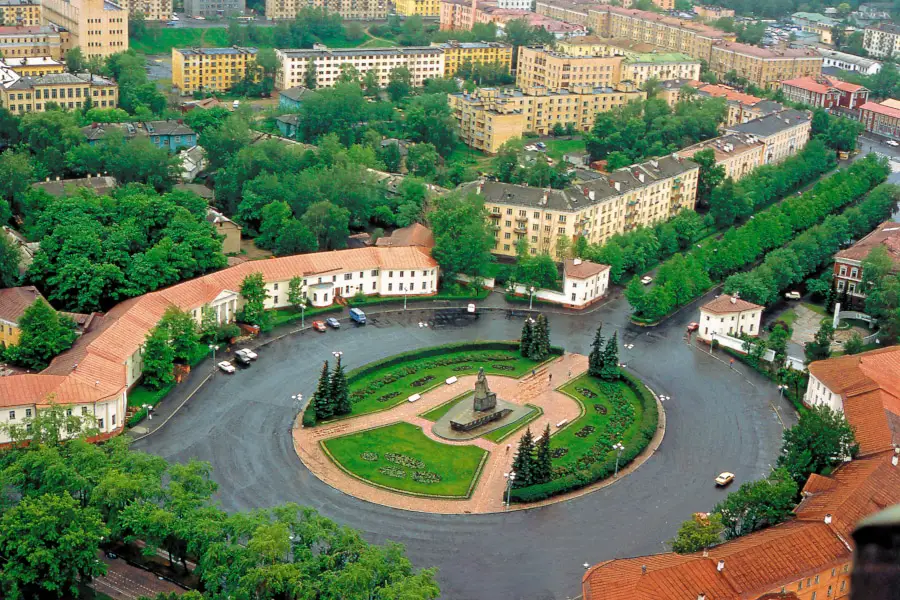
Multifaceted and diverse, this modern city draws in tourists with its neoclassical architecture and evolving cultural sphere. Noteworthy museums include the “House of the Doll” Tatyana Kalinina, the house-museum “Karelian Hut”, the Karelian State Museum of Local Lore, and the Museum of Fine Arts of the Republic of Karelia . Those interested in theatre should also visit the Musical Theatre of the Republic of Karelia , admire its gorgeous architecture and take a stroll through its surrounding square and park. Petrozavodsk is unique in nature due to its location, as it has a blend of Russian, Karelian and Finnish culture. This is expressed through the local cuisine, language and everyday lifestyle. Furthermore, being the capital of Karelia means that it is a local hub for nightlife and shopping, with several new shopping centres popping up around the city over recent years. Petrozavodsk also hosts several festivals, such as the International Contest of Snow and Ice Sculptures “Hyperborea”, Vozdukh live music festival, “White Nights of Karelia” music festival, and the landscape festival “Harmony of White Nights”.
Karelia Travel Destination #2: Kizhi Island
Located on the northern end of Lake Onega, the tiny island of Kizhi is home to one of the largest open-air museums in the world. The museum is a spectacular cultural site comprised of over 80 monuments of wooden architecture collected from the 17th to the 19th centuries and skillfully crafted and restored to form a glimpse of the past. Old chapels, peasant houses, windmills, threshing barns and granaries can be found scattered all around the island.

The crown jewel of Kizhi is the Church of Transfiguration, otherwise known as Preobrazhenskaya. This architectural masterpiece features 5 tiers of 22 wooden domes, gables and ingenious decorations designed to prevent rain from ruining the walls. Built-in 1714 without the use of a single nail, it has withstood the elements for over 150 years. The Kizhi Pogost , which is a fenced area including the Church of Transfiguration, Church of the Intercession of Holy Mary (9 domed church) and the Bell-Tower, has been included in the UNESCO World Heritage List as the most prominent monument of ancient northern wooden architecture. Other must-see attractions include the 14th century Church of Ressurection of Lazarus and the Chapels of Archangel Mikhail.

With local villagers and artisans still living on the island to this day, they demonstrate rural life in Karelia, its traditional crafts from the 18th and 19th century, such as weaving, woodcarving, and painting, and tasks of peasant life. Rent a bicycle and explore the stunning landscapes and impressive architecture that Kizhi Island has to offer, or join a tour for an insight into the gradual development of a unique Karelian culture that differs greatly from the rest of Russia.
Karelia Travel Destination #3: Valaam Island
Valaam, dubbed the ‘Russian Vatican’, is an archipelago located in the northern region of Lake Ladoga. As one of the most popular Orthodox tourist destinations, the main attraction that draws visitors to its shores is the 14th century Transfiguration Monastery on Valaam Island .

The central monastery is a monumental structure that sits on top of the high hill, making it visible from many locations on the island. In the past, the monastery had been subjected to numerous accounts of destruction and devastation from fires and invasions. However, despite that, it was revived to live again. Now, nestled in its central part are gardens, a bakery, vegetable patches and a farm, surrounded by pine trees, rolling prairies and granite cliffs with around 200 Orthodox monks living within its walls permanently.
If you are looking to avoid crowds of travellers, you can also explore dozens of other smaller churches and chapels that are scattered around pretty headlands, quiet inland bays or bridged islets.
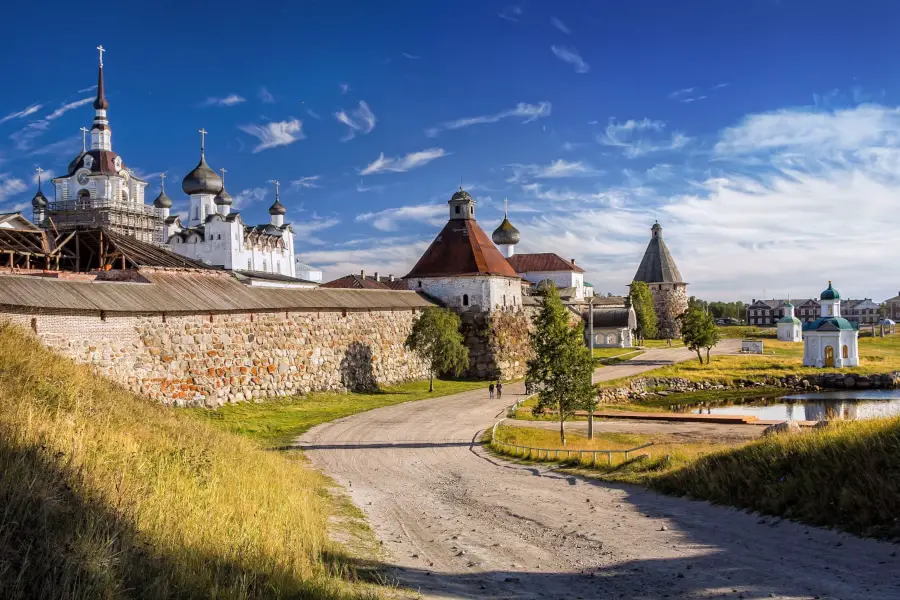
Karelia Travel Destination #4: Solovetsky Islands
The Solovetsky Islands, otherwise known as Solovki, is a place that many travellers fantasise about visiting when in Russia but few actually ever end up doing so. This is part of the attraction, however, as it means that you won’t encounter hoards of tourists in this largely unspoiled part of Russia, yet you can have an ‘off the beaten track’ experience without having to rough it up too much. Located in the Onega Bay of the White Sea, the archipelago is made up of 6 main islands and many smaller ones. The largest island is the Bolshoy Solovetsky and it is home to the main monastery, which dominates the rural idyll of Solovetsky Village, the islands’ main settlement.

Listed as a UNESCO World Heritage Site, the Solovetsky Monastery is a real stronghold for orthodox Christianity and for a while, Solovki was seen to symbolise nothing but asceticism, faith and spirituality. This took a drastic change in the 20th century as Stalin transformed it into one of the USSR’s most notorious prison camps.

Even if you’re not a history buff, the island’s main museum is worth a visit as it is dedicated to those who were incarcerated here during the Stalinist era. There’s no English translation but the photos, pictures and artifacts more than speak for themselves. The monastery was rehabilitated after the fall of the Soviet Union, and today the islands’ natural beauty, spiritual significance and solemn history draw travellers from all corners of the Earth to its shores.
Karelia Travel Destination #5: Kinerma – Village
The historical village of Kinerma , situated 100 km from Petrozavodsk, is a unique complex of wooden architecture specific to the Karelian-Livviki and a living example of the traditional settlements in Karelia. Said to be the most beautiful village in Russia, no new houses are allowed to be built on the lands. Everything seen today has been erected and restored according to the ancient plan of the village.

Currently, in the village of Kinerma there are 16 yards and only 5 permanent residents, but they are actively farming, preserving and maintaining the traditional rural way and visitors can visit the village personally to touch the past. With 17 houses, 7 baths, and an old cemetery, the main attraction and spiritual centre of Kinerma is its chapel, built in the second half of the 18th century in honour of the icon of Virgin Mary from Smolensk. According to legend, the icon was brought to the village by a passing soldier and has since protected the village from any harm and misfortune.
Another noteworthy attraction is the black banyas, typical of Karelian villages. Such banyas are built without a chimney and use the smoke from its primitive stoves made of stones to warm the sauna. We would highly recommend experiencing a session in a black banya, as the temperature inside is not too high, but the humidity is high enough to free yourself from all toxins and stress.
Karelia Travel Destination #6: Ruskeala Mountain Park, Sortavala
For lovers of active leisure, Ruskeala Mountain Park is the place to be. Formerly a marble quarry, this 109-metre wide canyon is a unique and multidimensional monument to both nature and the history of mining. Mined by the Karelians, Swedes, Finns and Russians for nearly three centuries, the marble has been used in the construction of some of the most significant structures in Russia, such as the floors of the Kazan Cathedral, St. Issac’s Cathedral and the window sills of the Hermitage in St. Petersburg .

Now, tall pines line the top of the steep canyon walls while its sides are riddled with caves and grottoes just waiting to be explored.

Over the years, the canyon has also filled up with the purest emerald-green water from underground springs. Karelia travellers can navigate through its system of open and underwater galleries, drifts and shafts, all of which stretch a total of several hundred metres.

Apart from hiking along some of the most breathtaking tracks, you will also have the opportunity to ride trolleys (mechanized bungees) over its waters, rent a boat and explore the beauty of Marble Lake, go down into abandoned mine shafts and ice-skate over the icy bottom of its caves. It is also only in Ruskeala that you will be able to find preserved exotic mosses, lichens, orchid plants and shrubs, as well as rare species of reptiles, amphibians and even bats.
Karelia Travel Destination #7: Ruskeala Express Retro Steam Train
The Ruskeala Express provides an incredibly scenic journey through the forested landscapes of Karelia to one of the most beautiful natural preserves in Russia, Ruskeala Mountain Park.

The retro-style steam train runs daily between Sortavala (250km west of the Karelian capital, Petrozavodsk) and takes around an hour to reach the park entrance. The Ruskeala Express is the only daily steam-powered passenger train left in Russia. Running on a locomotive engine built in 1949, its interiors are inspired by the late 19 th century look. Between July and September, non-stop train services run between Moscow and Sortavala, with a total travel time of 17.5 hours.
Karelia Travel Destination #8: State National Park Paanajärvi
In contrast to the action-packed Ruskeala, Paanajärvi National Park is all about reconnecting with nature and finding your own zen away from civilization. Located in the north-west region of Karelia, the main purpose of establishing the Park was to preserve the unique nature of the Olanga River and Lake Paanajärvi.

The landscapes are exceptionally breathtaking; mountain ridges are split by deep ravines, fast-flowing streams with frothing rapids cut through the terrain, and crystal-clear lakes sparkle under the sun’s gentle rays. Its valleys and hills alike are covered with virgin forests, where giant pines and spruce dominate the lands.

You can also find numerous fauna roaming around freely, such as bears, elk, wolverines, foxes, and reindeer. On a rare occasion, you may even be able to spot muskrats or beavers. The pearl of the park is Lake Paanajärvi – the biggest lake in the region. It is situated in a large bedrock rift and extends for about 15 kilometres from the East to West.
In winter it’s one of the most popular places for Northern Lights hunt.
Karelia Travel Destination #9: Petroglyphs of the White Sea and Lake Onega
Created during the Neolithic era, the petroglyphs of Lake Onega and the White sea are considered as some of the most complex and expressive samples of Late Stone Age art in northern Europe. The drawings depict elaborate scenes of warfare, seafaring, hunting, religious rituals, skiing and enigmatic figures. With more than 70 different ancient settlements identified in relation to the carvings, they constitute the largest Neolithic site in the region.

The Onega petroglyphs are located along the eastern shore of Lake Onega for a distance of about 18.5km, while petroglyphs of the White Sea are found about 6 to 8km from Belomorsk. Carved into stunning locations such as on huge flat boulders on islets in the middle of untouched forests, these petroglyphs are easily accessible to study and photograph.
Karelia Travel Destination #10: Vottovaara Mountain
A 417m glacial mountain peak and archaeological site in the West Karelian Hills, Mount Vottovaara is known for its bizarre, boulder-strewn landscape. Surrounding the peak is a patchwork of strange “legged” stones, oddly deformed trees and miniature lakes.

A superb hiking destination in Karelia, Mount Vottovaara is considered sacred among the Sami people, who historically inhabited all of Northern Scandinavia as well as Eastern Karelia.
Fantastic rock paintings discovered here and in nearby Lake Onega (known as the Onega petroglyphs) suggest that this was an ancient pagan ritual site as far back as an estimated 6,000 years ago.
Karelia Travel Destination #11: Karjala Park
In a picturesque rural location on the banks of the Shuya River, Karjala Park is a Scandinavian-style eco-hotel and year-round outdoor recreation complex with a wide array of activities on offer for day visitors and hotel guests.

During winter, the beautiful forested setting of Karjala Park provides an adventure sports playground with activities like husky dog sledding, snowmobiling and ice fishing. Summer activities include trekking, rafting and kayaking on the Shuya River. ATV and 4WD tours, fishing and authentic Russian and Karelian cooking classes can be enjoyed all year round.
Karelian Culture, Festivals & Cuisine
Sharing a 700km long border with Finland to the west, the Republic of Karelia is traditionally the home of the Karelians, a Baltic-Finnic ethnic group who today make up just over 34% of the population of Russian Karelia. Karelian, Finnish and Veps (another minority Finnic group residing on the Russian-Finnish border) are officially recognised languages in the Republic.
Today, Karelia retains a strong cultural connection with Finland. Distinctly Karelian culture lives on in the peasant traditions of poetry, music and folk ceremonies that reinforce the people’s bond with the land and sea.
Karelian traditions and folklore
Scandinavian sagas and chronicles tell us that the Karelians were known to the Vikings as early as the 7 th century AD. Karelian traditions and celebratory rites are closely related to a work of epic poetry compiled from Karelian and Finnish oral folklore and mythology. The Kaleva deciphers the local runes and explains the origins of the region and its inhabitants. It tells the story of the hero and demigod Vainamoinen, who according to legend built the first boat and created Karelia’s national musical instrument, the Kantele, a plucked string instrument somewhat similar to the dulcimer.

This legend and other pagan folktales inform many of the customs and festivals still practiced by the Karelian people today, although these days the majority of Russian Karelians are Eastern Orthodox Christians.
Festivals in Karelia
Midsummer Day or the Summer Solstice is the most important holiday in the traditional calendar for all northern peoples. The longest day in summer falls on June 22. Across Karelia, celebrations begin in the evening and last all through the night, during the time of the Karelian “white nights”, when sun lights up the land 24 hours a day. Young people would traditionally go to the forest to gather ferns, dance around bonfires and swim in the lakes.

The White Nights of Karelia Music Festival is an annual event organised by the State Glazunov Conservatory in Petrozavodsk city. Held over several days and nights each summer, the festival program includes exclusive performances by local, Russian and international musicians, performing well-known masterpieces, chamber music and the latest orchestral works.
The Elonpu (Tree of Life) Festival is a pagan holiday for the Veps culture, celebrated in mid-July on the shores of Lake Onega near the village of Sheltozero. There are only an estimated 7,000 Vepsians left, and most of them live in Karelian villages.
Hyperborea , or the International Winter Festival is held annually in February in Petrozavodsk. The highlight of the week-long winter festival is the international competition of snow and ice sculptures. Professional and amateur teams from Russia, as well as guests from foreign nations compete to create the most impressive and elaborate sculptures, carved out of ice and illuminated by multi-coloured lights. The festival mixes high art and everyday entertainment common to the region, encompassing everything from art exhibitions and concerts through to ice swimming races and dog sledding competitions.
Karelian Cuisine
For the Russian food lovers out there, Karelian cuisine is nutritious and diverse. Karelia is famous for its baked dishes. A must-try appetizer dish of Karelia is Kalitki with potatoes. Served hot, it is an open pie made from rye flour dough with a filling usually made from millet kasha, potatoes, rice, tvorog or meat. Salted and marinated Karelian mushrooms are also very popular as a snack.

For the mains, local freshwater fish such as the delicious Northern salmon are often added into hearty fish soups or are marinated, salted and served as a separate dish. Remember to save room for dessert, as they make sweet northern pies, pastries and pancakes with delectable local wild berries. Finally, wash down the food with freshly squeezed berry juices or robust liquors made from cranberries, red bilberries and cloudberries.
Karelia Travel Tips – Weather in Karelia and When to Visit
Karelia’s climate is transitive from maritime to continental, and typically carries much milder winters in comparison to other northern regions near the Arctic. This is due to the warm, humid air masses from the west, though incursions of Arctic air can cause bitter cold spells. Karelia’s climate has therefore gained a reputation for being unpredictable, so no matter the season, Karelia travel guide readers should be prepared for practically any weather.
Summer in Karelia
June – August
Average temperatures: 11ºC to 21ºC
Summer in Karelia is the highest travel season. The reason is quite simple: the best way to see most of the attractions located in this beautiful region – by water. These include, in particular, famous Valaam and Kizhi – islands of the Ladoga and Onega lakes. The navigation season opens in mid-May and closes in mid-September. Therefore, if you want to go on a tour of the main attractions of Karelia, it is better to plan a trip for the summertime. For the most part, Karelian summers are short but the days are long and cool with a fair amount of rainfall scattered in between. Plenty of outdoor activities are available during this time, such as fishing, quad biking, kayaking, cycling and whitewater rafting.
June (its end) is a month when you can experience the amazing spectacle of White Nights in Karelia, otherwise known as midsummer night or polar day. This is a time where the sun sets but remains above the horizon, bathing the landscape with a pearlescent all-night glow until the early mornings. Take advantage of this occasion and enjoy a night-time boat tour or a midnight stroll. This month is also the best for visiting the picturesque Marble Canyon at the mountain park “Ruskeala”, as well as visiting the “Kivach” Nature Reserve, which waterfalls are the fullest during this time.
The height of summer is during July , where you’ll be able to go for a swim in the many crystal-clear lakes scattered across the region. This summer month is very good for fishing: salmon, pike, roach, ide, steam perch, large bream are well caught in the local waters.
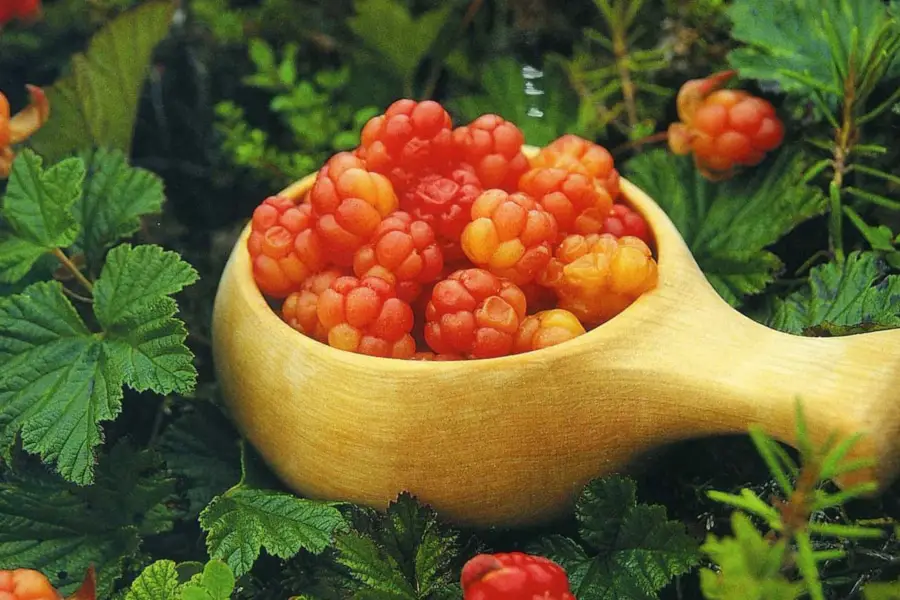
The summer heat often rolls over to August, but the nights start getting longer and cooler, it becoming rainy and foggy. August in Karelia is the time of picking berries. With the beginning of September, the high tourist season in this region of the Northern Russia ends and the off-season begins, which lasts until the beginning of December.
Autumn in Karelia
September – October
Average temperatures: -5ºC to +12ºC
The month of September is a lovely period as temperatures are still relatively warm, but you no longer have to worry about pesky mosquitoes. Lingonberries, cranberries and mushrooms are in full bloom, carpeting the forest and tundra. Trees start to turn yellow and gold, and the ground vegetation a deep red. This is what we like to call ‘Flaming Autumn’.

This is also one of the best time for photography. As temperatures start to cool in October, dip your toes in a steam bath and enjoy a hot beverage by the fireplace. This is when lakes begin freezing over and the snow starts to fall in preparation for a winter fairytale.

Winter in Karelia
November – April
Average temperatures: -15ºC to -5ºC
November is off-season with very unstable weather. Rivers and lakes are getting to freeze. It is still possible to get to such popular places as Kizhi or Valaam by hivuses and snowmobiles, but these sights are not as impressive as in summer.

In December , snow covers the land and forests, turning the region into a winter wonderland. Explore the frosty ethereal taiga forests on a snowmobile or try your hand at dog-sledding with the famous Siberian huskies. Later on, settle down around a fire in a local dacha and soothe your muscles in a Russian-style sauna. Its proximity to the Arctic Circle means that the Karelian skies are sometimes graced by the stunning Northern Lights, which even can be observed in Petrozavodsk, although, the best place is somewhere far away from the city lights, such as the remote village of Nilmoguba or Paanajärvi National Park, located on the border with Finland. If you won’t get lucky with the Northen Lights hunt (it happens quite often), then at least you may admire the untouched nature of Northern Russia.
March is the sunniest month, while the very end of Winter – April , is the time when lakes and rivers start to get free from the ice.
Spring in Karelia
Average temperatures: 0 ºC to +15ºC
Spring is arguably one of the best times to venture outdoors into the beautiful Karelian forests. Tree leaves turn green, flowers start to bloom, rivers flow faster. Try your hand at fishing in one of the many lakes and rivers, as early May is a time when Northern Pike and Perch spawn by the thousands.
Karelia Travel Options
Karelia travel by plane.
At the moment, the only flights coming in and out of the Karelian capital of Petrozavodsk are from Moscow. S7 Airlines has flights that leave between 5 to 7 times a week from Domodedovo Airport, taking approximately 1 hour and 45 minutes. Be sure to keep an eye out on S7’s flight schedule as the timetable changes fairly frequently.
Once you arrive at the Petrozavodsk airport, it is about a 12km drive to the city centre. Pre-arranged private transfers are typically the preferred methods of transportation to get to town.
Karelia Travel By Train
This is the most reliable and convenient way of travelling to Karelia. There are several daytime and overnight trains running from the St. Petersburg Ladozhsky railway station to Petrozavodsk (approximately 7 hours). Usually, travellers prefer the overnight train, as it saves time and money.
Alternatively, trains from Moscow to Petrozavodsk run daily. The journey from Moscow to Petrozavodsk takes around 16 hours.
Karelia Travel By Bus
>Catching a bus is one of the cheapest ways to travel to Karelia. There are bus services running 4 to 5 times a day that travel between St. Petersburg and Petrozavodsk, with the journey taking between 5 to 6 hours.
Karelia Travel By Car
There are two main routes to Karelia: the M-8 and R-5 from Moscow via Vologda, and the M-18 from St. Petersburg (from Moscow you can get on the M-18 bypassing St. Petersburg through A114 Zuevo-Volkhov-Novaya Ladoga). If you were to choose any route other than the M-18, it should be noted that Karelian roads are in mostly bad conditions, quite bumpy and often include stretches of unpaved roads.
The approximate travel time from St. Petersburg to Petrozavodsk is 5 hours (430km), and 12 hours (996km) from Moscow to Petrozavodsk.
Related posts

16 UNESCO World Heritage Sites in Russia You Must Visit
Did you know that there are currently 26 UNESCO world heritage sites in Russia? That makes Russia 9th in the world for its total number of World Heritage Sites – 16 of which are cultural and 10 of which are natural.

Kazan Travel Guide - Perfect Your Travel Itinerary
Craving a one-of-a-kind, awe-inspiring trip to a place of ancient histories, visually spectacular, and spiritual marvels? The Kazan Travel Guide has everything you need to get just that.

A Traveller's Guide to Russia’s Golden Ring Region
The perfect retreat from million-miles-an-hour Moscow, the medieval cities of Russia’s Golden Ring are nestled amid green hills and floral meadows, with rambling country roads surrounded by forests, lakes, orchards and wooden farmhouses. The idyllic ‘Mother Russia’ of old still exists, and it’s right here.
Related Tours
Gems of karelia – kizhi island, solovki and valaam.
Enjoy all major sights of Karelia just in a 7-day tour. You will visit Kizhi and Valaam Islands, Kivach Waterfall and Ruskeala Park, Solovetsky and Valaam monasteries. See the ...
Karelia & Kizhi Island in 3 Days
On this short detour from Moscow or St Petersburg, you will explore cultural and natural sites of Karelia. Your tour starts in Petrozavodsk - the largest city in Karelia mostly ...

Articles by Category
About 56 th parallel.
56th Parallel is a travel company specialising in providing packaged tours and travel services in Russia.
Our goal is to redefine travel to Russia, focusing on creating the most rewarding experiences, which help travellers unfolds the soul of this exciting destination.
RUSSIA TOURS FINDER
Russia tour finder.
< Return
Destination
Russian capitals and surrounds, siberia and russian far east, russian arctic, travel style, city breaks.
River Cruises
Trans Siberian Tours
Adventure and Discovery
Russia Winter Tours
Other travel styles
Luxury Holidays
Have a question or need specific information?
Send us a note below or call us
Country * Afghanistan Albania Algeria American Samoa Andorra Angola Anguilla Antarctica Antigua and Barbuda Argentina Armenia Aruba Australia Austria Azerbaijan Bahamas Bahrain Bangladesh Barbados Belarus Belgium Belize Benin Bermuda Bhutan Bolivia Bosnia and Herzegowina Botswana Bouvet Island Brazil British Indian Ocean Territory Brunei Darussalam Bulgaria Burkina Faso Burundi Cambodia Cameroon Canada Cape Verde Cayman Islands Central African Republic Chad Chile China Christmas Island Cocos (Keeling) Islands Colombia Comoros Congo Congo, the Democratic Republic of the Cook Islands Costa Rica Cote d'Ivoire Croatia (Hrvatska) Cuba Cyprus Czech Republic Denmark Djibouti Dominica Dominican Republic East Timor Ecuador Egypt El Salvador Equatorial Guinea Eritrea Estonia Ethiopia Falkland Islands (Malvinas) Faroe Islands Fiji Finland France France Metropolitan French Guiana French Polynesia French Southern Territories Gabon Gambia Georgia Germany Ghana Gibraltar Greece Greenland Grenada Guadeloupe Guam Guatemala Guinea Guinea-Bissau Guyana Haiti Heard and Mc Donald Islands Holy See (Vatican City State) Honduras Hong Kong Hungary Iceland India Indonesia Iran (Islamic Republic of) Iraq Ireland Israel Italy Jamaica Japan Jordan Kazakhstan Kenya Kiribati Korea, Democratic People's Republic of Korea, Republic of Kuwait Kyrgyzstan Lao, People's Democratic Republic Latvia Lebanon Lesotho Liberia Libyan Arab Jamahiriya Liechtenstein Lithuania Luxembourg Macau Macedonia, The Former Yugoslav Republic of Madagascar Malawi Malaysia Maldives Mali Malta Marshall Islands Martinique Mauritania Mauritius Mayotte Mexico Micronesia, Federated States of Moldova, Republic of Monaco Mongolia Montserrat Morocco Mozambique Myanmar Namibia Nauru Nepal Netherlands Netherlands Antilles New Caledonia New Zealand Nicaragua Niger Nigeria Niue Norfolk Island Northern Mariana Islands Norway Oman Pakistan Palau Panama Papua New Guinea Paraguay Peru Philippines Pitcairn Poland Portugal Puerto Rico Qatar Reunion Romania Russian Federation Rwanda Saint Kitts and Nevis Saint Lucia Saint Vincent and the Grenadines Samoa San Marino Sao Tome and Principe Saudi Arabia Senegal Seychelles Sierra Leone Singapore Slovakia (Slovak Republic) Slovenia Solomon Islands Somalia South Africa South Georgia and the South Sandwich Islands Spain Sri Lanka St. Helena St. Pierre and Miquelon Sudan Suriname Svalbard and Jan Mayen Islands Swaziland Sweden Switzerland Syrian Arab Republic Taiwan, Province of China Tajikistan Tanzania, United Republic of Thailand Togo Tokelau Tonga Trinidad and Tobago Tunisia Turkey Turkmenistan Turks and Caicos Islands Tuvalu Uganda Ukraine United Arab Emirates United Kingdom United States United States Minor Outlying Islands Uruguay Uzbekistan Vanuatu Venezuela Vietnam Virgin Islands (British) Virgin Islands (U.S.) Wallis and Futuna Islands Western Sahara Yemen Yugoslavia Zambia Zimbabwe
If you have any urgent questions or enquiries, please give us a call +61 412 587 785
- Turkmenistan

Located just under the “Arctic Circle”, the Republic of Karelia is a federal region of Russia with a rich history and abundance of natural wonders.
The Russian region of Karelia is part of the larger Northern Europe region of the same name, currently split between Russia and Finland. Despite its vast territory, the population of Karelia is small, around 600,000 people. The historical sights, unique nature and convenient location are what distinguishes Karelia from many other destinations in Russia and Northern Europe.
In its early history, Karelia was inhabited by indigenous ethnic groups, Karelians, closely related to Finnish people and heavily influenced by raiding Vikings, as well as the people of the Novgorod republic. The region’s territory has been continuously disputed between Scandinavian and early Russian states, becoming a reason for multiple wars and border changes. By the 18 th century, as a result of post-war treaties, most of Karelia’s territory became part of Imperial Russia. Following the Soviet-Finnish war of 1939, an additional territory of Finnish Karelia was ceded to the USSR, effectively completing the region’s integration to Russia as the Autonomous Republic of the Soviet Union (ASSR).
As of today, more than 75% of the republic’s population are ethnic Russians, while around 60,000 descendants of indigenous Karelians also remain in the region. Consequently, Russian is the main and the only official region in the republic. Nonetheless, a small minority of the population speak Finnish and Karelian, as they continue to safeguard their ancestors’ culture and traditions. There remain communities, such as Big Selga and Kinerma, where local handicrafts, traditional costumes, fishing and old believers are prevalent and safely guarded by the villages’ population.
The north-western location of Karelia and its situation between the White and Baltic Seas determines the unique geography of Karelia. Bodies of water play a central role in the territory of Karelia and its attractiveness for tourists. The region also features more than 60,000 lakes scattered throughout. Moreover, the two largest lakes in Europe, Onega and Ladoga, are also located in the republic.
The richness of natural and food resources in Karelia, coupled with the abundance of rivers to transport goods have made Karelia a historically rich region, which industries and crafts relied heavily on local extraction and production. Before the 10 th century, the extraction of copper ores already began in Karelia. More recent history of the region saw it rely heavily on forestry and timber exports, with wood processing being the major industry in the region to date.
How to get there: the capital of Karelia republic, Petrozavodsk, is conveniently accessible from Russia’s largest cities. Petrozavodsk Airport is connected to the Russian Capital, Moscow, with low-cost return flights available for $60. The city can also be reached by a direct 5-hour train from St. Petersburg with prices starting from $13. The local destinations within the Republic are mostly accessible by local taxi services and occasionally by bus routes.
Time of year to visit: Karelia is a great destination both during the winter and summer months. The temperature during winter rarely reaches below -15 °C, and averages at a comfortable 20°C in June-August.
Documents: citizens of only 35 countries have visa-free access to Russia, for remaining visitors, a tourist visa application must be submitted. It is processed for up to three weeks and may cost up to $160. In 2021, Russia suspended the introduction of the simplified e-visa process due to the ongoing pandemic, but plans remain to introduce the system in near future.
Where to visit
Lake Ladoga:
Sunset at Karelia republic islands on Ladoga lake (Alamy)
Ideal for nature lovers, Ladoga Lake is the largest lake body in Europe. The best time of the year to visit Ladoga is during the summer months. Boat tours are readily available from settlements around the lake, such as Sortavala. Many tourists also choose to camp in the preserved natural locations at the lake, and numerous camp sites are available throughout.
The lake is relatively shallow, with 51 metres of average depth, and therefore features many islands, some of which are inhabited and possess many notable landmarks. The largest island in the Ladoga basin, Valaam, hosts one of the oldest monasteries in Russia, the Valaam Monastery. Founded between the 10 th and 15 th centuries, the monastery features unique orthodox church architecture, as well as a natural park and museum dedicated to the history of the monastery and Karelia.
Ruskeala Mountain Park:
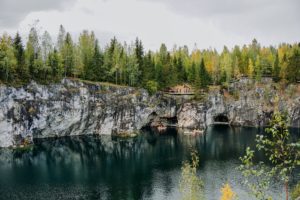
Abandoned marble canyon in the mountain park of Ruskeala, Karelia, Russia (Alamy)
A unique location in Karelia republic is often chosen by visitors from St. Petersburg for a one-day visit. Ruskeala Mountain Park is a man-made natural reserve, which was formed following the exhaustion of marble deposits, previously extracted in the region. The abandoned marble quarries and mines were filled with water and, along with the surrounding natural reserve, became an attractive destination for active tourists. The mountain park features beautiful canyons for boat trips, numerous hiking trails as well as opportunities for summer and winter sports, such as diving, bungee jumping and driving on snowmobiles. The entry to the park costs around $5 and it is easily accessible by car or train from St Petersburg or the local town Sostravala.
Kizhi Island:
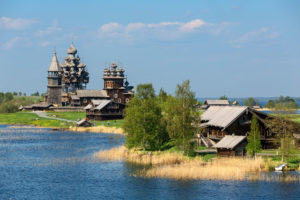
The Kizhi Island is located at the second-largest lake in Karelia and in Europe, lake Onega. The island, populated from the 15 th century by rural settlements, features one of the most unique structures in Karelia – the Kizhi Pogost. Built exclusively of wood, it is a compound of two churches and a bell tower. The main architectural marvel is the Transfiguration Church, which is built without using a single nail and features 22 domes. Services are still held in the church, but only during the summer months, which is when it is advisable to visit Kizhi. The sight has been included in the UNESCO list of World Heritage sights for its unique architecture, historical significance, and longevity.
Kizhi is easily accessible by boat from the river port of Petrozavodsk, the capital of Karelia. Return tours to Kizhi cost around $50 and it takes 1 h and 15 min to travel to Kizhi. Alternatively, many visitors choose to visit antique village Velikaya Guba on the bank of Onega lake and travel 18km by boat to Kizhi from there.
Kivach Waterfall:

Kivach Waterfall on the territory of Kivach Reserve, Karelia, Russia (Alamy)
There are numerous notable nature reserves in Karelia, but the Kivach Nature Reserve is particularly worth visiting. Covering an area of 42 square miles, it features a rich forest, extensive river systems and diverse flora and fauna. While not all of the territory is accessible to tourists, particularly remarkable and open for access is the Kivach waterfall. It is the second-largest non-mountainous waterfall in Europe and is also classified as a cascade waterfall, being composed of multiple smaller waterfalls, with a 10.7-metre total height of the waterfall. It is accessible by the main hiking trail of the Kivach reserve and is only 60 kilometres away from Petrozavodsk. The waterfall is visited by 30-40 thousand tourists annually and includes notable visitors, such as the Russian Tsar Alexander II.
DATA SNAPSHOT
ALLEN ORGAN INSTALLATIONS
The petrozavodsk state academy of music petrozavodsk, republic of karelia, russia.
The Petrozavodsk State Academy of Music is an independent music institute with approximately 100 faculty members and 500 students. The Academy has become a center of excellence for training music professionals, concert activity and musicological research in North Russia. Its more than 4000 graduates work in Russia and in many countries around the world.
This Allen organ was installed in the newly dedicated and acoustically superior Great Hall of the Petrozavodsk State Academy of Music in Karelia, Russia. The three-manual console was finished to match the stage's floor and shell. In addition to authentic pipe sounds, the instrument provides modern musical sounds through Vista Navigator™.
Click here to see this organ as an Organ of the Week
IMAGES
VIDEO
COMMENTS
Which is, to take a wrecked Sunfish, then: 1) cut the cockpit coaming from the deck, cutting slightly outside the highest part. 2) lay the cockpit coaming over the rear decking as a template—as far aft as possible. 3) mark, then cut the decking material somewhat larger than the coaming. Leave a margin of about 1½ inches.
Coaming Bullseye Fairlead Mast Step Horn Cleat Bow Handle Stern Congratulations on the purchase of your new Sunfish!We suggest that you read through this guide to better familiarize yourself with the parts and rigging of your new boat. If you have any questions please contact your dealer or call Vanguard's customer service at 1-800-966-SAIL ...
The bow handle elegantly styles the Sunfish deck and allows for the boat to be easily maneuvered and.. $47.80 Add to Cart. Sunfish, Coaming Rivet (Package of 13), 91190. Aluminum Coaming Rivet.Sold in packs of 13 Old # 79361.. $10.00 Add to Cart. Sunfish, Drain Plug, 91086. This RWO brand drain plug is black and was used on boats built from ...
The coaming is structural in that it reduces the amount of hull flex. Usually it's the two. or three screws on each end of the coaming that pull out due to the stress. The hull seams. opposite the coaming ends also have a tendency to to pull apart due to the flexing. It would.
On a sunfish, most people seem to prefer putting the port centered in front of the daggerboard slot and behind the coaming. The advantage is that you can access the front of the footwell if you need to add backing to screws holding in a hiking strap, and you can also reach the hardware for the halyard near the mast step tube.
How and where to install Sunfish sailboat inspection ports or deck plates. How to install Sunfish sailboat coaming or splashguard. The rivet hole is 3/16th, ...
Reinstalling the coaming on a Sunfish sailboat is a relatively simple process that can be done by anyone with basic DIY skills. The coaming, also known as the cockpit rim, serves as a boundary between the cockpit area and the rest of the boat. It provides support for the sailor and helps prevent water from entering the cockpit. To reinstall the ...
Sunfish Repair Notes. ... apply soapy solution around the outside edge of the boat, (where the deck and hull seam is), around the mast tube and daggerboard trunk. Note: You must also soap the bottom of the daggerboard trunk at the same time. ... (coaming). When you locate a leak, circle the area with a grease pencil then rinse the boat with ...
How to install a rivet on a Sunfish sailboat splashguard coaming. Rivet hole is 3/16th inch.
Description. Reviews. Laser Performance Sunfish Coaming (splash guard) Rivets. Buy Laser Performance Sunfish Coaming (splash guard) Rivets, sailing gear, sailboat parts, sails and running rigging at Vela Sailing Supply. Technical support, customer service and product information. Vela and sailing supplies.
Re: Sunfish Repair help -- Update on weight It's finally starting to get warm/hot and dry here in North Carolina and I've been able to leave the boat outside, wrapped in black trash bags, and with a small computer fan running. The boat has been shedding weight fairly quickly now.
Sunfish Sail Boat, Blue Coaming (Splash- Rail) Description; Reviews (0) Please visit our CONFIGURE YOUR BOAT page for a full list of available options for you new Sunfish boat Most popular sailboat ever built. The Sunfish is the most popular recreational sailboat in history (Over 200,000 built) and it's still simply one of the easiest boats to ...
Sunfish Hull & Deck Parts. West Coast Sailing is your source for hull and deck fittings for your Sunfish sailboat. Check out our selection of bailers, drain plugs, hiking straps, inspection ports, bridles, gudgeons, bow handles, and more. Sunfish Covers. Protect your Sunfish with a proper Sunfish cover, blade bag, or spar bag.
Sunfish Coaming. $295.00. Qty. Description. Sunfish Coaming. Laser Performance Part #91080. Replace or refresh your Sunfish Coaming with this new splash rail. Only available in white but can be painted. Compatible with all years of Sunfish.
Throw on a couple of sail ties. Wrap a towel around the bundle at the coaming for cushion and back aft where the mast ends. Then we use the halyard starting from the bow handle and marlin hitch it as far was we can. The line runs through the deck fairlead and the swivel cleat.
Skip to main content
Navy Coaming (Splash Rail) Step Three - Choose your rudder and daggerboard: Classic Wood. FRP (Class legal) High Performance. Step Four - Optional Accessories: Add a light weight dolly for easy beach launches: (Dolly image is an example only, actual dolly may look different) No Dolly.
Karelia Travel Destination #7: Ruskeala Express Retro Steam Train. Karelia Travel Destination #8: State National Park Paanajärvi. Karelia Travel Destination #9: Petroglyphs of the White Sea and Lake Onega. Karelia Travel Destination #10: Vottovaara Mountain. Karelia Travel Destination #11: Karjala Park.
I did a search but everything I came up with seem to involve removing the coaming completely and filling holes, etc. ... Maybe someone changed them over the years. 1979 Sunfish. Sep 7, 2021 #5 L&VW Well-Known Member. ... Depends on when the boat was built. Sep 8, 2021 #8 S. Sailflow Active Member. My 76 has screws holding the.coaming.
Kizhi is easily accessible by boat from the river port of Petrozavodsk, the capital of Karelia. Return tours to Kizhi cost around $50 and it takes 1 h and 15 min to travel to Kizhi. Alternatively, many visitors choose to visit antique village Velikaya Guba on the bank of Onega lake and travel 18km by boat to Kizhi from there. Kivach Waterfall:
coaming made into the deck (raised coaming) halyard bullseye pulley starboard of the mast and the main halyard cleat behind the mast. the lenght of the boat is 13 foot 6 inches. cant find any pics that look like my sunfish. I assume it is pre 72. Your description is ok, but could fit a hundred different Alcort Sunfish look-alikes.
The Petrozavodsk State Academy of Music is an independent music institute with approximately 100 faculty members and 500 students. The Academy has become a center of excellence for training music professionals, concert activity and musicological research in North Russia.
In the photo below, I'd propped the 'Fish up on its trailer to raise the boat to a comfortable working height. The right side has imperfections filled with automotive "glazing compound" and sanded, while the left side awaits sanding. ... (no such a big deal on a sunfish). I'll be doing the hull on my 1966 fist soon, but will probably go with a ...