
Become the Confident Skipper of Your Own Sailboat
How to make a small sailboat.
- Post author: Anns
- Post published: October 11, 2022
- Post category: Uncategorized
- Post comments: 0 Comments
Introduction
Are you looking for a fun and rewarding hobby? Making your own sailboat is a great way to spend your free time, and it can also be a very rewarding experience. A small sailboat takes about six months to complete, but if you have the right materials and tools on hand, it’s not too difficult.
Getting Started
In this series, we’ll be going through the entire process of making a small sailboat. This will cover everything from ideas and plans to building and launching.
By the end of the series, you should have all the knowledge required to build your own boat.
Buying the Materials You Need
When you are building a small sailboat, it’s best to buy the materials you need from an online store. That way, you can be sure that the parts will fit together correctly and that everything is of high quality. The following list includes all of the materials needed for this boat:
- Wood for framing (plywood)
- Planking (plywood)
- Balsa wood sheets or blocks for covering the hull with fiberglass resin and cloth tape
Constructing the Hull
When constructing your boat, it is important to consider all aspects of the hull. You want it to be strong enough for rough seas, able to withstand collisions with rocks and other boats, and watertight so that you don’t sink into the ocean. The hull will also have a significant effect on how long it takes you to build your boat—if it’s too heavy or difficult to transport, you’ll need more time than if you built one out of lightweight materials like carbon fiber or aluminum.
In addition to shaping its overall form, keep in mind that there are many different ways to construct a hull: some boats use wooden planks while others use composite materials such as carbon fiber or Kevlar; some have flat bottoms while others have rounded bottoms (rounded bottoms make fast sailing possible); some are made from metal sheets riveted together while others are molded together using plastic resin such as epoxy resin glue. The construction method that works best for you depends on what type of material(s) you’re using—and even then it may be necessary to experiment before finding optimal results!
Constructing the Sailboat’s Keel
Once you have the hull and deck formed, it’s time to attach the keel. The keel is one of the most important parts of your sailboat because it:
- Is heavy. The keel is usually made from fiberglass or wood, so it will be very heavy and add a lot of stability to your boat.
- Keeps the hull straight while sailing downwind at high speeds (called point-to-point sailing). It prevents wobbling around in circles when you’re using all that power!
The Deckhouse
The deckhouse is the cabin of your sailboat. It should be large enough for you to comfortably stand up in, and it needs to keep out water when it’s raining or when you’re going through waves. Also, if you want your sailboat to have a nice aesthetic, then you’ll want your deckhouse to look good!
The shape of your hull will determine the shape of your deckhouse. For example, if you have a round-hulled sailboat with no keel (a flat bottom), then there’s no reason why you shouldn’t make your deckhouse rectangular or square-shaped instead of attempting something more complex like an L-shaped design with rounded edges along each side because this would just waste materials without providing any functional benefit whatsoever compared against just using straight lines instead which are easier both financially as well as physically speaking since they don’t require any additional tools than what’s already available whereas curved lines do require special tools such those used by carpenters who work with wood frames such as saws designed specifically for cutting curves into wood pieces rather than straight lines which can be done easily without fancy equipment at all).
If however you were building this same boat using plywood sheeting rather than solid lumber boards though then different considerations might apply depending on whether or not there was sufficient space within those sheets’ thicknesses (they could only handle so much weight before breaking apart) versus their widths (how wide each sheet would need be before splitting along its lengthwise edge). In either case though I’d recommend sticking with simple geometric shapes unless absolutely necessary due to space limitations; otherwise stick with simple rectangles/squares since these tend
Fitting the Sailboat Together
Now that the hull, keel and mast are in place and secured, it’s time to make sure your boat is ready for water. First things first: check that your boat is watertight by testing it with a bucket of water. If any leaks appear, tighten the screws or add more glue before continuing on.
Next, turn your attention to the rigging and rudder. The rigging should be secure at all times; however if you feel like something is loose or if there are sharp edges poking out somewhere then feel free to trim them down as needed with scissors or sandpaper while they’re still attached to their respective parts (you can always cut off extra threads later).
If you haven’t already done so earlier this week, now would also be an ideal time for me for me test out my rudder on land before attaching it permanently into place on our sailboat!
Finishing and Painting Your Small Sailboat
Now that you have your boat, you can paint it. You’ll want to make sure that the paint is dry before using it. Make sure you are happy with the color before applying a second coat! If the paintbrush feels good on your hand and has a good point, then it will be easy to apply the paint evenly. If not, replace it with one that does so (be sure not to use an old one because then you might get some unwanted colors). Good luck!
Learn how to make your own sailboat
Learning how to make your own sailboat is one of those activities that can be a real eye-opener. It’s not for everyone, but for those who are interested in taking on such an endeavor, it can be a rewarding and enjoyable experience. There are many advantages to building your own sailboat; for example, you can choose the type of boat you want and customize it as much as possible based on your personal preferences.
The first step in learning how to make your own sailboat involves choosing a design that suits both your needs and abilities as well as finding the right materials needed for construction. You might find yourself working with wood or fiberglass if the project calls for either one of these materials (or both). If so, there are several ways this may be done including using traditional woodworking tools like saws while others prefer using power tools instead which speeds up production time greatly compared with hand tools but requires more investment upfront since these types require expensive equipment purchases before starting any projects needing them such as sanding machines used when finishing off surfaces after applying paint coats or varnishes coatings onto finished pieces made from different materials such as metal sections which may need buffing out after being painted over twice during initial stages before final touches were added later down line depending on type work being done which could range anywhere from weeks months depending size job being tackled at time being completed
In this article, we’ve covered everything you need to know about building your own small sailboat. We hope that by following these steps and examples, you will be able to design and construct your own boat!
You Might Also Like
How sailing on a sail yacht can inspire your life, everything you need to know about windsocks, leave a reply cancel reply.
Save my name, email, and website in this browser for the next time I comment.
Affordable Sailboats You Can Build at Home

Key Takeaways
- There are many sailboats that anyone can build from home depending on tastes
- Budget will be the biggest deciding factor on a majority of the process
- Consider kits that come with most of what you need or choose ones that are all-inclusive
- Design complexities and new materials may make the building time process longer
- Plan the best you can ahead of time to save money and your working hours
Buying a sailboat can be expensive, but building your own can save you money. So what are sailboats you can build from home?
Sailboats that you can build from home will likely be a small boat under 20 feet. These could be from many different boat suppliers such as B&B Yachts, Brooks Boat Designs, and Chase Small Craft. Boat plans will vary based on your budget and how much time you have on your hands.
Based on my previous experience, building your own boat will take much longer than if a professional were to do it. You also have to be able to study plans, consider various sailboat designs, and have tons of supplies such as fiberglass tape or fiberglass cloth. On top of that, you will also have to be good with your hands.
Table of contents
Top 10 Affordable Sailboats Anyone Can Build at Home
Building your own pocket cruiser or other styles from boat plans is an impressive feat, as this will need dedicated time and money to assure your boat sails safely. Boat building takes a lot of patience as well, especially since this will not be completed in a fast manner.
Finding boat plans and materials that fit your budget will be key to being able to complete the project. The time it takes to complete these projects will vary on your overall experience and needs. Below are 10 of the most affordable sailboats that you can build in the comfort of your home.
B&B Yachts

B&B Yachts have 14 different boat plans you can choose from to find the boat of your desires. Their shop is located along the Bay River in North Carolina where they construct all of the kits and have a 100 foot dock to show off your project once you complete it.
One popular model to check out is their Core Sound 15, as it is the perfect size for those wanting to build a modest size boat for a handful of people on board. Their website features some videos of completed projects and the plans or kits for purchase.
- 14 different models to choose from plus some dinghies
- Various monohull and multihull options
- Friendly customer service with attractive prices
- Might be too many options for some that are indecisive
- Not ideal for those wanting to have a motor sailer
Brooks Boat Designs

Brooks Boat Designs has a handful of options to consider for your next sailboat building project. They are located in Brookline, Maine and give the option to buy the kits or have them build one from scratch for you. They have plenty of knowledge, so do not be shy to ask about modifications or custom features you are looking for.
Depending on your specifics, they can attempt to accommodate some of their plans to help fit your desired outcome. By checking out their site, you can see many examples of their construction in progress and what the boats will look like when completed.
- Offers a variety of kits
- Plans vary around $50 and up, while materials will obviously add more costs
- Some plans can be rowing boats that can convert to sailboats
- Might take a while to hear back from them, as their contact section is a little outdated
- Their plans may not accommodate a ton of extras for your taste
Chase Small Craft

Chase Small Craft offers a simple process for building boats. Their kits are equipped with everything you need and will help save you time than just buying the materials outright and other parts you could need. This is arguably one of the best bang for buck instances if you want to save time and money searching for pieces to your boat.
They are located in Saco, Maine and will ship everything to your home from there. All the necessary materials are included and all you need are the proper tools and working space.
- All-inclusive kits with what you need
- Tons of knowledge on their site for boat building
- Easy process to order and customize
- Complete kits can range over $20,000 for larger boats
- Kits may take up to eight weeks to ship out
Chesapeake Light Craft

You can expect high-quality boat kits from Chesapeake Light Craft . They feature 18 different sailboat kits that vary from eight to 20 feet in length. This should be more than enough to find one for you if you are newer to boat building.
They also have a wide variety of other kits in addition to the sailboat, in the event that you wanted to order a small kayak or paddleboard in addition to your sailboat. The prices vary considerably when considering a small or larger boat, so check the complete list of options to in order to potentially fit your needs.
- Plenty of sailboat offerings to choose from
- Different beautiful hull form options to consider
- Easy to build and perfect for sailing
- Only has basic materials needed for kit, so you may need to purchase other items
- Has epoxy shipping fee no matter if you pick up item
Dudley Dix Yacht Design
Dudley Dix Yacht Design has an extensive list of plywood and single skin sailing boat options. They have plenty of sail plans and kits to consider depending on your goals. These follow a classic look for sailboats, which are aesthetically pleasing.
If you are wanting one to accommodate a small family, they have more than plenty to look through. The cost is not as bad compared to others, but keep in mind that you may need to throw in your own supplies or specific tools to get the job done.
- Plans start at $30 and range up to $7,500 or more for kits
- More than enough of options to consider
- Affordable variety of sailboat offerings
- Might be too many options for those new to sailing
- Most are wood without the use of aluminum or steel
Farrier Marine

If you are in search of a multihull to build, then Farrier Marine is what you need. They offer a unique folding catamaran that is trailerable and give you the option to build it yourself. This not only makes it an appealing option, but anyone can take this multihull boat wherever they want with ease.
It features a thorough construction guide once you receive all of the materials. These also come with stainless steel fasteners and an aluminum mast for high-quality materials. Pricing will vary since you must request which model type you are considering.
- Ability to build a unique catamaran
- In-depth construction guide to help
- Easily handled and trailerable
- Price may be too high
- Limited offerings since only a few multihull options
Glen-L Marine Designs

Building a boat from Glen-L Marine Designs can save you time and money. They feature an easy system to order and receive the kits, as well as an in-depth guide to building them. This is an appealing option compared to most boat kit sellers.
The beauty about Glen-L is that anyone can build these from scratch, so you do not have to be the best boat builder in the world to get it done. They offer guides and helpful insights from their team to point you in the right direction. Plans vary around $15, while kits can range well over $1,000 depending on boat size.
- Nearly 50 designs to choose from
- Complete guide to help anyone build it
- Plenty of price points depending on size
- Might be overwhelming with the amount of options
- Could take a while to get parts since they are popular
John Welsford Boat Designs

John Welsford Boat Designs invites new and veteran boat builders that want a taste of quality small wooden boats. The boat plans are designed to meet your specifications and are catered to your desires.
There are seven sailboat designs to choose from so you do not feel overwhelmed in the process. However, they do not sell kits all the time, so you would need to have the materials or be on the lookout for the best prices when they are available.
- Seven sailboat plans with different sizes
- Quality boat builder and supporting community
- In-depth knowledge provided to you when you order
- Might be too small of boat size
- Kits are not always available
Iain Oughtred
There are plenty of options on the wooden boat store, but you should narrow down your search for Iain Oughtred’s line of sailboat kits and plans. There are 25 different plans to choose from, which should accommodate most everyone looking to build their own boat.
While they do offer some kits, they do not routinely offer sailboat kits. You would need to purchase all of the materials if you are considering one of their sail plans. Keep this in mind if you are considering, as you would need to hunt down the parts yourself.
- 25 different sailboat plans to look through
- Various sizes to contemplate for you sailing needs
- Prices will vary but are not bad compared to market
- No sailboat kits, only plans
- Newer boat builders might find too many options unappealing
Paul Gartside Boat Builder and Designer
Gartside Boats is a boat builder company based in Long Island, New York that showcases a variety of boats from traditional and newer methods of boat building. Within that variety, they have boat plans meant for six to 50 feet in length.
With an abundance of options, you will need to contact them regarding prices and any customizable options. Kits may vary as well, as they typically design in-house and build for you.
- Experienced boat designer that can accommodate with custom plans
- Many options are trailerable
- Can have plans for up to a 50 foot boat
- You will need to contact them for prices
- Customized options may make process more complicated for new boat builders
How Much Does it Cost to Build a Sailboat at Home?
As you have likely already done so, the math between building your own boat and buying one may be a huge difference. Likewise, you may even enjoy the challenge of taking an older boat that is gutted and restoring with parts from a kit to build one new again.
But how much does it cost exactly to build a boat from the comfort of your own garage or workshop? The prices are going to vary dramatically depending on your situation and material needed to get the job done. In addition, the time that it takes to complete this will also vary.
Sail plans are rather inexpensive if you are aiming to build a small boat. These plans allow you to see the workings of the boat design and what you need to build the boat.
Without these plans, you will not know the exact details of the design and it can cause major issues with the boat’s hull or other areas of the boat. Think of these as the backbone or instructions of the boat’s infancy before being built.
Price Per Square Foot
You should assume to pay anywhere between $300 to $600 per square foot if you are interested in building a boat. Buying a kit outright can be a good way to save time, but oftentimes these do not come with everything you need.
Instead, you should try to source as much of the materials at the best price as possible. Thinking ahead is part of the process and you might be able to score a deal at a lumber yard or hardware store for parts.
Boat Designs Matter
The design of the boat will be much different from one boat to the next, regardless if they are the same size in length. If you are pondering boats that range anywhere between 16 and 20 feet, you should factor in the shape of the hull, any rigging, and various appendages.
Prices tend to increase when there are more complexities within the designs. If you are considering a kit with more details than others, you will also have to pay more for the designs on that as well.
Kits Can Differ
It is important to understand that all kits are not going to be the same. As you gander at sailboat kits online to stitch together, you need to thoroughly look over to see if you have everything you need before buying.
It would also be at your advantage to ask the seller if any additional parts or supplies are needed. This may change your dynamic on the kit buying process and you may pass up one for another if it has everything you need. An all-inclusive kit may cost several hundred, if not thousands, of dollars more to have the convenience of everything in the bundle.
Construction Approaches
Some boat plans may require you to have certain tools to get the job done. This means special saws or planers, which the average person simply does not have.
Purchasing specialty tools might be expensive upfront and hard to find depending on what it is. Your best bet would be to check locally for others trying to sell their tools or consider a boat plan that does not require extensive tools to finish the job.
How Long Does it Take to Build a Sailboat?
An easy to build sailboat could take a while to build from scratch. Many different variances come into play that are difficult to pinpoint for everyone. But how long is that exactly and how will your experience play into this?
A fun project to sail in the wind could take you several months to well over a year depending on the boat plan and how big your boat is going to be. In addition, the materials all need to be accounted for prior to starting in the event a hardware store does not have them in stock.
Time Varies
The time that passes for simple boat designs on small sailing vessels can be done in a few weeks. This is assuming you have everything you need and work non-stop around the clock.
Certain complex situations may make the process long, such as the difficulty of working with some materials. If you are a skilled laborer, it may take you half the time compared to a novice. The amount of time it can take will vary on your availability and skill level.
Planning ahead will undoubtedly offer the most time-saving features. It also helps if you can tackle parts of the project at your own pace.
Complexity of Design
The design of the boat may make the construction process longer. For example, it may take you longer to build a catamaran compared to a similar lengthed monohull.
More complex designs might require more materials, therefore making the process a bit longer to complete. Furthermore, you will also need more experience working with difficult designs and that will affect you more as a newbie.
Be sure to manage your expectations well and do not allow yourself to become too stressed over this fun project. If you can, seek expert boat building advice from a local builder or the company you purchased sail plans through.
Quality Materials
The quality of the materials will matter significantly when building a boat and will greatly affect the time it takes to construct it. Handling fiberglass or carbon fiber might require specialty tools, while wood also demands a certain level of craftsmanship.
If you are not skilled at working with the material at hand, it might affect the quality of the build and you may have to go back to fix mistakes. This will definitely add more time to your project, because mistakes are bound to happen with your first project.
To save time, consider adding the tools and materials throughout the year or as often as your budget allows. You may want to try testing your skills on fiberglass or other materials to get a feel for how to work with it.
Related Articles
Daniel Wade
I've personally had thousands of questions about sailing and sailboats over the years. As I learn and experience sailing, and the community, I share the answers that work and make sense to me, here on Life of Sailing.
by this author
Best Sailboats
Learn About Sailboats
Most Recent

Best Small Sailboat Ornaments
September 12, 2023

Best Small Sailboats With Standing Headroom
December 28, 2023
Important Legal Info
Lifeofsailing.com is a participant in the Amazon Services LLC Associates Program, an affiliate advertising program designed to provide a means for sites to earn advertising fees by advertising and linking to Amazon. This site also participates in other affiliate programs and is compensated for referring traffic and business to these companies.
Similar Posts

Discover the Magic of Hydrofoil Sailboats
December 11, 2023

Best Bluewater Sailboats Under $50K

Hunter Sailboats: Are They Built for Bluewater Cruising?
August 29, 2023
Popular Posts

Best Liveaboard Catamaran Sailboats

Can a Novice Sail Around the World?
Elizabeth O'Malley
June 15, 2022

4 Best Electric Outboard Motors

How Long Did It Take The Vikings To Sail To England?

10 Best Sailboat Brands (And Why)
December 20, 2023

7 Best Places To Liveaboard A Sailboat
Get the best sailing content.
Top Rated Posts
© 2024 Life of Sailing Email: [email protected] Address: 11816 Inwood Rd #3024 Dallas, TX 75244 Disclaimer Privacy Policy
- Activities for Kids
- Arts & Crafts
How to Build & Float Your Own Mini Sailboat

Crafting and outdoor exploration come together with this project—learn how to build a boat that floats and sails. The best part? You’ll only need to buy a couple of supplies because the main part of this barge is made from sticks that you find outside. Read on for the step-by-step instructions and you’ll soon have a ship to sail the high seas (or slow streams).
What You’ll Need
1 piece of paper (patterned scrapbook paper is nice, but plain construction paper also works)
2 craft sticks
string or twine
hot glue gun
14 sticks in similar sizes (5-6 inches long works well)
How to Make the Boat
1. Start by wrapping 12 the sticks together with your twine. We used Kid Made Modern Craft Twine ( target.com , $9.99) to add a pop of color, but white string would also work just fine. Tie one end of the twine to the end of one stick and wrap the string around a few more times, then move on to the next stick. Wrap the twine around that stick a few times and then use the same piece of twine to wrap the third stick and so on and so on until 12 of your sticks are connected. (You’ll use two elsewhere.) Don’t worry too much about how many times you loop around or how perfect your wrapping is. Knot off the twine on the last stick. Then, do the same thing on the opposite side of your sticks.
2. Wrap two sticks onto the bottom. Now add two more sticks, one on each end of your boat, to the bottom of your group of sticks. Again, tie a knot on one end of the stick then weave your twine in and out of the connected sticks, looping the twine around each stick and then around the stick on the bottom. Repeat for the second stick.
3. Cut 2 triangles out of your paper. Ours measured 5-inches along the side and bottom, but you may want to adjust based on the length of your sticks. We used Kid Made Modern Print Palooza patterned paper ( target.com , $7.99 for 150 sheets). However, if you have plain construction paper, ask your child to decorate it with stickers, crayons, markers, or any other way you like.
4. Add the craft sticks as your mast. Line up the craft sticks along the edge of the triangle to create your mast. Use a hot glue to secure the craft sticks.
5. Glue the triangles together. Ask your child to cover the two triangles with glue, using the glue stick. Then, press them together to complete your sail.
6. Connect the sail to the raft. Slip the craft stick in between two of the sticks in the middle of your boat. Use a piece of twine to wrap around the craft stick and around the two middle sticks until it feels fairly secure. To give it extra support, add hot glue all around the area where the craft stick and twigs come together.
7. Sail your boat. Once the glue has cooled and dried, your craft is ready for its first voyage. Fill a baby pool or other vessel (even the bath tub!) with water and watch your homemade schooner float.
8. Create some wind. Want to get your boat moving faster? Use a straw to blow it across the water.
9. Take it to the park. For further experimentation, we took our model to the park so it could sail in a real stream. Even after several sails and a few capsizes, our sailboat has held up.
Happy sailing!
Project inspired by Minieco’s handmade boats .
Have you crafted any boats with your kid? Tell us about your design in a comment.
–Julie Seguss
Need some fresh ideas?
Subscribe to our weekly newsletter for expert parenting tips and simple solutions that make life instantly better.
By subscribing you agree to Tinybeans Terms and Privacy Policy
Related reads

Why Are Gen Z Kids Covering Their Noses in Family Photos?

Screen Time for Babies Linked to Sensory Differences in Toddlerhood, Study Shows

Kids Shouldn’t Have to Finish Dinner to Get Dessert, Dietitian Explains

The Questions Parents Should Be Asking Their Pediatrician—but Aren’t

6 Better Phrases to Say Instead of ‘Be Careful’ When Kids Are Taking Risks
- your daily dose

- and connection

- Your daily dose


- Basic Kayaking Knowledge , Learn
15 Free Boat Plans You Can Build This Week (with PDFs)
Boatbuilding is one of the most ancient forms of craftsmanship still alive today. As long as our ancestors have had a curiosity about exploring open waters, they have been practicing and honing their boatbuilding skills.
To be honest, however, building a boat is no small task. It will require a lot of work and patience to ultimately create a finished product that you are happy with and that is actually seaworthy.
Of course, we have also included a few free boat plans. You can keep in your back pocket for the next time you are asked to build a cardboard boat as part of a contest or lakefront teambuilding adventure.
We hope that these resources help you in your journey to build your own boat!

Photo by SeventyFour via Shutterstock
Free Boat Plans
- The Wanigan
- The Slipper
The Handy Andy
- The Jolly Roger
- The Hobby Kat
The White Duck
- The Sea Midge
The Crazy Cardboard Boat
Why Build Your Own Boat?

Photo by Halsey via Shutterstock
There are a lot of reasons why you should explore building your own boat versus buying a pre-made model. Here is a quick breakdown of the most obvious benefits:
- You will know the ins and outs of your finished boat better than anyone
- It can be a great project to work on with your teenage or even adult children
- You will gain valuable skills molding and shaping wood and other materials
- You can design your boat for your specific needs
- You don’t have to trust the sometimes-questionable manufacturing of mass-produced boats
- You can create a boat that functions as your second home on the water
- You can save money if you source materials mindfully
Of course, most first-time boatbuilders still experience some level of trial-and-error. With patience and perseverance, however, you can craft a one-of-a-kind vessel that has no equal anywhere in the world.
Free Boat Plans You Can Build This Week (with PDFs)
1. the wanigan.
PC Duckworks Boat Builders Supply
The Wanigan boat began as a garvey design, which is one of the older boat plans known to the Americas. Traditionally, these boats were built as work scows and were very popular among American summer camps.
The design itself is very simple, but these boats can carry heavy loads. It can also handle a trolling motor being mounted to the stern so you can cover more ground if you want to use it as a fishing boat.
The creator of this boat plan became aware of some of the downsides of the garvey design, such as the heavier weight that made it less efficient than some other designs. So he combined elements of dory and wanigan designs to create a hybrid.
The main changes include an enlarged beam, tilted lathes to provide a stiffer hull, and knocking off the top strakes to reduce the boat’s overall weight.
The Wanigan text
These additional The Wanigan drawings  may also prove useful for your build process!
2. The Mouse

The Mouse is one of the most compact and nimble boat plans we have found for this list. It is an easy build and also a great boat for two kids or a single teenage paddler.
The original builder began with a one-sheet boat design in an effort to create the lightest and most affordable boat possible. This means it is only suited for calm waters and should not be used in high winds or wavy conditions.
That said, it was built in roughly 12 to 24 hours of work time and doesn’t require a full workshop to construct. The main material that is required for building this boat is quarter-inch plywood. But the builder recommends using one-inch by half-inch pine or something a little sturdier.
The plywood and pine components are held together using a method called ”˜stitch and glue’. This method requires choosing one of the best glues for kayak outfitting , which are typically made of epoxy and glass tape rather than something cheaper like polyurethane.
The Mouse Instructions
Also, here are a few extra useful The Mouse Notes for builders
3. The Slipper

The Slipper is the first of many sailboat plans on our list and it is faster, easier, and cheaper to build than most. It also features a deeper cockpit than many other sailboat designs, which makes it safer for intermediate sailors.
This sailboat plan features dual steering stations so that you can sail from inside or outside of the helm. It also includes a centerboard trunk that hardly intrudes into the cabin at all. So that, it is easier to work around while you are in the cockpit.
The exterior hull and cabin of this sailboat feature a modified dory design using two sheets of plywood ripped to three feet wide before being joined together. The resulting hull is a modified V-shape that reduces drag.
The centerboard of this boat can also be winched up to the level of the top of the cabin or lowered down to alter the draft. This allows you to customize the boat design for a stiffer and more weather-worthy vessel if you need it.
The Slipper was also intentionally designed with an aft cabin that naturally helps to keep the bow pointed into the wind whether you are underway or the boat is anchored in the port.
The Building Slipper
4. The Handy Andy

PC DIY Wood Boat
The Handy Andy is a great little 10-foot portable rowboat for hunting, camping, fishing, and other recreational uses. It is actually the only folding boat design on our list, which makes it best for folks that need the most portable boat plan possible.
This boat features a 42-inch beam and a depth of about 15 inches at the mid-section. It also weighs roughly 80 pounds when assembled and can handle up to three average-sized human passengers.
The design boasts a flat bottom with canvas-bound edges and the primary material used for construction is ⅜-inch marine-grade plywood. Despite its lightweight nature, this rowboat can handle trolling motors or even outboard motors with a maximum of five horsepower.
Once finished, the hull can be folded or unfolded in less than a minute’s time.
This design makes it one of the only boats on this list that can be stored in a truck bed or easily carried by two people to be launched at more remote locations.
5. The Junior

If you are looking for an all-purpose dinghy that can handle almost any use you might imagine, look no further than The Junior free boat plan. It can carry three or four average-sized adults and is much easier to row than a traditional dinghy.
It is also durable enough to be equipped with a small outboard motor. You could even set it up with sailing equipment if you want to use it as a sailing vessel. As we said, this is truly an all-around boat design!
This boat plan requires constructing three frames that will provide the majority of the load-bearing support. The builder recommends using ¾-inch framing with ⅜-inch plywood as the exterior material for this boat build.
Resin glue and flathead screws are also required to hold this boat together. But there is a full list of materials included in the plans we have linked to below. Sticking to that plan should also give you enough leftover materials to construct two six-foot oars for rowing this boat until you install a trolling motor or outboard motor down the line!
6. The Jolly Roger

Channel your inner Captain Morgan when you are following these plans to build your very own Jolly Roger boat. This flat bottom boat design is designed for pond fishing . It can also be a useful yacht dinghy for getting from your dock to a larger vessel anchored offshore.
The plan follows conventional dinghy construction methods but also includes a few modifications that will save you time and energy. The wide design is super stable for boaters of all ages.
The keel, frame, chines, and risers are all cut from ¾-inch oak, ash, or any other trusted hardwood you can get your hands on. For the smaller components, the builder recommends using cedar, cypress, fir, or white or yellow pine.
Because this boat plan is also sturdy enough to handle a small motor, it includes important points for protecting the wooden hull from spark plug damage.
Be careful to follow these guidelines to build the safest boat possible if you imagine installing a motor down the line.
The Jollyroger
7. The Cork

The Cork is another simple rowboat design. This one trends away from the flat bottom plans that we have included thus far. Instead, it features a deeper, V-shaped hull that makes it better suited to more efficient rowing and easier maneuverability.
It can be rowed easily from either seating position and is durable enough to handle up to three average-sized adult passengers. The ends of the boat are identical, which allows for multi-directional rowing.
The list of materials required for this boat plan should cost you between $30 and $50, depending on your location and hardware costs there. The resulting build is lightweight enough for two people to be carried and also to be transported on top of a vehicle .
Inside the boat, the builders use aluminum tubing to secure the struts that hold the seats. This material choice keeps the overall weight of the boat down while still adding the necessary rigidity across the beam of the boat.
8. The Hobby Kat

The Hobie Cat is one of the most iconic and recognizable small sailing vessels ever made. This Hobby Kat plan is your answer to building your own iconic sailboat without spending thousands of dollars.
Your finished boat will be able to handle speeds of up to 20 miles per hour. It will be a super fun vessel for windy days on the lake or bay. The builder was able to construct the hulls, decking, and rudder for this boat while spending little more than $200.
From there, they purchased and installed the mast, boom, sail, and rigging, which brought the total amount spent to roughly $650 (still much less than a name-brand Hobie!). Without the mast and sail, this boat weighs roughly 165 pounds and is constructed using primarily 3/16-inch marine plywood.
You can also elect to build your own mast, boom, and sail if you have the time and skills to do so.
Those elements are not included in this boat plan, but they do offer some recommendations for where to buy these components!
The HobbyKat
9. The Tern

Named after the common seabird found around the world, the Tern is a lightweight and nimble sailboat with a 72 square foot base design. She is made for inland sailing and planes very well in moderate breezes.
The hull design also provides minimal water resistance and the small floor plan makes this boat easier for intermediate sailors to handle. Even though it offers a small footprint, this boat is sturdy enough to handle up to four adult passengers.
One of the best things about this boat plan is that it can be built almost entirely by using only common hand tools.
Of course, you can speed things up if you have power tools and you are skilled enough to use them correctly.
The Tern boat plan includes a 20-foot mast, but you can shorten that length if you desire. The plan includes a complete list of materials and step-by-step instructions on how to plane and assemble each element.
10. The Falcon

As you might expect from its name alone, the Falcon is an incredibly speedy sailboat for its size. It boasts a 14-foot centerboard and can handle two to four passengers, depending on its size and weight.
In tests of the original build, the creators claim that this boat out-distanced many Snipe and Comet sailing vessels as well as pacing evenly alongside longer 18-foot sailboats. When finished, your boat will have a six-foot beam and a total weight of roughly 475 pounds.
For the main framing components, they recommend using white oak and plywood will be the main material used in the hull construction. The hull features a V-shaped that was inspired by larger schooners.
The Falcon is best suited to sailing on bays, lakes, and wide rivers. It is also a boat plan with just under 120 square feet of deck space and it is a great build for amateur craftsmen and sailors.
11. The White Duck

The White Duck is a flat-bottomed rowboat with a total length of 13’6” and a four-foot beam. The cockpit is approximately 15 inches deep all the way around and this boat can handle up to five passengers while maintaining buoyancy and stability.
When fully constructed, it will weigh roughly 200 pounds, but the final weight will depend on the type of lumber you choose for your build. This boat plan features plywood planking over solid wooden frames.
The White Duck is built with a pointed bow that cuts nicely through the water. The flat stern of this boat design will make it easy to attach a small outboard motor with a maximum of six horsepower.
As you might expect from its name, this rowboat is a great option for duck hunting trips. That being said, it is a highly versatile craft that can also be used for pond fishing or casual rowing on your nearby lake.
12. The Sea Midge

The Sea Midge is one of the smallest rowboats on our list and it is ideally suited for one average-sized rower or two small paddlers. It is only about 8 feet in length and offers a 52-inch beam at its widest point.
The Midge’s small dimensions make her ideal for navigating narrower creeks and streams. With an approximate weight of 62 pounds, she is easy to maneuver on the water and can also be much more easily transported than some of the larger boat plans on our list
The Seamidge
13. The Zephyr

The Zephyr is a compact and speedy dinghy sailboat that measures roughly 14 feet long and approximately five feet across. This boat style was originally developed for safely crossing the English Channel. This means it can stand up well in rough waters.
When finished, it is also light enough to be transported on a small trailer or on top of a larger vehicle.
The boat plan calls for using hemlock or fir for the framing and oak or Douglas fir for the keel and chines.
14. The Gypsy

The Gypsy is a small cruising sailboat that is meant to be equipped with an outboard motor for powered locomotion. The original design resulted in an incredibly seaworthy vessel that logged more than 6,000 nautical miles in her lifetime.
It includes a comfortable cabin that makes it well-suited for multi-day sailing adventures. This boat plan includes improvements on the original design that will help you build an extremely durable and long-lasting sailboat.
The Gypsy boat design will help you construct a vessel that can handle a motor up to 25 horsepower so that you can enjoy cruising speeds of up to nine miles per hour.
While it may require a bit more of an investment in time and money, it will also help you produce one of the best boats you can build with a free boat plan!
15. The Crazy Cardboard Boat

PC Saint Dominic Catholic School
Finally, let’s talk about a crazy cardboard boat plan that you can build in less than a day. This is a great boat plan to bookmark for your next teambuilding project so that you can earn bragging rights with your coworkers.
The plan calls for using 1.5 sheets of cardboard. But you can use the remaining half sheet to build your own boat paddle if you want to get creative.
Triple-thick cardboard is best for this boat plan. But you can always double up thinner sheets if that is all you can find.
These plans include an easy-to-follow diagram for marking, cutting, and folding the cardboard sheets to create the hull of your boat. From there, it calls for using contact cement and construction adhesive to seal the edges and corners.
If you are looking to save a little money on this build you could also use duct tape and then wrap the entire design in plastic sheeting to provide waterproof qualities.
Overall, this build is one of the cheapest and easiest on our list. It is also a great project for hot summer camp days on the lake or river!
15 Free Boat Plans You Can Build This Week (with PDFs) – Final Thoughts

Photo by Alexandra Soloviova via Shutterstock
We hope that you now have a couple of free boat plans to inspire you to begin your own construction project.
Don’t hesitate to check out YouTube for some useful boat-building videos when you are getting into the nitty-gritty of these build processes!
Enjoyed 15 Free Boat Plans You Can Build This Week (with PDFs)? Share it with your friends so they too can follow the Kayakhelp journey.
Share on pinterest.

Peter Salisbury
Pete is the Owner of KayakHelp.com. Born and raised in Cleveland, Ohio, he grew up kayaking, fishing, sailing, and partaking in outdoor adventures around the Great Lakes. When he’s not out on the water, you can find him skiing in the mountains, reading his favorite books, and spending time with his family.

MorningChores
20 Budget-Friendly DIY Boat Plans for Loads of Water Fun
Do you enjoy spending a day out on the water every now and again? But does your budget allow you to purchase a new boat?
Well, even if you’re working on a meager budget, you could still own a boat. “How?” you might ask.
Rather simply in fact… make your own. I probably wouldn’t have thought of this idea either until a few months ago when my husband developed the itch for a boat.
He traded for a boat with a title, but it didn’t run. We’ve spent quite a few dollars and hours into making it work, and now we have a decent boat to enjoy on the water.
If you aren’t into fixing something up, I’m going to bring you some of the internet’s best ideas for making your own DIY boat. Here they are:
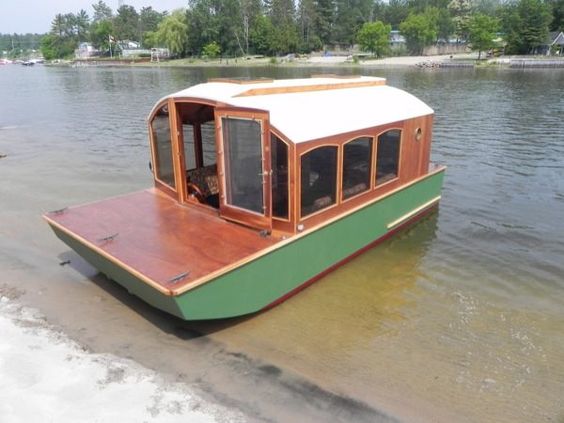
1. The DIY Tiny House Boat
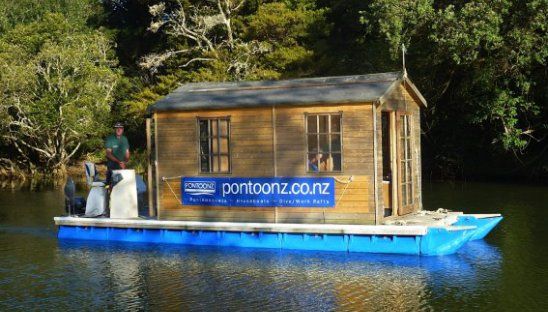
We’re going to jump right in with a doozy to choose from. If you’re in the market for not only a boat but a houseboat, you may be wondering if this could ever fit in your budget.
Well, when you see this wood framed pontoon tiny houseboat , you’ll soon learn it can become a reality for you with a little hard work.
2. Basic Wooden Boat
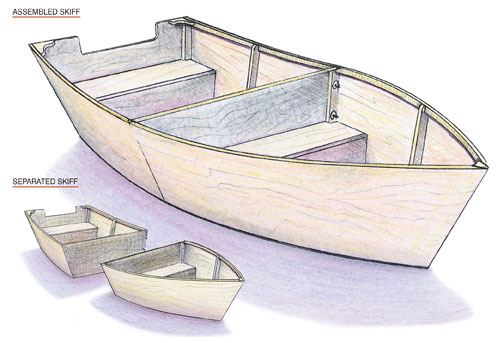
Whether you need a small fishing boat or a smaller boat to paddle around a pond, these plans are great for either.
The plans for this boat walk you through each step of the process. If you’re a beginner in the world of carpentry, this boat could still be feasible for you.
3. PVC DIY Kayak

I wasn’t aware of how expensive kayaks could be until our oldest recently caught the urge to purchase one. Suddenly, I realized how much money a person could invest in one.
However, this kayak appears to be quite buoyant and should be quite a bit cheaper because it’s constructed from PVC pipes . How neat does it look?
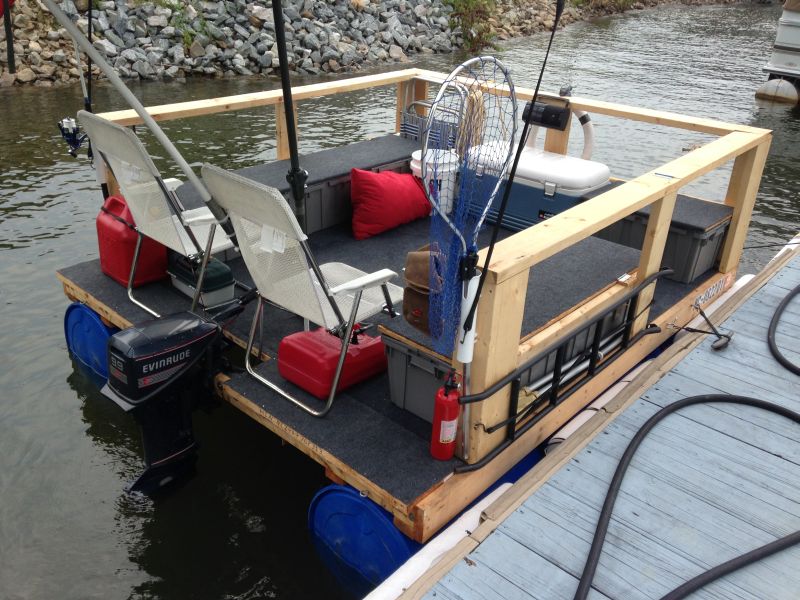
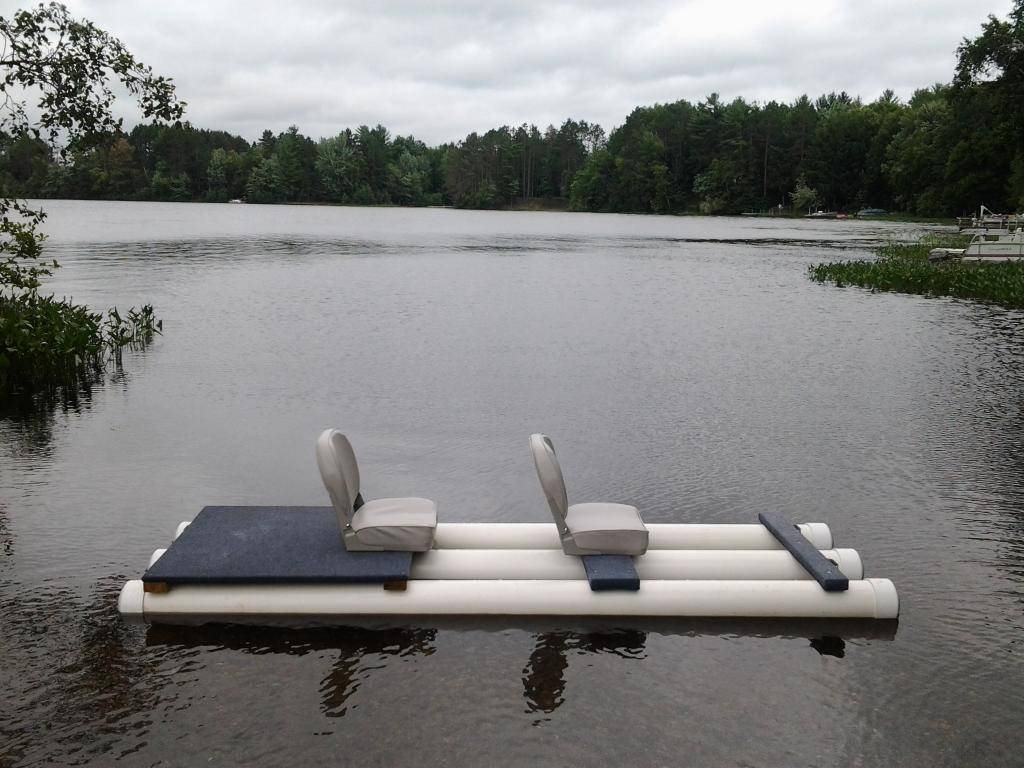
4. Recumbent Pontoon Pedal Boat
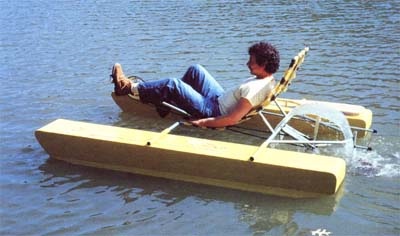
Do you enjoy renting a paddle boat and heading out on the water? Then you’ll love this boat. It’s a DIY version of a paddle boat.
However, it has large floats on the side which makes it a smaller version of a pontoon boat . Also, it’s made to recline for a more relaxing ride.
5. Plywood Canoe
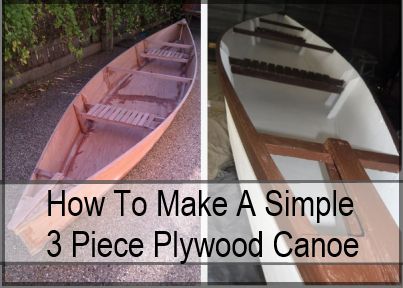
Canoes are a fun way to go up and down a river or other smaller bodies of water. If you’d like to have one, consider building it.
You can use these plans which show you how to construct a canoe out of plywood. This should make it more affordable yet functional too.
6. DIY Pontoon Boat
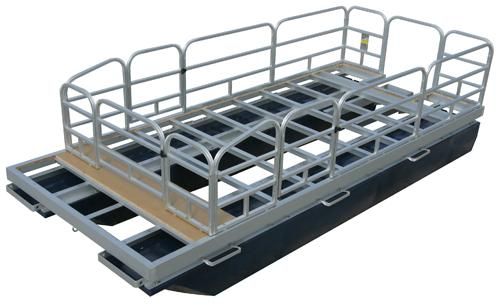
Pontoon boats are amazing boats to own. They’re great for fishing and luxurious enough to be a comforting way to cruise the water on a gorgeous day.
If you’d like to own one but can’t afford to buy, consider using these tips to help you build a pontoon boat all on your own.
7. Flat Bottom Boat Plans
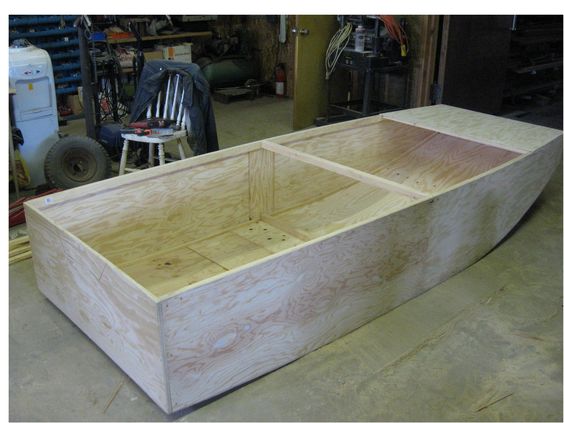
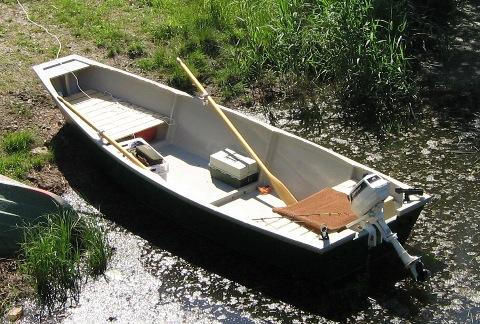
One thing I’ve learned over the past few months of renovating a boat, is you don’t need anything fancy for a fishing boat – unless you want it to be fancy.
However, if you’re in the market for something simple and functional, the plans for this flat-bottomed boat should do it.
8. PVC Johnboat
A Johnboat is a great way to get out on the water and have lots of fun. They’re also functional enough to make a nice fishing boat too.
Either way, if you’re in the market for a fishing boat, consider building your own johnboat with these plans.
9. DIY Simple Wooden Boat
This option doesn’t come with plans which I could find. However, it could still be used as inspiration for building your boat.
Again, these boats would be good options if you’re someone looking for an inexpensive way to go fishing.
10. Homemade PVC Raft
This PVC raft is another option which doesn’t come with plans, but it looks simple enough to build. If you have experience in carpentry, you should be able to figure it out rather quickly.
However, this looks like a fun way to get the whole family out on the water uniquely and cost-effectively.
11. The DIY Pontoon Double Hulled Kayak
This pontoon boat is built in an abnormal but intriguing way. Instead of having typical floaters on the bottom of the boat, they used kayaks.
From there, the rest of the boat was built of foam insulation and PVC pipe. When you get creative, you can build a boat with little expense.
12. The Fishing Punt
This is another cost-effective option for a fishing boat. However, there’s no guesswork on this one. The plans are laid out and easy to read.
Whether you’re an experienced carpenter or someone who has recently begun to build things, this could be a viable option for you.
13. Inflatable Raft Fishing Boat
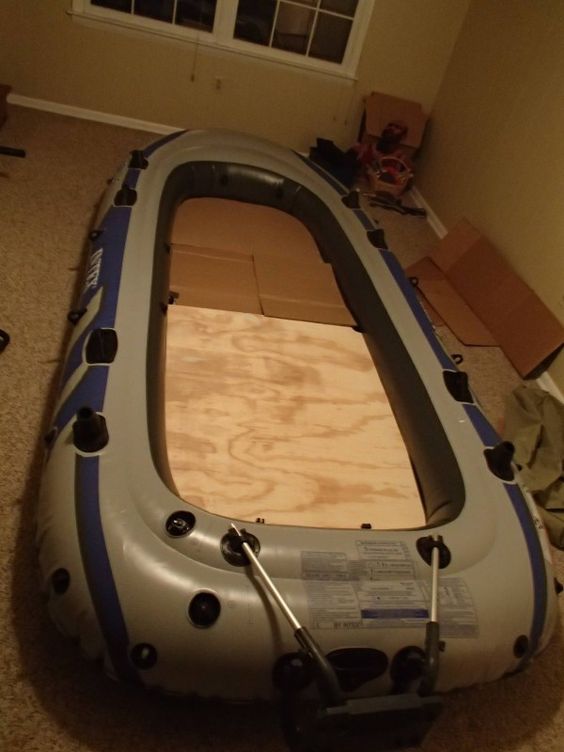
Are you struggling to come up with enough room in your budget to build a new fishing boat? What if you could use your inflatable raft as a boat?
Well, thanks to this idea, you can. The person who created this put a plywood bottom in a raft and turned it into an amazing little fishing boat for little money.
14. Single Plywood Boat
If you don’t need a larger boat, this could be the answer for you. It’s cost-effective because the whole thing is built from one sheet of plywood.
Even though this boat isn’t the biggest, it would make a great fishing boat for a one-person fishing trip .
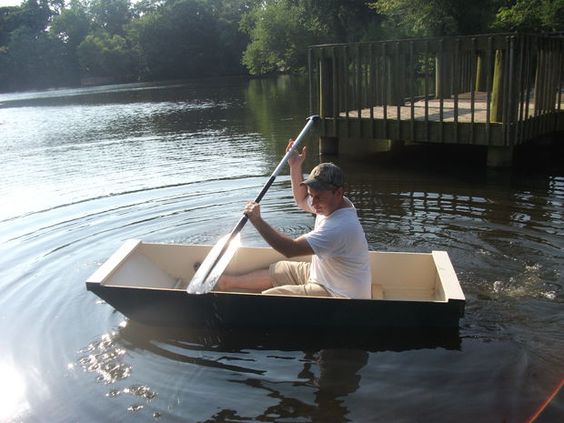
15. Zip Tie and Ply Mini Boat
If you’d like to get out on the water for a fun day of fishing or sight-seeing, consider building this unique mini-boat .
It’s made from zip ties and plywood. Though it may sound a little sketchy on the surface, it seems quite buoyant and inexpensive too.
16. The Homemade Pontoon
When I saw this boat , I instantly sent it to my husband and said, “Can you build this? I may need it a little bigger to fit the kids and dog on board.” This should tell you; I love it!
But it actually is a cool idea. It looks comfortable for both cruising and fishing. Plus, it should be possible for most budgets.
17. PVC Pontoon Boat

Some of you may be looking at these ideas and saying, “This is great, but I’d prefer to have a motor attached to my boat.”
Well, you’re in luck. This pontoon boat is easy to build and also shows you how to attach a motor to keep you from having to paddle everywhere you go.
18. The Micro Houseboat
If you’ve ever searched for a houseboat, you know how expensive they can be. But don’t give up on your dream yet.
Instead, look into building this tiny houseboat . It has a gorgeous interior and would make a great full-time home or a small vacation home.
19. DIY River Raft
Who says you have to build something overly complicated to enjoy a day out on the river? Well, you don’t.
Instead, build this simple raft . It’s constructed from PVC pipe and has a few seats add onto it. It looks buoyant and can help you to have many enjoyable days out on the water.
20. Seafoam Kayak

Would you like a light-weight kayak you can build yourself? Consider creating this kayak made from sea foam.
It only weighs 16 pounds and is built to be eight feet long. This could be a great way to enjoy many days out on the water without much fuss.
Now you have 20 different options for a DIY boat. You can choose between kayaks, johnboats, houseboats, tiny homes, pontoons, and much more.
We hope you’ll find something on this list to inspire you and be able to create something you can enjoy all summer long.
Was this article helpful?
What went wrong.
This article contains incorrect information
This article does not have the information I am looking for
How can we improve it?
We appreciate your helpful feedback.
Your answer will be used to improve our content. The more feedback you give us, the better our pages can be.
Follow us on social media:

How to Build a Sturdy Wattle Fence with Tree Branches

23 Free DIY Porch Swing Plans & Ideas to Chill in Your Front Porch

How to Grow and Make Your Own Herbal Incense

31 DIY Clothing Rack Ideas to Conveniently Increase Storage Space
26 DIY Cardboard Furniture Ideas That Are Surprisingly Practical

How to Make a Basket Fish Trap

17 DIY Dog Crate & Kennel Ideas Your Pup Will Surely Love

9 Effective Homemade Bug Sprays to Make Your Summer Pest Free

How to Build an Outdoor Cob Oven for Under $30

How to Build a Worm Farm at Home (and Monetize it for Profit)
45 DIY Picture Frames to Display Your Happy Moments

39 DIY Christmas Ornaments to Deck Your Halls With This Festive Season
Great Projects
Build a small sailboat free plans.

These plans are for a small 15 foot knockabout sailboat.
I like these plans for their ease. Building a smaller boat is a lot more attainable than a cabin cruiser! And these plans get right to the specifics of building. From the plans:
ANY SAILBOAT fancier will like "Tramp," the trim, 15-ft. knockabout that's so easy to build in plywood. The first operation is to cut the stem, transom and side planks and assemble the forms.
Use casein or waterproof glue under the butt strap joining the side planks together. Forms can be made of almost any scrap material on hand. If you are a good enough mechanic, they can be dispensed with and correctly beveled frames made to their exact shape can be placed permanently in the boat. Screw-fasten the oak frame at sides and bottom on the inside of the transom. Then notch out the bottom of the frame to receive the keel batten...
The transom is placed last and must be beveled so that the side planks fit tightly against the cleats and the transom edge. Be sure to place white lead and a thin thread of cotton between planks and stem and transom prior to joining them together...
Related Plans

All Our Vintage Projects Categories
Vintage projects.
All rights reserved, 2020 [email protected] Copyright, Safety and Legal Information Terms of Use - Privacy Policy Site Map
Discussion Forum
Ask questions, get answers, share stories in our discussion forum!
BoatNews.com
Free model boat plans: the MiniX, an easy-to-build radio-controlled sailboat
We set ourselves a challenge: to make a sailing model. In the end, after hours of reflection and work, we discovered that we took as much pleasure in designing and building as we did sailing our yachts. Here is the description of our project and the plans to download. Another article follows with the steps of the realization.
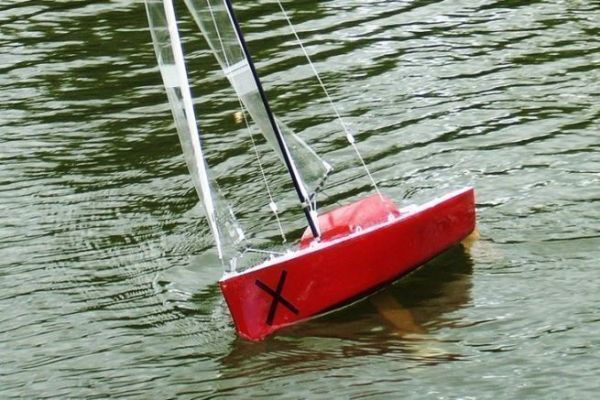
An easy-to-build, eye-catching, high-performance sailboat
Who hasn't dreamed of a little wooden sailboat with a beautiful canvas cover? The idea for this project is a child's dream.
Sailing on a regular basis in "scale 1", we had the idea of having fun by sailing two boats to race in our "spare time". The boats had to meet the following specifications:
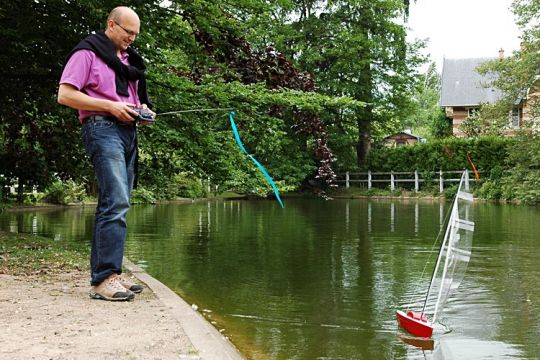
- Easy to transport. Measuring just 50 cm, our MiniX doesn't take up much space in a trunk. However, the keel and mast can be dismantled. If need be, the MiniX can even be included in our vacation luggage.
- Able to be thrown into the water "out the back of the car" without complicated implementation.
- No investment that would jeopardize our homes. As this is not a one-off activity, we didn't want to invest in expensive radio controls (our boat's biggest expense). A basic radio control kit is powerful enough to handle "small" sail surfaces.
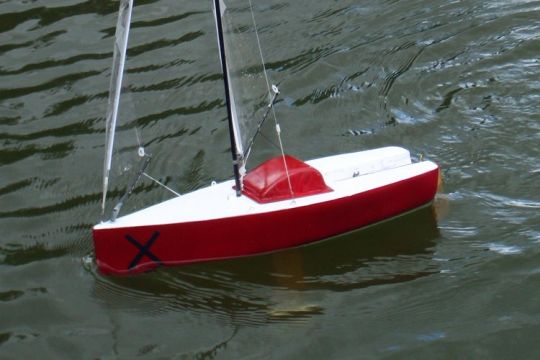
- Resembling a sailboat at best, hence the presence of the deckhouse and cockpit. These two elements give a sense of scale without resorting to model-building. Above all, a sailboat must be beautiful. Don't we also sail for the pleasure of our eyes?
Modern construction

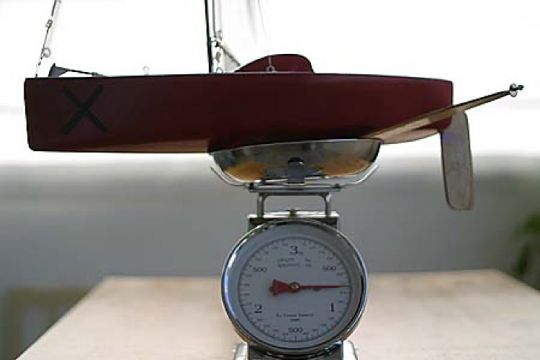
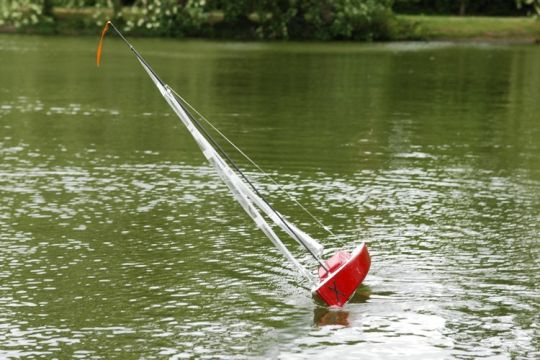
To keep it light (ready to sail , the MiniX weighs just 800 g), the hull is an extruded polystyrene/epoxy resin sandwich (laminated Depron). While this process is not impact-resistant (though...), the structure and sandwich make it very rigid. Together with the deck, the whole thing forms a kind of egg whose strength is astonishing. It's impossible to apply the slightest twist to the hull, despite its lightness (the bare hull weighs just 260 g).
Our yacht has a chine hull. But this doesn't detract from the look, as the chines are largely rounded and, combined with the straight bow, give the illusion of a beautifully shaped hull. When sailing close-hauled, the stern of the MiniX lifts off, limiting drag in the water.
Technical data
- Overall length (with rudder): 56 cm
- Hull length: 51 cm
- Width: 17.6 cm
- Draft: 25 cm (but this may change...)
- Air draft: 92 cm (mast: 86 cm)
- Operating weight (with sails, servos, batteries and keel ): 800 g
- Bare hull weight (without servos and keel ): 260 g
- Weight of ballast: 240 g (but may vary according to draught...)
- Wing surfaces: Jib= 6 dm² GV= 15 dm²
MiniX drawings
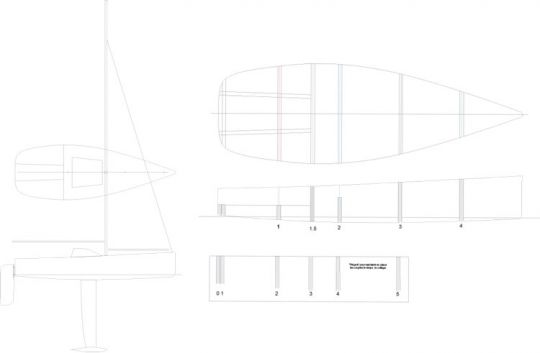
You can download the plans. They're simple and precise. We made our two boats by printing them on a basic A4 printer. Then we simply assembled the sheets by superimposing them and gluing them (repositionable spray glue) to Depron. A sharp cutter is all it takes to build the MiniX with precision.
Just one thing: we've put a lot of heart and soul into building this yacht. We'd be delighted if our experience could be put to good use. Don't hesitate, help yourself! But be so kind as to let us know with a little comment. We'd love to hear from you.
Here you can download the first part of the plan in A4 PDF format .
With this you already have the complete boat. Based on the construction photos, there's not much missing to build the whole MiniX. But since we're taking care of you, here are the sail plans too:
- Mainsail plan
Real sails with webs for their shape.
The construction budget
MiniX doesn't have to be expensive. We've always tried to find a way of "diverting" objects to make our project a reality. So it's hard to come up with an exact budget. It will be higher for someone who doesn't even own the basic tools , and much lower for someone who does it in the back of his already well-stocked workshop.
- 6 mm Depron sheet (2 sheets, 125 x 60 cm)
- Epoxy resin + fillers
- Glass fabric
- 4 mm plywood (a small piece for the keel , keel shaft and rudder)
- Carbon tubes (6 mm for the mast and 4 mm for the booms)
- GV carbon batten (1/10 mm in kite stores)
- Remote control servos kit ( first price: ?60)
- Florist paper for the sails (a good opportunity to give pleasure...)
- Blenderm (surgical tape), available from chemists, to join the sails. Cut the 20 mm roll in half to double its length.
In the end, we estimate a maximum budget of ?120 per boat (calculated in 2021).
Because a construction project like MiniX is above all a team project... And in a team it's good to be complementary.
The MiniX project went through a long phase of gestation - reflection - intellectualization - drawings - exchanges - helping hands to get to this stage. Today, it's sailing thanks to this pooling of skills. We hope you'll enjoy this project as much as we have. And we look forward to hearing from you in the comments or on the forum. Enjoy!

This Is the Easiest DIY Boat-Building Method We’ve Ever Seen
And the guy who discovered it is sharing all of his secrets.

In the summer of 1974, Sam Devlin was working on a tugboat in Alaska when he read the first issue of Wooden Boat Magazine . He was immediately entranced. “I couldn’t shake the image of that wooden boat from my head,” Devlin says. “I can even see it today, almost five decades later.” Devlin had loved boats from a young age and had worked on fiberglass boats in the past, but the process lacked creativity, he says, and didn’t challenge him. This wooden boat, though, was something different.
A natural craftsman, Devlin believed wooden boatbuilding was a career he could be proud of. He leaned into the idea of making vessels that were both beautiful and functional—something that would last. Physical labor suited his strong, tall frame. And as a child of the ’60s, someone who came of age post-Vietnam, he felt the freedom to draw his own roadmap and forgo a traditional career.

However, the wooden boat revival had just begun, and very few builders were sharing their processes. Devlin had to come up with his own from scratch. Starting in 1977 with hand drawings and small, to-scale models, Devlin created hull shapes that looked viable for small sail and motorboats. But one part stumped him: how to fuse the panels together.
Nevertheless, he forged ahead. “My dad agreed to buy the materials if I would build him a boat,” he says. Cutting the hull panels was the easy part. But they needed a method to attach them together. “We looked around the shop and saw baling wire and pliers, and two hours later we had the boat stitched together and looking like the shape we wanted. That was the eureka moment,” Devlin says. He had stumbled upon the stitch-and-glue method.
The stitch-and-glue method is a simple boat building technique popularized in the 1960s that creates a solid, one-piece hull, unlike most other wooden boats, which start with frames and bulkheads and build the hull on top. Using marine plywood panels stitched together with electric fence wire and sealed with epoxy resin, the process eliminates the need for frames or ribs, making it a simpler, faster construction. Stitch-and-glue doesn’t require expensive molds like fiberglass, and can be maintained over the long term, perfect for DIY builders.

Devlin and his father continued to tinker with the shape and construction of their boat. A few days later they had a functional skiff. It wasn’t perfect, but it showed the stitch-and-glue process was more than viable—it had clear advantages over other boatbuilding methods.
Stitch and glue, generally speaking, has a remarkable ability to adapt. Without high tooling costs like most other boatbuilding mediums, it’s more accessible to more builders, which makes for rapid idea evolution and pervasion about the method. “With low barriers to entry from an experience side, we learned a lot quickly,” Devlin says. They learned that if they cheated on the grade of plywood, they would be sacrificing the integrity of the whole boat. They learned to use epoxy resins because they would seal stronger than more popular polyester resins. And moreover, they learned the process, the best order of operations, and how unique it was to quickly go from an idea to an actual, working boat.
Less than a year after finishing his first boat, Devlin embraced boatbuilding as a full-fledged career. Research led him to builders making small boats in England and New Zealand that used a method similar to the one he had devised with his dad, but not at the same scale or complexity he envisioned.
From there, he focused on improving the process. “We needed to nurture the method, testing the parameters and not constraining it with patents,” Devlin says. “My goal from the beginning was to proliferate the knowledge as much as possible and keep persisting and developing my own skills as a designer and builder.

“Most people didn’t see the potential for boats over 15 or 20 feet with stitch-and-glue, but I didn’t believe in that limitation. I hung my boatbuilding shingle on the door of my shop at the time in Eugene, Oregon, and I got my business started in 1978 with 25- and 30-foot boats.” Devlin’s business has grown since then, adding members to his team, expanding his shop, and refining his process. Today he works on a variety of wooden boats, and currently is putting the finishing touches on a 40-foot ocean-going catamaran.
The biggest advancement in the stitch-and-glue method in the past decades has been computers replacing hand drawings. Using 3D modeling and CNC machines to cut out shapes, the panels of the boat are more accurate and easier to work with during assembly. This also allows boat designers like Devlin to ship kits to home builders with precut panels to assemble using their own tools.
In 2012 Devlin received the Lifetime Achievement in Boatbuilding and Design award by the Wooden Boat Foundation and Wooden Boat Magazine , after designing and building over 400 boats (ranging from 7 to 65 feet) with the stitch and glue method, which he helped improve and bring to the mainstream. To this day Devlin is still building boats, from his facility in Olympia, Washington. Here are his tips for making your own.

25 Steps to Building Your Own Stitch-and-Glue Boat

1. | Procure a set of plans, or scaled drawings of what you’re going to create. Devlin creates plans for hundreds of DIYers, detailing the peel shapes and all the materials you’ll need.
2 | If your boat is longer than 8 feet, edge-join the marine plywood panels end to end (called scarfing). If using a kit, the kit manufacturer will provide wave-to-keyhole type indexing to the ends of the panels that will help allow them to be joined.
3 | If you have a CNC router, use it to cut the panels to size (there are usually 5 to 8 for a small, simple boat). Skip to step 14.
4 | If you don’t have access to a CNC router, draw lines across the width of the panel at right angles to the long edge of the plywood, 1 foot apart.

5 | Make marks at the bisects at each line, as shown on the plans, then hammer small brad-type nails (“fence posts”) partially into the plywood at each of those intersections.
6 | Draw smooth curves between these fence posts using a flexible wooden batten to span smoothly between each of the fence posts. When complete, remove the nails.
7 | Saw the panels out, leaving about 1/8 inch extra plywood overhang so you can see the line you drew.

8 | Take both pieces and use a block plane to even them out so they’re symmetrical, smoothing the cutting lines out to the pencil line marks made previously.
9 | Do this for all of the panels of the boat, which together will make up the entire hull.

10 | Use a block plane to knock 45-degree bevels on half the thickness of the panel, on the inside surfaces (where it will mate with another panel).
11 | Scribe a stitch line, usually the thickness of the plywood plus 1/8 inch, and pre-drill small holes as marked on the designs. This works well on the bottom panels.
12 | For larger boats (those above 15 feet long), stitch upside down—it eliminates having to roll the boat over another time. A small boat can be stitched right-side up, because rolling one of these is much easier.
13 | For larger boats, set up the bulkheads, or athwartships (sideways) and longitudinal (lengthwise) structures that add structural strength and help define the architectural space of the boat. For small boats, use spreaders, which are small battens that open the top of the boat to the designed width, to stretch out the shear of the boat.

14 | Start with the two bottom panels laid one over the other (like a closed book) at the bow end and stitch the first two panels together at their keel edges. This process is similar to sewing two pieces of fabric together, but instead of a needle, you can feed the wire through the holes with your hands. It should be tight enough to keep the peels sealed together.
15 | Open the two halves of the bottom panels like opening the pages of a book and fit them over the bulkheads upside down. For small boats, use spreaders to maintain the correct shape.
16 | Repeat this process with each panel, stitching one side and then the other, from bow to stern. When all the panels are in place and the stitches are clamping the panels together into a boat shape, stitch the transom to the ends of the panels. For small boats, add spreaders to open up the top of the boat to the planned size.

17 | Start epoxy tabbing, which is like tack welding, putting epoxy and fiberglass tabs between the wire sutures, on the interior of the hull.
18 | Once the tabs have cured solid, at least 24 hours but maybe more in humid climates, you can pull out all the wire stitches and lightly sand over the tabs to smooth things out.

19 | Finish fiberglassing the interior seams of the boat. Set several layers of fiberglass tape in epoxy resin over the top. Then fiberglass the exterior plywood panel seams.
20 | Once the hull is to the designed thickness and all seams between the panels are taped with epoxy and fiberglass cloth layers, sheath the entire exterior of the boat with epoxy and fiberglass cloth. Some builders use a final layer of peel ply to control the resin-to-cloth ratio and eliminate air bubbles.
21 | Finish fiberglassing the seams of the interior of the boat, starting with narrow tapes up to the final width of the plans designated.
22 | Sand the boat inside and out to help smooth the edges and overlaps of the fiberglassing. Reseal with epoxy resin rolled and brushed over the hull as smoothly as possible.
23 | Sand and seal one final time and roll the boat over.
24 | Install the interior, such as seats, hardware, and the engine.

25 | Paint the entire boat, inside and out. Opaque paint offers the best UV protection, which is important to shield the boat from the sun’s reflection off the water.

Pop Mech Pro

What We Know About India’s Secret New Submarine

Debunking the 9/11 Myths: The Airplanes

We Debunked the 9/11 Myths About United Flight 93

Myths About the 9/11 Pentagon Attack: Debunked

Debunking the 9/11 Myths: The World Trade Center

America’s Secret Race to Recover a Spy Satellite

Scientists Find Groundbreaking Deep-Sea Battery

Archaeologists Find an Ancient Immortality Potion

China Could Build the World’s Fastest Submarines

Robot Dogs Could Make Appearance in Ukraine-Russia
: A Boeing B-52 G 'Stratofortress' long distance bomber.at an air force base: Crew scramble about 1960")
What Would Bombers on “Nuclear Alert” Mean?

Boosting Your Mind With Billions of Tiny Robots
POPULAR SEARCHES:
- Raspberry Pi
- Woodworking
- 3D Printing
- Maker Faire

- All Stories
- Magazine Projects
- Board Guide
- Magazine Issues
Projects from Make: Magazine
Wooden mini yacht.
Build a Wooden Mini Yacht this weekend.

- Time Required!: A weekend
- Print this Project

By Thomas Martin
Thomas martin.

When my son was 3 years old, I made a small bathtub boat with him, using scrap wood and a piece of dowel. It lasted much longer and got more of his attention than any dollar-store bath toy, and about six years later we decided to try building a larger boat for the pool and local ponds we fished.
Here’s the result of our experimentation: a simple and worthy pond sailer that’s rigged and scaled like a real yacht. You can build it in a weekend using readily available materials and tools.
Project Steps
Prepare the sailcloth..
It’s hard to find waterproof fabric that’s easy to cut and won’t fray. You can make your own by stretching ripstop nylon loosely over a frame or 2 hangers, and spraying it lightly (in a well-ventilated area) with polyurethane.
First spray up and down, and then back and forth, until the fabric is well coated but not saturated.
Let dry overnight.
Mark and cut the parts.
Download the project plan and print it at full size. Following the plan, measure and mark the mast, jib boom, and mainsail boom lengths on the ¼” dowel. Trace the hull from the printed pattern onto the top and 2 ends of the cedar block; cut templates or use carbon paper. Draw the keel and masthead crane patterns on the brass strips, and draw the bowser (rigging clip) pattern 8 times on the thin plastic.
Cut and drill all the parts. Any fine-tooth saw will cut the dowel, or you can roll it under an X-Acto blade and snap the score. Heavy-duty shears or a hacksaw will cut the brass; be sure to file away the sharp edges afterward. You can saw or file down the hull’s shape, then use a hobby knife or thin chisel to excavate the slot for the keel. Drill all holes, plus pilot holes for the screw eyes (in the hull, just poke pilot holes in by hand with a thumbtack).
Finally, file, sand, and smooth all parts. The more time you spend here, the better — especially if you plan to use a clear finish over the wood.
Mount the keel.
On the underside of the hull, mask both sides of the keel’s slot with tape. Wearing gloves, and in a well ventilated location, mix and spread some 5-minute epoxy into the slot using a scrap stick or wooden match.
Slide the keel into position and hold it there while the epoxy cures. You can square it up using a business card on each side.
Use a gloved finger to smooth the epoxy along the joint line, and fill any voids with more epoxy.
Finish the wood.
Finish the hull uniformly, or for a big-boat look, paint the outside of the hull and stain the deck.
Sand the hull with 100-grit paper over a sanding block, and again with 150-grit. Apply a first coat of paint or varnish, and re-sand with 180-grit before each subsequent coat.
For a stained deck, first paint the hull upside down, then re-sand the top perimeter to remove any overspray. Rub stain into the deck and edge, let dry, and coat with varnish or polyurethane.
For the mast and boom pieces, bevel the cut edges for a more finished look, then sand with fine grit to remove any fuzz. Stain if desired, and cover with at least 2 coats of varnish or polyurethane sealer, sanding lightly between coats.
Assemble the mast and booms.
Cut a slot in the top of the mast and glue in the masthead crane. Once that’s secure, follow the plan to install all screw eyes: 4 to the mast, 1 on the fore end of each boom, 1 more on the mainsail boom (for the boom vang), and 4 to the deck. Screw these in until the shank of the screw is completely into the wood.
Insert the brass brad down through the hole in the jib boom and bend it into a clew hook.
Use needle nose pliers to open the mainsail boom eye, hook it onto the eye on the mast, and close it. This forms the gooseneck, the joint that lets the boom swing from side to side (far left in the photo). Press the mast down into the hole in the deck with the masthead crane centered afterward, and tap it gently down into its hole with a hammer.
Add the sails.
After the sail material is dry, trace and cut it to the plan patterns. Lay the boat on its side on a hard surface with the masts and booms in place and fit the sails to the areas for rigging. For the grommets, cut a small X at each sail corner, insert a grommet up through the hole, press the cloth down around it, and tap the grommet flat with the eyelet tool until it firmly grips the cloth.
NOTE: It’s a good idea to practice setting grommets first with a couple of sailcloth scraps and extra grommets. It’s time for rigging. Knot and cut a short length of dacron line, thread it through a bowser, and string the boom vang. For these and all other knots, add a tiny drop of cyanoacrylate glue immediately after tying; the line is slippery and won’t hold knots otherwise.
Use 5″ lengths of line to tie each sail grommet to its corresponding screw eyelet or drilled hole with a square knot. You’ll need about 10″ for the top of the jib sail, which threads through 2 eyelets before tying off to the uphaul bowser.
Referring to the plans, tie the 4 lower connections on the booms first, and then add the upper lines for tension, so there are no wrinkles in the sails along the booms. Thread a bowser onto the jib uphaul as indicated: for their final tensions, you’ll adjust the jib using the uphaul at the top, and the mainsail using the boom vang.
For the backstay, tie in a long length of line at the masthead crane and install a bowser, routing the line through the eyelet at the stern.
Tighten the backstay and the sails so that they’re fairly tight but the mast is not bowed forward or aft. Finally, add the 2 lines called sheets. For these, cut two 15″ lines. Tie each one through the hole in the aft end of a boom, thread it through the sheet eyelet on the deck just underneath, then through 2 holes in a bowser, through the other sheet’s eyelet, and finally through the last hole in the bowser, doubleknotting the line.
NOTE: It’s important to tie the bowsers exactly as shown on the plan to make them work. The sheets let you adjust the angle (trim) of the sails — slack for downwind sailing or tight for crosswind — letting you cross a pond or pool in any direction that isn’t too close to directly upwind.
This project first appeared in MAKE Volume 20 , page 56.
From the Shed: New Arrivals

DIY Arcade Joystick Kit

Make: Arduino Electronics Starter Pack

Maker's Notebook - Hardcover 3rd Edition

Transistor Cat Kit

Our websites use cookies to improve your browsing experience. Some of these are essential for the basic functionalities of our websites. In addition, we use third-party cookies to help us analyze and understand usage. These will be stored in your browser only with your consent and you have the option to opt-out. Your choice here will be recorded for all Make.co Websites.

Escape to an island of imagination + innovation as Maker Faire Bay Area returns for its 16th iteration!
Prices increase in.....
- For Sale/Wanted
- Readers Tips
- Your Yarns.
- Restoration
- Miscellaneous
- DIY Boat Yards
- Boat Building
- Cabin Cruisers
Free Boat Plans
- Begin Boating
- Boating Terms
- Ropes and Rigs
- Just for Fun
- Celestial Navigation
- Passage Planning
- VHF Marine Radio
- Boatbuilding Tips
- Stitch and Glue
- Epoxy Resin
A selection of Free Boat Plans that can be viewed and / or downloaded.
These free to download wooden boat plans (pdf) were first published in magazines such as "Popular Mechanics", "Popular Science" and the "Boat Builder's Handbook".
- Rowing Boats
- Sailing Boats

Back Issues for Sale
"Popular Science" magazine and "Popular Mechanics" back issues can be viewed online at Google Books.
All these free boat plans can be built by anyone with a common sense modicum and a few basic woodworking skills and tools. However, if you have not got the skills and tools yet, this is a great way to acquire them.
One of the beauties of building yourself is that you do not have to buy everything at once, just get what you need when you can afford it.
While some of the instructions suggest using exterior plywood, I would always recommend using marine grade.
If you need help with lofting out the plans click here for an article here which should help.

Canoe Free Boat Plans

Combining the features of both kayak and canoe, "Blue Bill" is for those out-of-doors-men who hunt or the sportsmen who need an ultra-light-weight portable boat for use upon any waters.
Besides being usable to build a double-end paddling model, a few changes permit the plans to be used for making a canoe that will accommodate outboard motors up to 6 hp. for swift, speedy transportation on any stream or waterway.
Weighing only 75 lbs. complete, "Blue Bill" is easily transported atop an auto anywhere.
Click Here for the Plans

This kayak is the answer for young people who want to build an inexpensive boat for summer fun. A shop full of power tools is not necessary, either. All the work can be done with ordinary hand tools and a few C clamps. This Free Boat Plan will carry one adult but it's handiest when paddled by a youngster. The boat is stable in the water and, even though it can be turned over, it will not sink. It's also light enough to be carried with ease. Building is so simple that the 'Jig' consists of only two blocks and a few bricks.
Hunting Kayak

For many years a favorite of hunters, trappers and traders the kayak now is as popular with Europeans as the outboard boat is with Americans.
Although this boat was designed to carry two people, it will accommodate three in a pinch and gear may be stowed under fore and after decks.
A few strokes with the double paddle will send it gliding across the water with the minimum of effort on your part.
Kayaks are surprisingly seaworthy, too — more stable than a canoe, in fact, because the occupants sit on the bottom of the hull which lowers the center of gravity.
Pintail and 10ft Duck Boat

'Pintail' drawn from plans by Wm D Jackson is another of the Free Boat Plans from the 'Boat Builder Handbook'. This one is being built by Greg Allore .

If you have ever struggled with the oars of a heavy, slow-moving rowboat and then paddled a swift, high maneuverable canoe you can appreciate why many true sportsmen prefer canoes.
But, too often, the multi-ribbed conventional canoe is not only hard to build but too thin-skinned for hard usage.
This Free Boat Plan teams up plywood and fiberglass to produce a tough, scrape-proof canoe you can build in one-tenth the time it would take you to turn out a conventional canoe.
The use of only one frame offsets the extra weight of using plywood, so that this canoe is still light enough for comfortable portage.
Little Chief

Little Chief is a canoe with many virtues, ideally adapted to quick, easy construction.
Canoes are not easy to build, but here is one Free Boat Plan that can be made of ordinary materials for a fraction of the cost of conventional canoes.
It has attractive molded lines and may be built either as a paddling model or, with slight changes, adapted for use with small outboard motors.

In all countries of the world, particularly the United States, the kayak is enjoying newfound popularity.
Here's a nimble, lightweight craft that has its roots in the Arctic as a basic instrument of survival, yet is branching out as a modern outdoor sport on our own rivers and lakes.
To the Eskimo, a kayak is more than a boat.
When he's laced into his whale-bone and walrus-hide craft, he's ready for anything in the way of water or weather.
To most of us, however, a kayak is pure adventure and fun.
It's perfect for poking around uninhabited Islands, exploring the bends of a lazy, winding river, or just breaking the peaceful surface of a placid lake at sunset.
Redwood Canoe

You can build this 74lb, 16 foot canoe using redwood strips, an old boat-building technique.
Two persons can sit side by side in the center with one person at each end and plenty of room for gear.
This canoe is formed around plywood templates using redwood strips glued edge to edge.
You lay up the strips, remove the form, and the canoe is complete, except for fiberglassing and putting in the seats.
The plans can also be used to build a 13-foot version of this strip planked canoe.
or Click Here for the Free Plans

Houseboat Free boat Plans
Budget houseboat (trailerable).

The Budget Houseboat is like a camper that goes on water.
She's 20 ft. long with a 9-ft. beam, containing 300 sq. ft. of usable floor area.
This means that while she can accommodate two in outrageous comfort, she can easily take a family of four on an extended vacation and be entirely self-contained.
There are two full-size permanent bunks in the forward section of the cabin.
The dining table, in the rear section of the cabin, seats four and then drops down to convert into an extra bunk 6 ft. 4 in. long and 38 in. wide.
Cabin headroom is 6 ft. 2 in., and two cots can be stationed to the rear of the cabin area.
Bayou Belle

Bayou Belle is a 25' scow that can be built as a sports utility, a fishing boat, or a houseboat, depending on your requirements for pleasure offshore.
As a sports utility, she can be used for towing water skiers and for cruising, as a fishing boat, she offers a stable platform with plenty of elbow room and stowage space.
As a houseboat, she has roomy interior accommodations for a leisurely life afloat.
Construction of Bayou Belle makes use of prefabricated sections, which means that much of the work can be done indoors in the average garage during the cold winter months, and the boat completed outdoors in time for launching in late spring.
Float-A-Home

A houseboat is a unique water craft in that it combines most of the comforts of home with the mobility of a boat.
Of course, use is limited to sheltered waters, and speeds are slow in comparison to more sea worthy vessels.
Float-A-Home is a 21-footer that provides plenty of living space for three or four persons.
An extremely simple houseboat to build, the free boat plans feature a strong hull with a heavy keel and close-spaced framing.
This, coupled with a relatively low profile, makes it a very stable craft.
Click Here for the free Plans

Previous posts
See What Others Have Posted

Recent Articles
Boat Winches
Jun 21, 24 04:18 AM
- Boat Plan Books
- Glass Cloth
- Strip Plank
You might like these

Knotty wood, problems with boat building timber.
Knotty wood, how to avoid structural problems with knots in lumber when using softwood timber for fitting out and boat joinery

Build a Boat, tips for the DIY Wooden Boat Builder.
How to Build a Boat, Wooden Boat Building methods for the DIY, backyard, self-builders explained, carvel, lapstrake and plywood

Wood Screws for Boat Building and Repair.
Wood Screws are the most widely used and versatile fasteners used on wooden boats. Which type to use and how to use them
Wood, Environmentally Friendly Boat Building Lumber.
Make sure that the Wood that you buy and use is sustainably grown and harvested.

Timber, Lumber for Boat Building.
A brief description of the most common Timber used for building Wooden Boats how to choose wood for your project boat
Timber Properties
A brief guide to timber properties and wood, characteristics such as strength, stiffness and elasticity for choosing lumber for wooden boat building and restoration.

Rivets and Copper Rove Wood Boat Fastenings.
How to use Copper Rivets and Roves construction guide to fasteners on your wooden boat.
Ring Nails for Marine Fastening.
Ring Nails sometimes call Gripfast or ring shank, silicon bronze boat nails are renowned for their holding power. but how to get them out?

Plywood and Veneer Guide for Marine use.
A guide to plywood for boat building and why you should use the best marine grade you can afford.
Glue for Wooden Boat Building
Which Wood Glue to use when building or restoring a wooden boat, resorcinol to epoxy.
Owens Boats
Jun 05, 24 12:14 PM

Penn Yan Boats
May 28, 24 07:51 AM
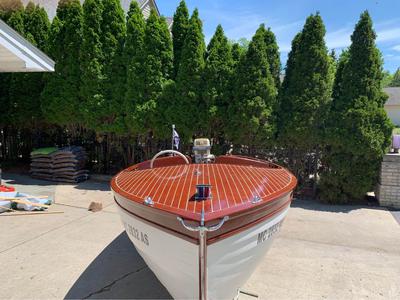
Wooden Boat Restoration, Repair and Maintainence.
Wooden boat restoration, how to fix up an old wooden boat, one of the cheapest ways to get afloat and have a boat to be proud of.

Epoxy Resin for DIY Wooden Boat Building.
A guide to the epoxy resins and sustainable enrtopy resins to use when building wooden boats with marine plywood.
Wood Rot Repair and Treatment
Wood rot in wooden boats, how to treat, repair and replace rotten timbers in a wooden boat
Vintage wood Boat Bottom Replacement
The ultimate bottom repair for a vintage wood boat, when re-caulking the planking on your classic antique boat

Surveying a wood boat
The problem areas to look out for when surveying an old wooden boat.
Initial Boat Survey Checklist
The initial survey questions to ask when looking at a Wooden Boat with a view to restoring or renovating

Stem and Stern Post Rebuilding
Repairs to the Stem of a wooden boat can be undertaken by the amateur with a little care and attention.

Planking a Carvel Boat
How to replace damaged or unsound carvel Planking, a guide for any reasonably competent amateur.
Iron Keel Rust Removal
Keel rust, how to remove rust from an iron keel and treat it prior to repainting your wooden boat restoration project.

Wedge Seam Construction
Wedge Seam Construction method for wooden boat building and glued wedging or ‘splining’ as a restoration technique for restoring old carvel planking seams.

Privacy Policy
Advertising Policy
Cookie Policy

I am perfectly aware that the majority of Wooden Boat aficionados are sensible folk. However, I need to point out that I am an amateur wooden boat enthusiast simply writing in order to try to help other amateur wooden boat enthusiasts. And while I take every care to ensure that the information in DIY Wood Boat.com is correct, anyone acting on the information on this website does so at their own risk.

Introduction: Mini Boat

Have you ever wanted to build a boat? How about a really ( really ) small one?
If so, you may be interested in building this 6-foot mini boat.
Here are the highlights:
- Super darn cute and a joy to ride.
- 100% electric propulsion from an outboard trolling motor.
- Made from precision laser cut components.
- Interlocking assembly means no jigs required.
- Simple and quick cable-tie and epoxy construction.
- Interior bulkhead design keeps it floating even when flooded.
- Steers with a beefy plexiglass steering wheel.
- Low and comfortable seating position.
- Surprisingly stable flat-bottom hull design.
- Reliable and accurate steering geometry.
- Convenient cubby storage (above dash).
- Additional behind-seat storage.
- Designed to fit a 6'2" tall rider 200lbs or less.
I was inspired to build my own mini boat after seeing a few others, most notably Paul Elkin's 8-foot "Little Miss Sally". Be sure to check it out.
I wanted mine to be a 6-foot boat so that I could say: Neener-neener Paul, my boat is smaller!
For more fancy product-shots, videos, and info on my mini boat, please visit my website: https://rapidwhale.com/mini-boat.php
Thanks, and enjoy. -Josh!
Step 1: Design (or Purchase) Your Boat Parts.

You can design your own boat referencing this workflow, or you can buy a DIY Kit or Plans from my website .
As with most of my projects, I spent more time designing than actually building. Here's what my design workflow looked like for this project:
- Sketch a desired shape.
My concept sketch started on a sticky-note (don't they all?). That sticky-note sat in front of my desk for a few months as motivation to actually start such a daunting project. The sketches that followed were drawn with more realistic proportions in order to actually fit myself into the boat.
- Model it in CAD.
I imported my favorite profile sketch into Solidworks and designed around it. I simulated the material and water-displacement in order to determine my vessel's center of gravity and center of buoyancy. The relationship between center of gravity, center of buoyancy, and hull shape is critical for determining (or estimating in my case) boat stability. I wasn't keen on designing an unstable boat, so I began tweaking my design as I went in order to make it more stable.
- Build and test a scale model.
I laser cut a 1:2.2 scale model to test in my friends hot tub (hot tub jets make for an awesome choppy-water simulation by the way). I loaded up the scale model with weights to match. The scale model floated, but it wasn't quite as stable as I was hoping for.
- Adjust the CAD model.
I took what I learned from the scale model and adjusted my CAD model accordingly. I needed to move the center of gravity forward, and I needed to slightly modify the hull-shape. Sounds simple, but that meant 40+ more hours of design edits. Ouch.
- Cut / Print the Full Scale Boat Parts! To build the full-scale parts meant a lot of laser-cutting and 3D printing. I actually cut / printed enough DIY Kits for 3 boats. My Dad and a friend of mine also wanted to build their own.
Step 2: Gather Your Supplies

In addition to the custom components that you created (or purchased as a DIY Kit) you will need to purchase a variety of off-the-shelf components. This will cost you an additional $500 - $1,100 depending on how crafty or fancy you are.
Here is a link to the complete Bill of Materials .
And here is a part list overview:
- Trolling Motor
- Motor Connector Plug
- 12V Battery
- Battery Straps
- Quick-Cleats
- Stir Sticks
- Chemical Foam
- PFD (life vest)
- Emergency Paddle
- Dean's Connector
- Dead Mans Cable
- Fillet Tools
- Fiberglass Tape
- SS Hardware
- Vinyl Tubing
- Hook and Loop
Step 3: Build Sub-Assemblies

- Glue the top and bottom of the seat base together and let dry under weights.
- File any excess dried glue out of the pockets.
- Glue in the rest of the seat base assembly.
- Clean up the glue before it dries.
Steering Wheel:
- Glue the center of the steering wheel assembly together. Take note of which side is routered. You can use Acrylic Cement, CA Glue (Super Glue), or Epoxy.
- Glue on the front and rear pieces of the steering assembly. Take note of which side is routered.
- Sand it to a nice uniform matte finish. This helps hide any unsightly gluing jobs.
Steering Drum:
- Glue the matching sets of the sub-assembly together.
- Let them dry under clamps and weights. Binder-clips work best!
- Sand any excess glue off the surfaces.
- Stack and glue the drum sets and let dry under weights.
- Scrape off any excess glue.
- Cut the motor shaft to length such that the total exposed shaft length is exactly 22.35". Use a metal conduit rod (as pictured) to ensure you do not cut (or drill) through the wires. You can also use that small motor-shaft sleeve as a guide for cutting. Rest a hack-saw blade on it, as we will not be using this sleeve in the final assembly. Remove the sleeve and leave only the motor mount on the shaft after you are done cutting.
- Use the 3D printed hub as a guide for drilling the holes. Obviously don't drill through the metal conduit that is protecting your wires. That means you will need to drill 4 total holes. Align the hub before your start drilling to ensure your steering drum will be facing the correct direction when mounted. Look at the propeller mounting location when determining alignment.
- Remove the protective metal sleeve that was protecting the wires.
- Ensure the only loose item on the motor shaft is the motor-mount itself. No other loose items should remain on the motor shaft. That sleeve should not remain.
- Epoxy the steering drum hub to the wooden spokes. You will want to dry-fit the spokes first to ensure they seat properly before applying epoxy.
- Quickly epoxy the Hub/Spoke assembly into the drum assembly. You may want to use a little hammer-force to ensure it all goes together smoothly.
- Drill an access hole (likely 1/2") into the assembly so that you can fit the bottom bolt. Grab one of the 2.5" long 1/4-20 bolts and test-fit to ensure you drilled out enough.
- Press-fit the delrin thrust bearing into the 3D printed steering drum hub. I have already inserted in in some kits, in which case just make sure it is there.
- Attach the steering drum to the motor shaft. It's very tricky to feed the hardware through the motor shaft without pinching the internal wires. You will want to use a smooth, rod (perhaps one with a cone-tip) to feed through first, in front of the hardware to more easily separate the internal wires, then drive the bolt in right behind it. Alternatively, one customer decided to thread in QTY: 4 smaller bolts from all sides that do not pass all the way through the wire area of the shaft. That customer used QTY: 4 of 3/4" length bolts instead of QTY: 2 of the 2.5" bolts.
Step 4: Prep for Assembly

Epoxy the Puzzle Joints:
For the sake of shipping (and manufacturing) some of the larger plywood pieces are split into multiple pieces. You must therefore epoxy together all of the puzzle joints in order to create the larger pieces of the boat. These puzzle joints end up being just as strong, if not stronger, than the rest of the plywood. So fear not, your puzzle joints are rock-solid.
- Run a small amount of 5-minute epoxy (or marine epoxy) along both edges of the puzzle joint.
- Use a flat board as a press. Wax paper can be used to keep the epoxy off the flat board.
- Stomp on the board to ensure a flush press-fit of the puzzle joint.
- The press fit should be tight enough that you do not need to use any serious clamps. Just use binder clips on the corners as pictured.
- Repeat for all puzzle joints.
- CRITICAL : When gluing the nose pieces (of the hull-sides), triple check that they will be glued such that the bottom of the boat is FLAT (not curved). This is a FLAT-BOTTOM boat. It is easy to make this mistake.
Glue Motor Mount to Transom:
This is where the removable trolling motor will tighten-down onto your boat. So it will need to be re-enforced as follows.
- Apply liberal amounts of wood glue and stack the pieces accordingly. Be sure the cable-tie slots are all aligned. You may want to avoid excess glue in these areas or you will need to scrap it out to fit the cable-ties through later.
- The piece with the two holes (pictured) is the top-most piece to be stacked. Put it on last.
- Be sure they are all perfectly aligned and let them dry under weights. Your battery makes a very good weight.
Sand Puzzle Joints Flush:
- Sand the puzzle joints after the epoxy has cured. Don't go too crazy with the sanding, you are just trying to remove the excess epoxy from the visible surface. You don't need to do much sanding at all to the non-visible side.
Trace and Cut Fiberglass:
- Use the newly formed pieces to trace and cut the fiberglass accordingly. Cut the fiberglass right on the line because you will not want this fiberglass to wrap around any edges (that's what the 3" fiberglass tape is for).
- You will be fiberglassing: The entire hull (including the transom), the deck (optional), and the floor of the cabin (where you sit). The floor of the cabin is not able to be traced since the shape is not obvious, you can cut that piece after assembly of the plywood or you can try to guess as to the shape by tracing and cutting a second bottom-hull piece and trimming off where the inner bulkheads will go.
Step 5: Assemble the Boat

Begin Cable Tie Assembly:
- Knock out the large circle in the bulkheads. You will be using this opening to fit an arm into the bulkhead in order to apply the necessary epoxy fillets.
- Attach the bulkhead plywood to the base of the hull first. Ensure the cable ties are oriented such that the heads are visible after assembly.
- Attach the sides of the hull, and the transom next. Leave the cable ties loose for now, such that adjustments can still be made.
- Carefully form the hull shape by bending the plywood and attaching cable ties accordingly. If you bend too quickly, or unevenly, then you may crack the plywood near the kerf-cuts. You can repair any cracks with epoxy later. To ease bending, consider a poor-man's steaming technique utilized by applying water and running a clothes-iron to force steam into the wood.
- Attach the dashboard. You will also want to glue the two small pieces to the dashboard, and possibly cut the profile of the dead-man's Dean's Connector before assembly. Reference the pictures.
- Attach the piece (that is similar in shape to the dashboard) to the bottom of the deck.
- Attach the deck.
- Attach the small pulley block pieces connecting the dashboard to the similar shaped piece.
- Begin cinching down all of the cable ties. The wood pieced inter-lock, and you are left with an edge as pictured if you are doing it right.
- Snip the dangly-bits off most of the cable ties. So that they don't get in the way as you begin the next step. At this point your entire boat should be assembled, minus the plywood windshield piece which will go on later.
Epoxy Fillet Hard to Reach Corners:
- Mix epoxy and Wood Flour until you get a peanut-butter consistency. It takes a good deal of Wood Flour, and it's better to error on the side of too stiff than too runny.
- Use the Icing Bags to apply the newly mixed peanut-butter-like epoxy. Cable-tie the back so that there is no chance of a leak from the wrong end.
- Channel your inner contortionist as you try desperately to fillet all of the corners INSIDE the bulkhead. This is by far the most challenging part of the construction. You will have to apply the fillets blind because unfortunately there isn't enough room to get a head AND arm into the bulkheads. Use a phone to take a picture of what your progress looks like, and repair the fillets accordingly. Use the wooden fillet tools if that is helpful.
- Apply fillets to the inside of the transom. (back of boat) Run a wooden fillet tool over the fillets to make the them perfect. Do that for as many fillets as you can.
- Apply fillets to the inside of the nose. (front of boat)
- Apply fillets up under the inside of the deck. At this point nearly every cable-tie and corner on the inside of the boat should be covered in an epoxy fillet. The only exception being the base of the floor of the cabin (where you sit). That spot will have its cable-ties trimmed and fillets applied after pouring foam.
Fill Bulkheads with Foam:
The bulkheads should be air-tight once construction is completed. The foam is just there to ensure that even with a leak, the bulkheads will still displace water. The purpose of the bulkheads is to provide flotation to a flooded boat. You can pack the bulkheads with pool noodles or just leave them empty if you don't want the redundency and professionalism that two-part foam offers.
- 5-Minute Epoxy the small wooden tabs into the back of the bulkhead hole. You will use these tabs to...
- 5-Minute Epoxy the large wooden knock-out panel back into the bulkhead. Align the grain if you want to be fancy, and ensure the small hole is punched out beforehand.
- Ensure you epoxy all around the knock-out panel. Otherwise the foam may push it out as it starts to expand.
- Quickly mix the foam.
- CRITICAL : Only mix as much foam as you need. (Assuming 2 lb density: You need 1/4 gallon of A + 1/4 gallon of B mixed well and then poured into each bulkhead). Follow the directions on the label. Confirm volumes. Do not pour too much or you risk injury, death, and blowing up your boat. I'm not exaggerating: Pour-foam can create a LOT of pressure.
- Pour the foam. It will quickly start to expand, so rock the boat such that the still-liquid foam gets evenly distributed throughout the bulkhead. That way as it expands, it fills the entire cavity evenly. The foam gives off a good amount of heat and creates a good amount of pressure. If you do everything right, most of the bulkhead plywood should be warm, and the foam should exit out the small hole opening. Wait for the foam to cure.
- Seal the bulkhead by carving out excess foam and gluing in the small plywood circle. Align the grain if you want to be fancy.
Continue Assembly:
- Snip the cable-tie heads off the floor of the cabin (where you sit). The now-cured epoxy fillet that you laid along the inside of the bulkhead will hold this piece in place.You are snipping these cable-tie heads off so that you can more easily run a fillet bead.
- Apply a fillet along the base of the floor of the cabin (where you just cut the cable-tie heads). As usual, clean it up with a fillet tool. At this point every single corner inside the boat should be covered in a nice looking epoxy fillet.
- Cable-tie the plywood windshield together. Keep them fairly loose for now and ensure the cable ties are oriented such that the heads are visible (outside) after assembly.
- Attach the windshield to the deck w/ cable-ties. It is easiest if these cable ties are already fed through the slots in the deck before placing the windshield (as pictured previously).
- Cinch down all the cable-ties. It helps to use needle-nose pliers.
- Epoxy fillet all inside corners of the windshield area, even those inside corners where the windshield meets the deck. This ensures a permanent bond to the rest of the boat. Let the epoxy cure.
Step 6: Admire Your Work Thus Far.

You just turned a pile of wood into a shape that resembles a boat! Yeah, we built three of them.
Step 7: Waterproof the Boat

Prep the Interior:
- Sand off any excess epoxy and ensure the wood is clean and even.
- Vacuum the entire interior.
Waterproof the Interior:
- Cut and layout a sheet of fiberglass all along the floor.
- Wet-out the fiberglass with epoxy. It doesn't have to be pretty since it's just the floor, which will eventually be covered with carpet, but try and keep air-bubbles to a minimum.
- Epoxy coat the entire interior, starting with the harder to reach spots like the nose, transom, and inside the windshield piece. I would suggest putting the epoxy on heavy in the hard to reach areas since no one will be seeing those areas. Let the epoxy cure overnight.
- Pro Tip: If you wash the recently cured epoxy with soapy water, you can remove a residue layer that clogs sandpaper. Otherwise your sand paper gets immediately clogged whenever you sand fresh epoxy layers.
- Lightly sand all of the visible epoxy and re-coat the interior with another coat of epoxy.
- Epoxy coat the seat base and the steering drum while you are finishing up. No need to have multiple layers of epoxy on these parts.
Prep the Exterior:
- Snip all of the cable-ties flush with the plywood.
- Epoxy fillet all of the exterior corners. Reminder: Fillets should be created with epoxy that is made to be a peanut-butter consistency with wood flour. Be sure to get enough epoxy in those corners such that you can later sand them into a round-over.
- Jam that same thickened epoxy into all of the kerf-cuts on the nose of the boat.
- Jam that same thickened epoxy into all of the small gaps/voids all around the exterior. If you can fit a fingernail in it, fill it. This is to ensure you don't get air bubbles when you lay out and wet your fiberglass.
- Sand all of the epoxy corners to make them rounded.
- Sand the nose and the rest of the exterior to remove excess epoxy.
- Fill-in any nooks or bubbles that didn't get filled with epoxy the first time. Sand flush after curing.
- Vacuum the entire exterior and then rub it down with Denatured Alcohol to ensure it is as clean as possible and ready for waterproofing.
Waterproof the Exterior:
- Cut, layout, and wet-out strips of fiberglass tape all along the corners of the hull. Try and keep air-bubbles to a minimum and wet the entire thing out from edge to edge. It tends to stay put once wet, but keep an eye on it to make sure it doesn't wonder. be sure to cover all of the edges of the hull, and then let cure.
- Lightly sand all of the edges to get them somewhat flush with the hull panels. Don't sand the rounded corners at all, as it's too easy to accidentally sand through the fiberglass at this point. Hit them with a handheld sanding pad if need be. Just light sanding is all that is required, knocking down any obvious problem areas.
- Layout and wet-out the pre-cut sheets of fiberglass for each hull section one by one. Repeat until the entire hull is covered in glass and epoxy is cured. If you did it right, there will be no air-bubbles and look like shiny wood.
- Lightly sand the entire hull. Avoid sanding the rounded edges, just focus on the surfaces for now.
- Clean the hull w/ a vacuum and Denatured Alcohol.
- Coat the entire hull in epoxy, lightly sand / clean / and repeat.
- Ultimately you should have 1 layer of wet-out glass, and 2-3 coats of epoxy on top of that.
Now we are going to do those same steps to the top of the boat:
- Flip the boat over and begin working on the deck. I stained my deck, but I wouldn't advise putting a dark stain like mine under a layer of fiberglass/epoxy because as you can see it showed all sorts of epoxy errors. I'll later go on to paint over this deck, so it didn't end up mattering in the end. I'm still glad I stained my wooden windshield piece though.
- Layout and wet-out the pre-cut deck sheet of fiberglass. If you decide not to glass the deck, then skip this step.
- Cut, layout, and wet-out strips of fiberglass tape along all of the corners of the deck. You can also do this when you are working on the corners of the hull, the order is not critical.
- Coat the wooden windshield piece in epoxy while you are at it. This piece does not need fiberglass.
- Lightly sand the entire top side of the boat. Avoid sanding the rounded edges, just focus on the surfaces for now.
- Drill and clean up any areas in the fiberglass that are meant to be openings.
- Clean and wipe down the boat.
- Coat again in epoxy, lightly sand, clean, and repeat.
- Ultimately you should have 1 (optional) layer of wet-out glass on the deck, and 2-3 coats of epoxy on top of that. At this point your entire boat is waterproof and every square inch is covered in epoxy.
Step 8: Paint (optional)

Prep for Paint:
- Ensure the surface is smooth. Sand with 220 grit sandpaper to knock down any imperfections. It doesn't have to be absolutely perfect since marine paint calls for at least 3 coats.
- Wipe the surface clean. Denatured alcohol is your friend.
- Tape the area to be painted. I'm not a fan of blue painters tape, so I tend to use thin green automotive tape anywhere paint will touch tape. I use the blue stuff to block off large areas.
- Follow the directions on your paint can.
- Paint on your first base-coat. Move fairly quickly and in an orderly fashion to ensure newly applied paint always hits wet paint.
- Sand, clean, and re-paint as many times as desired. Typically marine paint will call for 3 coats minimum. I did 3 coats.
- Peel off the tape!
Step 9: Varnish

Varnish is a necessity evil in order to protect your exposed epoxy from harmful UV rays.
- Prep the surface for varnish by cleaning it and wiping with denatured alcohol. If you painted part of your boat already like I did, you are going to want to tape off the paint to protect it from the varnish. You only want the varnish going over epoxy, not paint. And you don't want paint going over varnish, so if you plan on painting your boat tape off that paint area.
- Follow the directions on your varnish can! It is absolutely critical that you stir the varnish thoroughly before and during use. If you don't, then you run the risk of applying varnish that will never cure (ask me how I know). And not all varnishes are created equal. I tested two and put the better one in the bill of materials.
- Apply your varnish with a brush to all surfaces that will be exposed to the sun. I found that using the cheap disposable brushes was fine if your application technique is adequate. I would avoid applying it to any surface that is not exposed to the sun. I had issues with it not curing fully when I put it where the sun don't shine.
- Most varnishes will require you to sand w/ 220 grit after waiting at least 24 hours between coats for a minimum of 3 coats. I did 3 coats. The varnish I link to in the bill of materials allows for a wicked-fast application process than allows you to knock-out all varnish coats in a single day.
- Varnish your steering drum while you are finishing up.
Step 10: Final Assembly and Wiring

Begin Assembly:
- Bolt on the rear pulleys. The 3D printed spacers keep the pulleys level when mounted on the curved deck, and the smaller spacer goes under the deck (not visible) to keep the nuts level. The cover is held on with the one inner-most bolt, so tighten that bolt up last, after you place the cover. There are mirrored pieces for port and starboard sides, so no two pieces are identical. Pay attention to how your are assembling them and don't mix up the covers.
- Bolt on the front pulleys. Bolt them on staggered. Meaning: If you bolt one closer to you (as pictured) bolt the other one (on the other side) further from you. You need the pulleys to be staggered so that the rope runs through them and around the steering shaft smoothly. Use the fender washers on all spots where washers touch wood.
- Bolt on the Quick-Cleats to the steering drum.
- Bolt on the Delrin steering shaft bearings. Float the steering shaft in them as you tighten down. That way you can rest assured the two shaft bearings are concentric to the shaft after tightening.
- Drill holes in your steering shaft according to the note.
- Bolt the 3D printed steering hub onto the shaft and bolt the steering wheel onto the hub.
- Install the steering shaft into the boat and bolt on the final 3D printed steering shaft piece to hold it all in.
- Press-fit the motor controller. It goes in from behind the dash, and you may need to spend some time filing excess epoxy to get it to fit perfectly.
- Press-fit the 3D printed motor controller knob onto the motor controller shaft. That holds the motor controller in place.
- Attach the straps, seat, and hook-n-loop strips to the seat base. Be sure to thoroughly clean the seat base where you plan on attaching the peel-n-stick adhesive.
- Review the schematic.
- Wire the motor. Its never a good idea to use smaller wire than stock, and this motor comes with 10 AWG wire, so I would suggest sticking with that, and even transitioning to 8 AWG wire for the wire harness inside the boat.
- Run the motor wires through tubing (1/2" ID, 5/8" OD was the ideal size).
- Connect the motor wires to the trailer hitch connector. I didn't need to solder directly to this connector, I was able to tin the wires then file 'em down to fit inside the holes. If you strip a bolt, or can't get the wires to fit, then I wouldn't hesitate to just solder direct.
- Create your Dead Man's Switch. Use a proper Dean's Connector, which is rated for something like 60 amps, which is fine for the trolling motor which calls for peak current of 40 amps.
- Begin creating the wiring harness. You will want to measure, perhaps with a string, and cut your wires accordingly.
- Drill your own volt-meter and light-switch holes in the dash if you plan on having those features. I would suggest clamping on a sacrificial piece of wood to reduce the change of splintering the back side.
- Install the light. Use a gasket.
- Install the main wiring harness you created. I ran the wires through a large diameter tube and hot-glued the ends in an attempt to waterproof them. It's not necessary though, you could just run cable-ties every 6 inches.
- Wire in the fuse. It should be as close to the battery terminal connection as possible. I mounted mine up under the deck where the trailer connector is located (see pic).
- Connect the wires to the in-dash motor controller (reference wiring diagram).
- Cable-tie the wiring harness out of the way. Alternatively, you could drill a hole in the further wooden piece to run the wires through that. Try and coat the edges of any hole you drill with epoxy (5-minute epoxy is fine) in an attempt to maintain waterproofing of the wood. The wiring harness should look clean and tidy if you did a good job with cable-management.
Continued Assembly:
- Install the seat. Make sure to clean the floor of the boat to ensure the peel-n-stick adhesive on the hook-and-loop tape will stick. I would suggest doing a test-fit before adhering to the boat. I installed my seat such that in the fully open position, it was just barely touching the wood behind it. I had read that these seats do not like a lot of weight reclining on them, so I think it is a good idea to have it butt up against the wood support as I did. Mark the perfect location so that you can place it there again with adhesive. You will not get a second shot at this, and the industrial grade hook-and-loop is pretty much a permanent mounting solution.
- Run the rope. It is critical that you run the rope as pictured. If you deviate from this, then you will either limit your steering ability, or have backwards steering.
Step 11: Document and Enjoy.

Be sure to check out the other info, pictures, and videos on my website: https://rapidwhale.com/mini-boat.php
Thanks. -Josh!
18 Homemade Wood Boat Plans You Can DIY Easily

While the blissful and fun feeling a wooden boat offers while cruising in the calm waters is unparalleled, it is sometimes a luxury we cannot afford. Yes, quality wooden boats can cost a fortune!
How’d you like it if we say you can DIY a fantastic wooden boat from scratch all by yourself and for much cheaper?
It is an unmentioned fact that you’ll need a couple of pairs of helping hands and at least a basic woodworking skill, but the trouble you go through is so worth it in the end. We cannot wait any longer! Read on to find out 18 brilliant DIY wood boat ideas.
Table of Contents
1. Build a Boat Out Of Pine Wood
2. how to build a wooden boat, 3. 10 minute boat build || boat build start to finish, 4. how to build a wooden boat, 5. building a cedar strip canoe (full montage), 6. the ultimate 5-day diy plywood boat build, 7. wooden boat build (part 1), 8. how to build a wooden boat step by step, 9. fastest wooden big boat modern technology, 10. diy balloon-powered wooden toy boat, 11. wooden boat build – 17ft flat bottom skiff, 12. build a wooden boat, 13. to build a wooden boat: chapter one, 14. building a wooden boat, 15. amazing modern technology skill wooden boat building process, 16. how to build a boat, 17. building a wooden boat in my garage, 18. building a wooden deep v skiff.
Woodworking Tools in this video demonstrates a fast-forwarded tutorial on building a small wooden boat using pine wood.
On the downside, if you’re a beginner, you might find this tutorial hard to follow, as no specific instructions or step-by-step elaboration is given in this tutorial. Nevertheless, if you’re a fantastic observant, the DIY process is quite clearly demonstrated.

Are you a DIY noob when it comes to boatbuilding? If yes, we’d highly recommend this guide by Deep Sailing . A major decision one has to make while DIYing a wooden boat is to select the type of wood you want to work with.
Luckily, you’ll not only find step-by-step DIY instructions in this post but will also be provided with details on types of wood and different DIY boatbuilding methods . This post is a gem!
With proper tools and mediocre handyman skills, one can easily replicate what the Youtuber from Bourbon Moth Woodworking has accomplished in this video.
The end product is fantastic. So are the comments in this video. What’s more, this channel features plenty of other fascinating DIYs. Do check them out!

So, you’ve decided to build a wooden boat from scratch but don’t know where to start? Well, we’d say right here!
Gather supplies as per the list at the beginning of the post, buy a plan or design one yourself if you’re capable, and follow these seven well-organized steps to build a fantastic wooden boat for yourself. If you do, do share your experience with us!
What are your thoughts on building a cedar strip canoe? If your response is positive, here’s a fantastic DIY cedar strip canoe build video by A Guy Doing Stuff .
What we liked the most about this channel is that the Youtuber has further linked a few other topic-related resources in the description box from where his viewers can benefit. If this build has fascinated you, here are the 18 videos of this DIY series.

This short blog by Totalboat provides its readers with a brief insight on how Jason Hibbs from Bobon Moth Woodworking and Michael Alm from Alm Fabrications DIYed a wooden boat in a span of 5 days.
What’s amusing is that they didn’t even have a plan to start with. Watch the videos attached at the end of this post if you want to see how his DIY process went.
The Youtuber from Teys Cocset has presented a sequence of DIY images from his plywood boat build. He has used the stitch and glue method for this project. If this design is what you’d like to replicate, here is the second part of the boat build.

Here’s another step-by-step tutorial on how to build a wooden boat from Ride the Ducks of Seattle . The post features tools and a supply list, followed by 15 organized steps on the DIY process.
What’s more, there are a few solid tips the blogger would like to share with you regarding the project such that it becomes a major success in the first go. Don’t miss out on them!
The Youtuber from DIY Wooden Boat demonstrates to his viewers how to build a plywood boat. Unfortunately, the explanation in the video is not in English. Nevertheless, all the steps are clearly shown, and you can definitely take this video as an inspiration.

The blogger from Adventure in a Box shares with his readers how his family is crazy about ships and boats. Sounds relatable?
If yes, you’ll definitely love this brilliant ballon-powered DIY wood boat idea . If you have children, bring a smile to their faces with this project, and if you don’t, you always have your inner child who’s desperate for fun, playful times. This project looks so fun that we cannot wait to to DIY one for ourselves!
Here’s a video tutorial on building a 17 ft flat-bottom skiff by World boat skiff !
This tutorial video features a step-by-step explanation of the process accompanied by documented images from throughout the process. The attention to detail is excellent, and you’ll definitely be able to replicate this design.

Now, if you don’t have a plan and are in the dark regarding the supplies and dimensions you need to build a wooden boat, look no further! We’ve got a perfect tutorial for you.
Will Shelton from Mother Earth News decided to clone a skiff his father built and has shared with his readers all the plans, designs, and dimensions for the project.
This is definitely one of the most detailed written tutorials for both DIY noobs and experts to follow. We hope Mr. Shelton’s tutorial will be a great help to you.
The description of the video says – This is not a ‘How-to’ series but a ‘Why you should’ series. To all the boating and boat DIY fanatics, you shouldn’t sleep on this content put out by Matt Dean Films .
This is just ‘Chapter one’ of the series, and the further chapters are expected to be published throughout 2022. Stay tuned!

For his fellow boat DIY enthusiasts, Msil3070 has shared all his plans and his entire DIY process in detail in this post on Instructables .
You can find all the materials, their dimensions , and tools required for the DIY at the beginning of the tutorial. The project took 4 months for Msil3070 to complete. Let us know how long it took for you!
The Youtubers from DIY Wooden Boat have built a professional-looking sleek wooden boat in this video. This DIY features a cold-molded hull.
While this is not a serious tutorial per se, you can definitely take ideas and inspiration from this video. What’s more, this channel features plenty of wooden boat DIYs and other boat-related videos. Boat fanatics will surely find them fascinating.

When it comes to ‘How-tos’, Wikihow never fails to deliver. If you’re a beginner in woodworking DIYs, this 12 ft by 30 inch and 11-inch deep canoe build tutorial using the stitch and glue method is perfect for your first boatbuilding project.
As always, every step of the process is elaborated in detail with clear illustrations. Also, don’t forget to check the tips and warning section at the end of the blog.
Clint Hauger, in this video, DIYs a 19ft Albion Skiff designed by Jeff Spira. The tutorial is in a slideshow format accompanied by a brief explanation of each step.
Everyone in the comment section is raving about how great the build is. This video is short yet extremely informative!
Learn how to build a 14’6’’ wooden V skiff by watching this video tutorial by Robin Hodgkinson. The original plan of this build was ‘Little Moby’ by Charles Wittholz to which many changes were made.
The Youtuber elaborates on steps involved, tips, tricks, successes, failures, and warnings in this video. He also shares the plans and designs at the beginning of the video. Overall, this video is surely worth the watch!
So, which among these 18 wood boat DIY ideas did you find most easy to replicate?
While it is important to be honest to yourself regarding your handyman skills while attempting DIYs like these, you can always start small to gain skill and confidence. Also, you can always request a pair of helping hands for the project.
Have you ever DIYed a boat? If yes, what was your experience? What are the Dos and Don’ts? Help fellow DIY enthusiasts out!
Related posts:
- 27 Homemade Boat Plans You Can DIY Easily
- 16 Homemade Plywood Boats Plans You Can DIY Easily
17 Homemade RC Boat Plans You Can DIY Easily
15 homemade dog dock & boat ramp plans, similar posts.

18 Homemade Boat Trailer Plans You Can DIY Easily
To watercraft enthusiasts, owning a boat trailer is non-negotiable. If you want to protect your invaluable crafts from harsh weather, you need to carry and store them in weather-protected facilities. And the great news is that those handy with metalworking tools don’t find it difficult to DIY a boat trailer all by themselves. So, if…

18 Homemade Bass Boat Plans You Can DIY Easily
If you desperately want to own a bass boat but want to be as budget-friendly as possible, following the commercial path is a waste of time and effort. Bass boats can cost you tens of thousands of dollars! Luckily, with plans and tutorials available on the internet, you can DIY one from scratch or convert…

17 Homemade Boat Lift Plans You Can DIY Easily
So, you’ve finally decided to build a boat lift? Well, good for you! A boat lift can truly add invaluable years to your boat life. On the downside, it can cost you quite expensive to buy and install. But if you have faith in your handyman skill, you can DIY a boat lift for much…

17 Homemade Boat Seats Plans You Can DIY Easily
Put your heart and soul into maintaining your boat and preventing its accessories from water and weather; the damage is inevitable. Sooner or later, you’ll notice your seats old, dirty, and ragged, and it is only human to want to replace them. The bad news is that boat seat costs you hundreds of dollars! But…

If your doggo loves to swim, a dog ramp is a must accessory for your boat! Be it taking your dogs out for a good time, a swim, or hunting, you’d definitely want to make their experience as comfortable and safe for them, wouldn’t you? As much as you love your pet, it will definitely…

DIYing an RC boat can seem a bit scary at first, especially if you’re a DIY noob. But if you have a proper plan, tutorial, and a basic grasp on electronics, building an RC boat is a great DIY fun project for weekends. Be it for making your kids happy or pleasing your inner boat-fanatic…
Leave a Reply Cancel reply
Your email address will not be published. Required fields are marked *
Save my name, email, and website in this browser for the next time I comment.
COMMENTS
Fitting the Sailboat Together. Now that the hull, keel and mast are in place and secured, it's time to make sure your boat is ready for water. First things first: check that your boat is watertight by testing it with a bucket of water. If any leaks appear, tighten the screws or add more glue before continuing on.
Sailboats that you can build from home will likely be a small boat under 20 feet. These could be from many different boat suppliers such as B&B Yachts, Brooks Boat Designs, and Chase Small Craft. Boat plans will vary based on your budget and how much time you have on your hands. Based on my previous experience, building your own boat will take ...
Use a hot glue to secure the craft sticks. 5. Glue the triangles together. Ask your child to cover the two triangles with glue, using the glue stick. Then, press them together to complete your sail. 6. Connect the sail to the raft. Slip the craft stick in between two of the sticks in the middle of your boat.
Because this boat plan is also sturdy enough to handle a small motor, it includes important points for protecting the wooden hull from spark plug damage. Be careful to follow these guidelines to build the safest boat possible if you imagine installing a motor down the line. The Jollyroger. 7. The Cork.
It's a DIY version of a paddle boat. However, it has large floats on the side which makes it a smaller version of a pontoon boat. Also, it's made to recline for a more relaxing ride. 5. Plywood Canoe. Canoes are a fun way to go up and down a river or other smaller bodies of water.
affiliate links Cabin Cruiser, Free Sailboat Plans Petrel You can build this 16ft boat as a day sailer or an overnighter with cabin. Petrel is a Free Sailboat Plan that fulfils the greatest possible variety of uses in one model, offering the builder either an open-cockpit racing craft with comfortable accommodation for day sailing or a snug cabin model with accommodation for overnight trips to ...
Build A Mini Wooden Boat That Challenges Your Sailing Skills#woodworkingskill Do you have an idea, a project to work on or a proposal? Please leave a comment...
From the plans: ANY SAILBOAT fancier will like "Tramp," the trim, 15-ft. knockabout that's so easy to build in plywood. The first operation is to cut the stem, transom and side planks and assemble the forms. Use casein or waterproof glue under the butt strap joining the side planks together. Forms can be made of almost any scrap material on hand.
An easy-to-build, eye-catching, high-performance sailboat. Who hasn't dreamed of a little wooden sailboat with a beautiful canvas cover? The idea for this project is a child's dream. Sailing on a regular basis in "scale 1", we had the idea of having fun by sailing two boats to race in our "spare time". The boats had to meet the following ...
25 Steps to Building Your Own Stitch-and-Glue Boat. George Retseck. 1. | Procure a set of plans, or scaled drawings of what you're going to create. Devlin creates plans for hundreds of DIYers ...
Build a Wooden Mini Yacht this weekend. Time Required!: A weekend; Print this Project By Thomas Martin. Thomas Martin. View more articles by Thomas Martin . December 18th, 2012 June 22nd, 2015 1 . Take me to the Steps. When my son was 3 years old, I made a small bathtub boat with him, using scrap wood and a piece of dowel. It lasted much longer ...
Plywood and epoxy is a great combination! You can easily create inexpensive high performance boats in your garage. I don't think people realise just how good...
Build a Short Dragon (16 Foot 3-Board Outrigger Sailing Canoe) 20 Boats You Can Build Yourself: It's getting warm again, so why not build yourself a boat for some summer adventures? The authors on Instructables have you covered with all sorts of amazing boats you can build yourself!These boats range from easy to advanced, and some can be built….
Its enduring popularity, strong class association, and supportive community make it a beloved classic in the world of small sailboats, embodying a perfect blend of performance, comfort, and inclusivity for sailors of all levels. 8. Hobie Cat. Start a fun hobby with the Hobbie Cat. Length: 16.7ft / 5.04 m.
Free Boat Plans. A selection of Free Boat Plans that can be viewed and / or downloaded. These free to download wooden boat plans (pdf) were first published in magazines such as "Popular Mechanics", "Popular Science" and the "Boat Builder's Handbook". "Popular Science" magazine and "Popular Mechanics" back issues can be viewed online at Google ...
Apply fillets to the inside of the transom. (back of boat) Run a wooden fillet tool over the fillets to make the them perfect. Do that for as many fillets as you can. Apply fillets to the inside of the nose. (front of boat) Apply fillets up under the inside of the deck.
It should be about 6 cm x 6 cm. Poke the toothpick through opposite ends of the sail (near the edges) to hold it in place. Your completed boat should look like this: Image Credit: Ben Finio, Science Buddies / Science Buddies. You've made your first sailboat! Put it in the water. Blow on the sail from behind.
Read More 17 Homemade Jet Boat Plans You Can DIY Easily. Diy. 18 Homemade Bass Boat Plans You Can DIY Easily. By BoatDriving.org March 24, 2024 March 25, 2024. If you desperately want to own a bass boat but want to be as budget-friendly as possible, following the commercial path is a waste of time and effort. Bass boats can cost you tens of ...
Check More Details. 4. Build a 7.5ft Boat with 2 Sheets of Plywood. Depending on what you hope to achieve - as well as your previous DIY and boat-building experience - your chances of success when trying to build your own boat can vary enormously. However, if what you hope to make is a modest boat of the kind you can take into a lake for a ...
Read More 16 Homemade Plywood Boats Plans You Can DIY Easily. Diy. 18 Homemade Boat Trailer Plans You Can DIY Easily. By BoatDriving.org March 20, 2024 March 21, 2024. To watercraft enthusiasts, owning a boat trailer is non-negotiable. If you want to protect your invaluable crafts from harsh weather, you need to carry and store them in weather ...
in this American Boathead video I tell you 5 common mistakes many people make while building a homemade plywood mini boat. there's no wrong way to build a mi...
A simple 14' rowboat, for example, can go for well over a grand. Believe it or not, this 48 foot ketch is built of cement—and it's currently for sale, on YachtWorld. 9. Ferrocement. If you want to build a boat over 20 feet, as counter-intuitive as it might seem, cement actually makes a pretty good material.
https://ElkinsDIY.com Presents:Testing out my improved version of the Coro box boat on Lake Union. If you have some tools and skills I offer build plans here...
Pro Tip: This meatball recipe makes about (80) 1 1/2 teaspoon-sized mini meatballs. So adjust accordingly if you don't want to use that many in the soup. These mini meatballs can also be frozen for use in another recipe. 3. Form into Mini Meatballs + Bake. Divide mixture into even 1 1/2 teaspoon portions and roll to smooth.