- THE PRINCESS PASSPORT
- Email Newsletter
- Yacht Walkthroughs
- Destinations
- Electronics
- Boating Safety
- Ultimate Boat Giveaway


From the Yachting Archives: How to Build a Sharpie Sailboat
- By Edwin S. Parker
- Updated: July 21, 2014
Editor’s note: The plans for a sharpie sailboat, as outlined in the December 1930 and January 1931 issues of Yachting, look to us like a great project to teach the grandkids about boatbuilding! Some materials, costs, and methods have progressed since the time of writing, so instead of asking your plumber to cut pipe to just the right length and thread it, you may now be able to go down to Home Depot to find the bolt in question. Marine plywood may also be a good alternative to the wood listed.
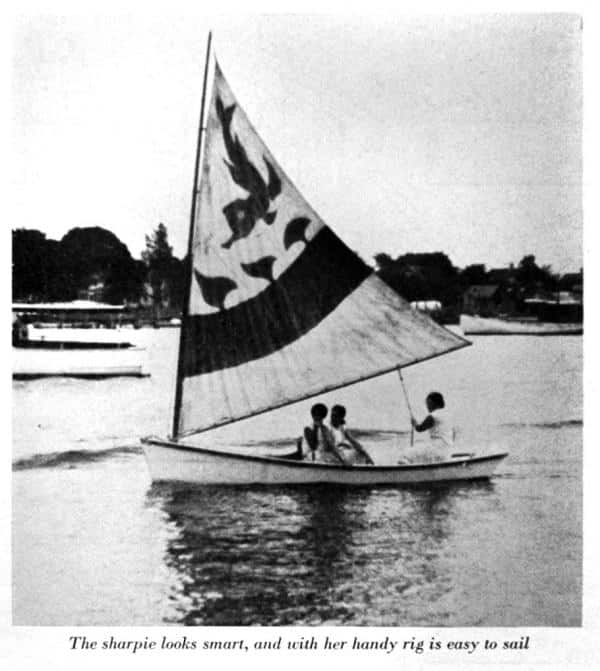
Unfortunately, we are not all rich, and we can’t all build Cup defenders. But that is no reason for building a tub or staying ashore. There is always a way to beat the game, and the way to heath the boat game is to build a sharpie. You can do it for under forty dollars.
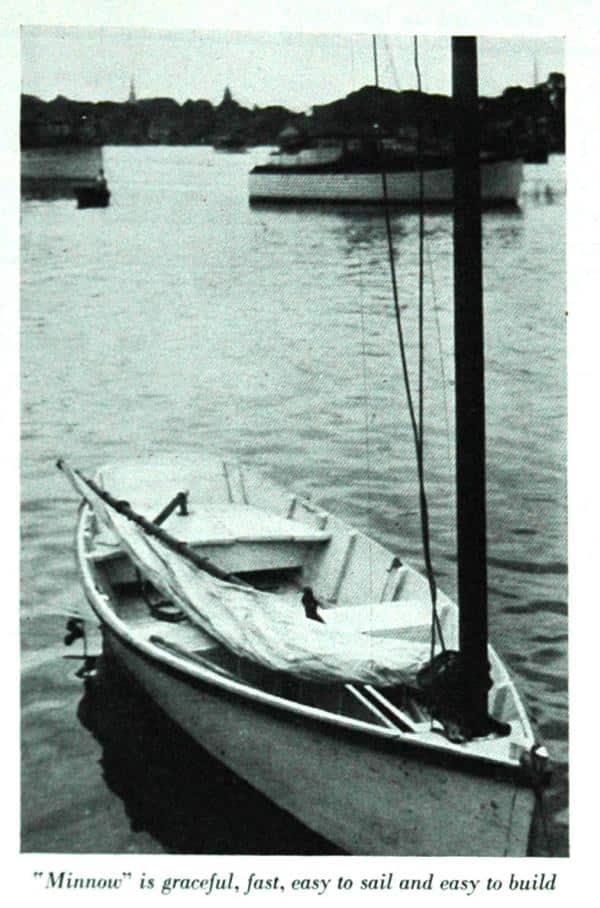
A sharpie represents the most boat for the money. It is graceful, fast, and a joy to sail. It is also eminently seaworthy and stiff. Minnow , fifteen feet over all, makes just over five knots under one reef and a strong wind. I have driven her with all sail in the same wind but I was too busy to do any timing – a considerably larger boat could not catch us.
A sharpie is easy to build. In general, the process is to bend two side boards around moulds, fasten them to stem and stern, screw in a chine batten, plank her crosswise, saw out the centerboard slot, and proceed with the finish (Detail J). If the pieces are carefully made, the process is really very simple. There is nothing that involves experience in boat building or special skill with tools. There are no pieces that go into place with difficulty or won’t stay put. I have built two of them single-handed with success.
Many times I have sailed among the big ships laid up in Oakland Estuary in my 18-footer, lying along the deck with one bare toe hooked carelessly over the tiller. With a gale it required at least two fingers – never more. She would come about like a top anywhere, any time. And one day we worked her up the Alameda Canal against a tide and sailed in San Leandro Bay when it blew in windows in “Frisco.” Add to this regular trips on Frisco Bay (it fairly blows your hair off there in summer) and a season on Monterey Bay, off Santa Cruz, and you have a fair idea of what an 18-footer will do.
I have built three sharpies, besides five smaller craft for fishing or hunting. At the age of nineteen I built the first one along the lines of a sketch my father had of a New Haven sharpie, eighteen feet long, dating from about 1880. The type was taken to the Carolinas from Connecticut by Mr. George C. Ives, and his son, Mr. John B. Ives, of Statesville, N.C., writes the following:
“Father had his sharpie built in 1875 at Fair Haven, Conn., by a famous builder. She was 36 feet long, having a fore and aft mutton leg sail with boom six to eight feet on the mast from the foot of the sail. This made the sail set like a board. This boat was tried out with the fastest boat then in the fleet and beat her. A club of gentlemen wanted to keep her at home and offered a bonus over cost, which father declined as he wanted the boat to pit against what North Carolina boatmen claimed for their clinker built boats which they considered superior.
“He brought two sharpies to North Carolina, and it was not many years till there was a big fleet of them in our waters. They built to 50 and 60 feet, the larger ones schooner rigged and decked, and this style is largely used now in the oyster dredging industry. The fishermen modified the style into deadrise skiffs, gaff sail and jib, and they carried sail like the wind and would almost go into the eye of it. The larger boats superseded the round bottom schooners in some industries, and would beat them in all weather at sea, but motor craft finally took their place.”
The design of a sharpie is a very particular affair. One was published around 1910 which brought down the scorn of my father. “Pumpkin seed,” he called it, for it was fat and flat, an it had a skeg, which would kill any real sharpie. In my first boat the side boards were sawed curved, starting from the bow. She rocked fore and aft too much and pounded in a chop. In the second one I started the curve farther aft, and it worked better, but they both dragged waves behind when going fast. When it came to Minnow I analyzed the design carefully, and I found that the best displacement curve came when the side boards were perfectly straight on both bottom and top, tapering, of course, from bow to stern. So I built her that way. She does not pound, drives to windward regardless of waves, and leaves the water nearly flat. Besides this, it makes building much simpler. So don’t let any wise friend persuade you to cut a curve on the bottom edge – you will get a perfect curve from the bending on the sides on the flare.
It is the experience of the author that textbooks tell you everything but how to get the monkey out of the box. It is the intent of this article to be brief, but comprehensive, covering all small points, even to nail sizes.
All the following directions are important. If you follow each step in its proper order, you will be surprised how quickly the boat will go together. But do not omit any steps or take any short cuts. Remember, a boat has a habit of leaking, even under the best of circumstances.
- cross-cut, rip, keyhole and hack saws
- spoke shave
- light plane
- brace and bits 1/4″ to 3/4″
- screw driver bit and countersink
- twist drills 1/8″, 5/32″, 3/16″
- plain screw driver
- square, metal shears
- three clamps with 2″ openings
LUMBER No list of pieces is given because one usually gets what is available. A few pieces are called for on the details, and if you don’t get enough lumber the first time, order again. Avoid spruce because it rots, and use regular 7/8″ boards, not thinner, to finish 13/16″. Never use tongue and groove boards below the water line. Planking should be 6″ wide.
HARDWARE Hardware should be galvanized. Use 6 penny or 7 penny nails generally, wire rather than cut, with a few 8 penny. Two gross screws 1.5″ No. 10. Get some scraps of heavy galvanized sheet iron from your plumber.
CAULKING Use regular stranded cotton caulking, or get balls of candle wicking from a hardware store. Cotton batting torn into strips will do in a pinch.
SIZE OF BOAT A 15-foot boat will hold two men and a boy. It sails best with three boys or two men. An 18-foot boat holds four men but sails best with three.
COSTS The materials for Minnow cost $45, with no attempt at economy, in 1929. A deck might add five dollars more. The 14-footer cost $20, in 1910. The 18-footer cost $35, in 1907. If you have $30, start work – you will raise the rest as you go along. Be careful of the dimes and quarters if cost is a problem. I have heard that in the Carolinas they used to build them for a dollar a foot plus materials. That, of course, could not be done now.
DIRECTIONS FOR WORK In order of procedure.
MAIN ASSEMBLY 1. Have your saws sharpened by an expert, and sharpen your other tools.
2. Study the plans carefully. Every word and line is on there for business. On the plans certain pieces are identified where they occur, by a number in a circle.
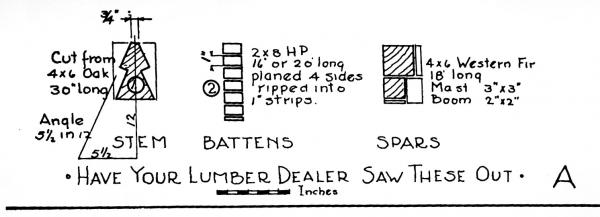
3. Get pieces out at mill, and order lumber (Detail A). You can chop the stem out of an oak piece but don’t do it unless the mill man wants to rob you. They should be able to saw it out.Get a full width side board if you can afford it; mine was redwood. Otherwise, two 12” boards joined carefully as shown (Detail E). Making tight may be a nuisance, but the joint will only be under water when sailing, and slop comes aboard then anyway.
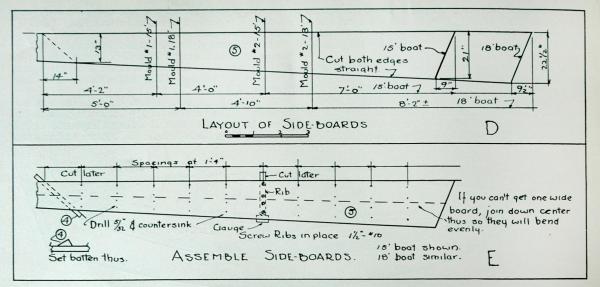
4. Finish side boards complete but do not cut at stern (Details D & E). Saw out as shown, mark for ribs, bore 5/32” for each screw, and countersink. Be sure to make sides opposite hand. Screw ribs in place by the gauge so chine will fit. Use screw driver bit and brace.
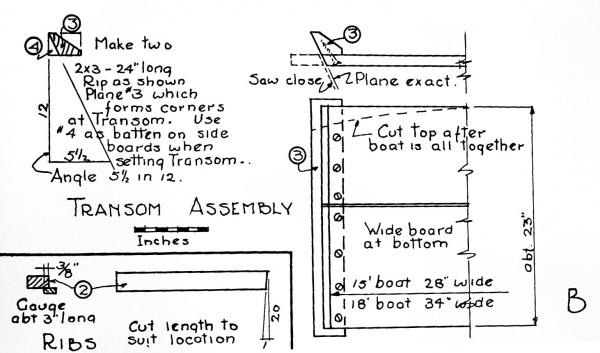
5. Make transom, leaving a wide board at the bottom. Stem is presumably made at the mill. (See detail B.)
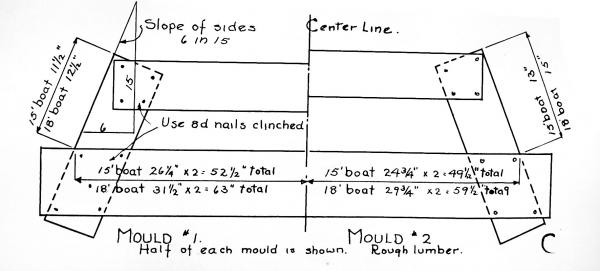
6. Make moulds of rough lumber (detail C).
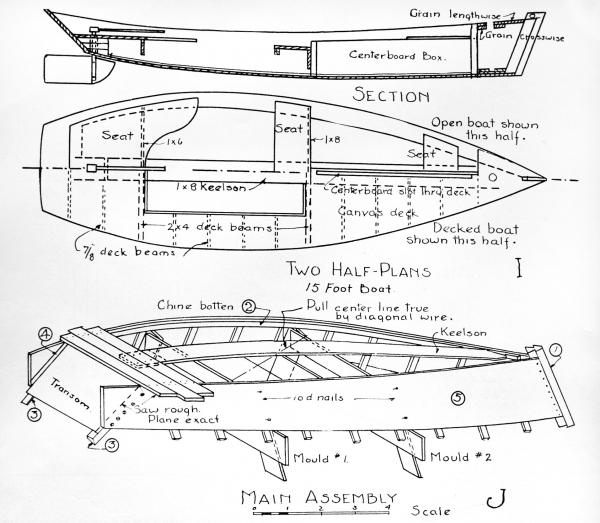
7. Form the boat upside down (detail J). Nail boat side boards securely to the stern. Nail to mould No. 2 with two 10 penny nails each side not driven home. Take rope hitch on after ends of boards and cinch in. Nail in form No. 1. Cinch up by twisting rope and draw tight over transom. The battens on the inside of side boards to set transom will help a lot. Screw transom in place, screws into corner piece rather than in end grain of boards of transom. Have transom extended beyond bottom edge of side boards for bevel planking.
The sides will not bend evenly. Pull the boat true with a diagonal wire or rope. Use a string down center for truing.
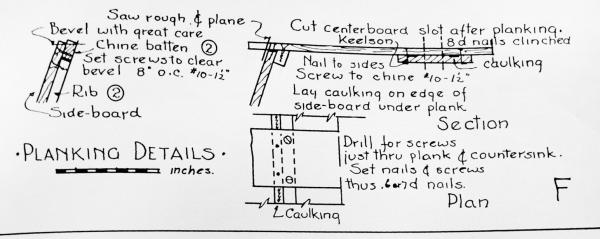
8. Spring chine battens into place with clamps, and screw, beginning at one end and working towards other. Screws go from outside of side boards through, as with ribs. Chine will project beyond edge of board 2/3″ so both will bevel for plank. (Details F, J, and Q.)
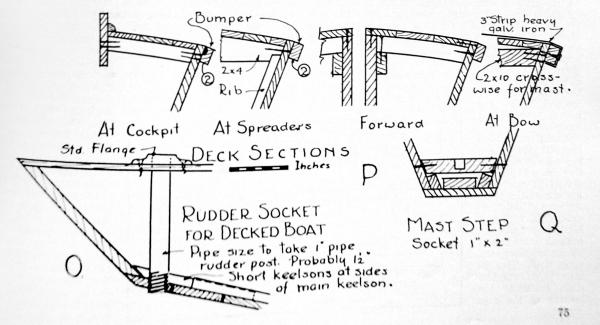
9. Bevel edges of side boards and chine exactly to take plank. Work on both sides at once and use strip across for guide. Work down with drawknife and plane carefully. Boat is apt to leak here. Bevel the transom. Cut stem so last plank will lap onto it and finish at line of rabbet. (Details M and N.)
10. Begin at stern and lay three planks. (Details F and J.) Be sure to lay a thin stir of caulking on edges of side boards under planks. Nail plank to sides and screw to chine as shown. Cut plank long and leave trimming till later to be done all at once. Do not lay too close – you want a crack to caulk into.
11. Start keelson at middle of second plank, and let it go loose at bow at first or nail to end of stem lightly. Fit it at bow when half the planks are on (detail J).
12. Complete planking. Watch caulking carefully, and lay it between plank and keelson on each side of centerboard slot (detail F). Saw plank as close to sides as you can without marking sides, and plane true.
13. Mark centerboard slot and saw accurately with cross cut saw through from the bottom. Should be 1.75” wide to take post.
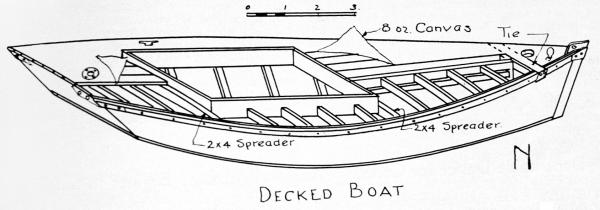
14. Turn boat right side up. Nail in spreaders to sides of ribs for open boat and 2×4 deck beams crowned for decked boat. Also seats. This holds the boat spread when the moulds are taken out, which is done now. (Details M & N.)
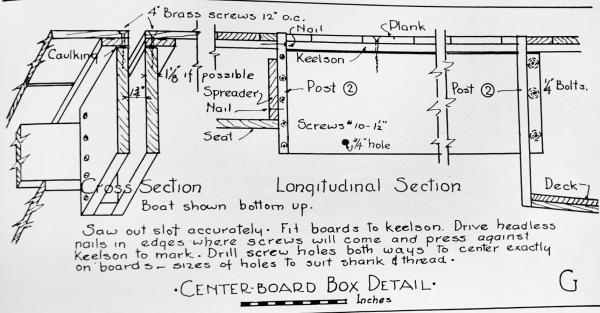
15. Centerboard box (detail G). Fit boards of box to keelson. They should be 1 1/8” thick, if possible but 7/8 can be used with care. It is almost impossible to drill for screw holes through from the bottom and run true into the boards of the box. It is better to drill both ways from the center, but the places must be accurately marked for the holes to meet. So drive some nails in the edges of the boards where the screws are to go, cut off the heads, and press down against the keelson. This will mark the holes, and you can bore the keelson from the inside through the plank, and into the edges of the boards. Use drill through bottom slightly smaller than shank of 4” brass screws, and a smaller hole in edges of boards to hold thread of screw.
16. Fit posts either end of slot, set in white lead, and nail into keelson with one eight penny. Clamp box to posts or nail lightly. Turn boat over and drive screws with brace and screw-driver bit. Be sure you have a thin strip of caulking between keelson and edges of box. Turn boat back, bolt box at bow with 1/4” bolts as there is no room to drive a screw (have holes already), and screw after ends to post, with 1.5” number 10 screws.
This completes the work on the rough hull. In the next issue of Yachting, directions and plans for completing the sharpie will be given in a second and final article ( continued on the next page) .
How to Build a Sharpie Part II The Most Boat for the Least Cost By EDWIN S. PARKER From the January 1931 issue of Yachting.
In the December 1930 issue of Yachting , the plans and directions for building a 15-foot Sharpie were given that carried the work as far as planking the bottom. In the present article the directions for work are continued from that point to completion. Reference is made here to some of the sketches in the first article and it will be necessary to have them at hand for reference in reading this installment.
STEPPING THE MAST (Details I & Q) For open boat, build small decking in two layers, top running lengthwise, and lower running across to prevent splitting. Saw mast hole with keyhole saw. Nail this decking securely in place with eight-penny nails. But the strain on the mast is so great that it will spread sides. So later, when the bumpers are on, bend a 3-in wide strip of galvanised sheet metal, as heavy as you can handle, across and around the bumpers, screwing it with two screws each side — 2-in screws preferably—holes drilled in metal and wood. Put some extra screws through sides into bumpers just abaft this. The step is as detailed.
For the decked boat, put 2 by 10 boards across and fur up for crown of deck (Details N & P).
17. DECKING Use 2 by 4 spreaders as already mentioned, crowned as much as you want. The crown is for appearance only. Nail the coaming to this, with the 1 by 6 planking left over, and set in the other deck beams made of 7/8-inch stock, crowned likewise. The coaming supports the adjacent deck. Do not set the edge too high or it will cut one’s knees- two inches will stop all the water necessary.
Use narrow matched boards for the deck -old flooring would be good. Another way is to have 7/8-inch boards ripped to 1.5-inch strips and bent to the curve of the boat, laying edge pieces first and working inwards, nailing together edgewise and into deck beams as well.
Paint deck a sloppy coat, lay canvas and tack to outside of side boards so that the bumper will conceal the edge of canvas. Paint canvas a sloppy coat at once. Use 8-ounce canvas if you can afford it, or anything lighter, down to unbleached sheeting.
18. BUMPERS (Details M, N & P) In the open boat this strip strengthens the edge materially. In any case, it turns a lot of water on a rough day and takes the knocks when landing. Use the hard pine battens No. 2. Taper off the forward ends to about 3/4 of an inch on the inside. In the open boat, clamp in place and screw 8 inches o.c. from the inside of the side boards, as with ribs. In the decked boat, screw through bumper from outside into side boards, countersinking deeply. In either case, bind at bow and stem with galvanized iron to prevent spreading. Make patterns of heavy paper for cutting metal. Drill for nails in metal, and clinch nails where they go through boards.
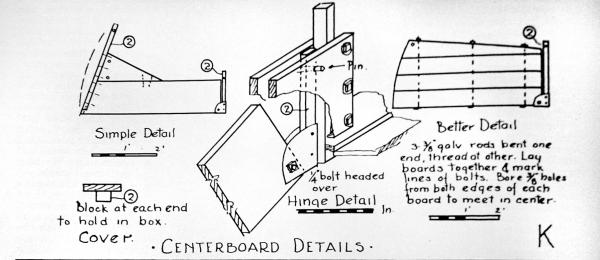
19. CENTERBOARD (Detail K) Make either way, as shown. The board can be pinned through the case for the hinge, as is usually done, but it is very convenient in a small boat to be able to get the board out from the top. The method of hinging shown has proved a good one, and keeps the pivot low. Have a hole in the box aft to take a pin to hold board down when sailing. Make removable cover to go on when board is down (Detail K).
20. RUDDER This is of the balance type. A very small area forward of the post will balance a large area abaft it. Set post by trial if necessary. The detail shown is very cheap and very strong. Either type of socket is good, as shown (Details H & P). The pipe is better for the decked boat, while the built-up one will serve for the open boat, and is less expensive by perhaps a dollar. But have all the seams accessible in case the soft cloth between the pieces of wood does not make tight. This cloth can be slopped with paint when laying. To cut the hole for the post, use a gouge if you have no extension bit, and, in any case, cut through each piece as you lay it and set post in place when screwing down each piece to get hole true.
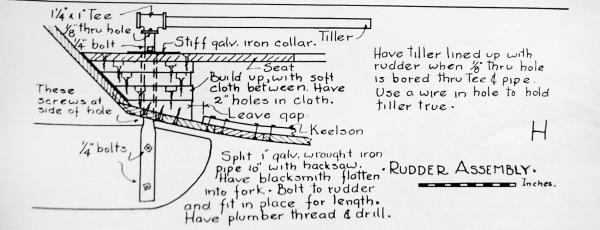
For the rudder post (Detail H) get a couple of feet or so of galvanized 1-inch genuine wrought iron pipe from the plumber’s scrap pile, hacksaw it down the middle, working from sides alternately to keep cut true. Cut down perhaps a foot. This is easy. Do not try to flatten it out cold, as it will split. Have the blacksmith heat and spread and drill for the 1/4-inch bolts. This should cost about 25 cents. Now set the rudder and bolts in place and, with this assembled, place the socket in the boat and mark the position of the bolt which holds the shaft from dropping out, and also place where the tee shall come for the tiller. Take to the plumber, who will cut the pipe, put a long thread on it, screw on a tee which has a larger opening horizontally than vertically – they come standard if you can find them – and with this tee lined up with the rudder so that the tiller will be true, drill a 1/8-inch hole clear through tee and shaft. Through this run a wire to prevent tee from rotating on shaft.
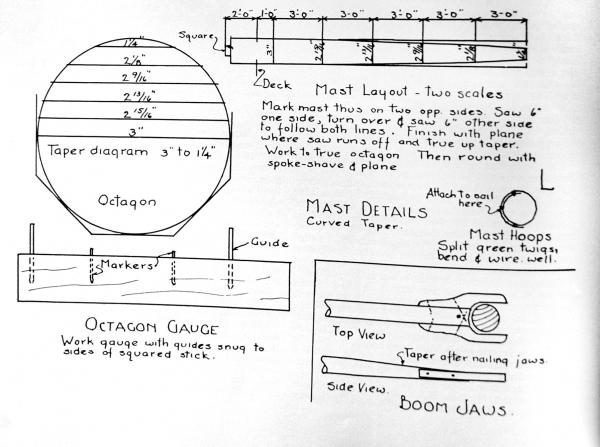
21. SPARS (Detail L) Choose a clear, straight 4 by 6 to cut mast from, preferably western fir. Have mill cut to 3 by 3 and 2 by 2 (Detail A). Mark mast as in diagram… do not taper straight. Tack in brads at taper points, and spring the batten to get true curve. Saw to tapered square, working from both sides alternately to keep the lines, sawing perhaps 6 inches at a time on each side. Have the saw sharp. Where saw breaks out at edge, finish with plane – do no try to hew out, as the grain will tear in and leave a hollow in the mast. But work into a perfect squared stick. Make the octagon gauge, as shown. By twisting this as you go towards the small end you get a true octagon on the mast. cut to this line with drawknife and finish with plane. This will give a true octagon. If this is well done, the work of rounding off is negligible.
Bore hole 5/8 of an inch fore and aft at the head for halyard and work it out with knife so that rope will pass through easily.
Make boom similarly. Jaws of hard wood. The boom tapers very sightly at after end, and flattens out at forward end to take jaws. Make long in case sail stretches. (See detail L).
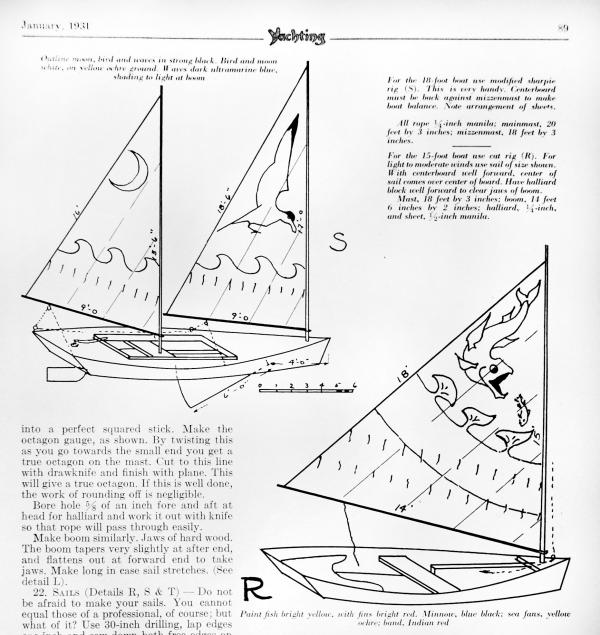
22. SAILS (Details R, S & T) Do not be afraid to make your sails. You cannot equal those of a professional, of course; but what of it? Use 30-inch drilling, lap edges one inch and see down both free edges on a seeing mating, using number 30 thread and a long stitch and tight tension. Pin pieces together about one foot apart to be sure pieces pull alike. Lay the sail out with string on a large surface. Cut the sail to this pattern, selvage on the leach or rear edge, allowing hem at bias edges. Curve the edges you cut (at mast and boom) an inch or two out, especially on the edge next to the mast. Not too much, though, as the sail will bag. Hem bias edges, but leave selvage as is.
Have at hand a piece of 1/4-inch manila rope long enough to go around the edges of sail, with some to spare. Hang it out of doors for a month or more. Sew this to edges of sail with sail twine or knitting cotton, well waxed and double, with a sail needle or any heavy needle, the needle going under one strand of the top each stitch. This is the only tricky part of the process. If the rope is not tight enough, or rather, longer than the edge, the edge will flop curiously. If it is shorter than the edge, the sail will bag. To get even tension, lay sail out and stretch sail and rope together. Catch rope to sail every foot or so, and as you sew the rope on, come out even at each catching. The luff (at the mast) and the foot will be easy, but you may have to do the leach over again, as I did.
Sew on reef points of one-inch tape, 12 inches long, at each seam and two between. Make cover for sail so sun will not rot it.
23. CAULKING In making a boat tight, plan for a good seam and fill it with caulking. The planks may be too close in some cases. Make a hard wood wedge and drive it all along the seam to open the seam slightly. Take the caulking, preferably stranded cotton, and drive it into the seam with the wedge or a putty knife, or at the ends of the seams, with a screw driver. Fill the seams evenly and fairly tight.
DO NOT drive caulking in seam at edges of bottom, between planking and side boards, that is, against mailings. The caulking will swell and pop off the planks. The caulking laid when planking should be sufficient. If leaks develop, fill with plenty of copper bottom paint.
Making tight is not easy. The bottom seldom gives trouble, but at the rudder socket and stern, and at all unexpected places, leaks show up and cause trouble. Make tight with caulking as far as possible. Then use white lead inside and out in corners, drying the boat before applying. A coat of paint does wonders, too, but all this should be done after the caulking is completed.
24. PAINTING Paint inside, thinning for first coat.
Paint bottom with brown copper paint direct on the wood, giving two or three coats. Green looks better, but does not stay on as well.
Paint some kind of a design on the sail (Details R & S), using one-third or one-quarter oil and the rest turpentine. Outline design in black about one-half inch wide. Two are shown, but the possibilitics are endless.
25. MODIFYING THE DESIGN It would be doubtful policy to modify the design of the hull. From Mr. Ives’ letter, it would seem that I have developed the design somewhat along the same lines us the fishermen did, namely, toward a dead rise skiff. The older sharpie had a long overhang aft, but actual analysis of the design does not favor this, and Minnow keeps going right into a sea, as the others did not. Do not put on a skeg, or change the rudder, for it is a joy to sail with the balanced rudder. The centerboard, however, may be moved forward or aft, at will, to suit any sail plan you may prefer.
Personally, I like the two masts on an 18-foot boat, though I never could bring myself to move the boom up the mast and reef along the mast as the old sharpies did. On my 18-footer I had a gaff sail forward, but the gaff was a nuisance. Do not have any stays on the mast – there is a tradition to the effect that the spring of the mast helps the speed.
A sloop rig should be good for the larger boats, but whatever rig is used, be sure the center of the total sail area comes over the center of the area of the centerboard.
If a boat larger than 18 feet is to be built, increase the depth of the side boards as well as merelY lengthening them, as shown, so there will be more freeboard aft.
26. GENERAL POINTS It is well to have the boat decked – you can tip without taking water over the lee rail. A cover on the centerboard box is worth having. as water shoots up in a chop. For a small boat, though, the open model is very handy for rowing.
When sailing before the wind pull up the centerboard. One trial will show you why.
Do not use ballast and try to carry more sail- you lose thereby.
My father’s plan of 1880 is said to have steered with an oar. This should help in a race but I found it a nuisance.
Ready to get building? Click here for a printer-friendly PDF of all the instructions and diagrams. Then write to Yachting to share your experience!
Yachting would like to thank reader Fred Ganley for remembering this article and calling it to our attention. Happy building, Fred!
- More: Classic Yachts , How To , Sailboats , Seamanship
- More Yachts
Azimut Launches the Fly 62

Sunseeker Predator 75 Reviewed

Meet the Emissions-Free Colombo 25 Super Indios E

Offshore Fishing Boats and Insurance Prices

For Sale: Hargrave 96 Skylounge

Reflections on Offshore Sailing

For Sale: Outer Reef 720

For Sale: Prestige 620 Fly

- Digital Edition
- Customer Service
- Privacy Policy
- Terms of Use
- Email Newsletters
- Cruising World
- Sailing World
- Salt Water Sportsman
- Sport Fishing
- Wakeboarding
Building, restoration, and repair with epoxy

Building a wood/epoxy Sharpie, Phase I
By Captain James R. Watson
When I was building my first boat, my dad used to drive me nuts as he sat in his rocking chair considering “how to proceed.” I wanted to see the chips fly. Now, after many of my own projects, I realize the wisdom of studying the sequence of events from the beginning of a building project to the end. Building projects are a lot like a child’s dot-to-dot puzzle. There is often a best order to the steps that can save time and money, improve quality, and most effectively utilize your shop space. So often I have foolishly rushed to build the easy and rewarding components only to have them take valuable room and leave me late in the project to struggle with time consuming keels and rudders.
With my most recent project of building a 29′ sharpie with wood and epoxy, I’ve tried to think carefully about my order of building. I built the frames and daggerboard and case first because they take little room, not the main shop space (in my case, half a garage that requires winter heating). I built the daggerboard and its ballast component before the daggerboard case because then the case can be built to fit the board. I also finished interior surfaces before closing them off, installed components while there was still easy access, precoated and sanded parts on a bench rather than waiting until they were in place.
With any project, it helps to think carefully at the outset about the entire building process so that you can be more efficient. Make every step a clear step forward (without two steps back) to the next dot in project completion. I’ll share some tips with you, as well as a few of the nonconventional approaches I am taking in building the sharpie.
Select the design
Ever since I was a kid, I have wanted to build a sharpie. These relatively narrow, flat-bottomed skiffs evolved in the 19th century. They’re pretty boats and have often been praised as offering the most performance for the least investment. I liked their virtues of shoal draft and good sailing characteristics with a speed potential. Sharpies can make good pocket cruisers that can be trailered easily and open up many new cruising grounds. They’re also relatively simple to build. The first step in any successful boatbuilding project is selecting a design. As I’ve written before, too many folks want to be designers, but after all the hard work end up with a fundamental design error that dooms the entire effort. Sharpies have evolved over 150 years and the designs of Howard I. Chapelle and others are well proven. I wasn’t about to design my own. I bought plans for several similar designs before selecting this Howard I. Chapelle’s DANDY, a development of Commodore Monroe’s popular EGRET. The boat is 29′ length overall, with a 7’6″ beam and an 8″ draft (Figure 1).
I planned several variations, however, the most important being a ballasted daggerboard, molded composite chines, and a high performance rig.
Choose quality wood
For many applications, several choices of wood are possible. Be sure you understand the physical properties of the species you select. You will also need to consider cost and availability. Here are some of my thoughts on the choices for the sharpie project.
I chose Douglas fir for the stringers (including chines, clamps, keelsons, frame and bulkhead perimeters, etc.) because of its cost and availability in the Midwest. I bought 20′ clear vertical grain (VG) Douglas fir for about $3.70 a board foot. Another good choice for stringers is Sitka spruce. It is lighter than fir but the cost is about double. (Prices will vary, but the comparative prices between species stay about the same). Cedar is too soft for these components. Stems, daggerboard, daggerboard case ends, rudder
I selected Honduras mahogany for stems, false stems, daggerboard, daggerboard case ends and rudder. Mahogany’s attributes are strength, dimensional stability, and durability. Bulkheads, daggerboard case, and planking
I chose marine-grade Okoume plywood for all bulkheads, the daggerboard case, and planking. Where 1/4″ thickness is used, I prefer 5 ply over 3 ply because it is stiffer. I recently saw a large catamaran built with mahogany plywood and WEST SYSTEM® epoxy that has spent her life in the tropics and there was no checking and no moisture damage, a credit to the builder and the construction materials. Another option would be marine grade fir plywood. I’ve built several boats of this material which are now 25 years old and still going strong. However, marine grade fir plywood has a tendency to check which even covering with glass may not contain.
Many wonder if AC grade plywood will work for boat building. It will, but the voids and knots will be a source of problems and should be filled with epoxy. I’ve found AC grade plywood ends up costing so much more in time and epoxy to repair to bring it up to speed that it is not a good choice.
Fabricate stock before storing When I unloaded my lumber, I already knew member sizes and shapes. So I ripped all stringers to width and shape (chine stringers are trapezoids) before storing. All the longer pieces would require was scarfing to length later. Then I carefully stacked the lumber in order of use, placing 3/4″ x 3/4″ sticks spaced at about 6′ intervals between layers. Pre-finish whenever possible.
Whenever possible, I prefinish parts and surfaces. It is much easier, neater and quicker to sand and coat parts on a bench or when there is good access. Crawling around inside the hull with a sander and roller is difficult and time consuming, and the quality suffers. Typically, because the interior will be finished clear, I apply one coat of WEST SYSTEM 105/207, sand it, and give it another coat. I don’t apply the second coat where I know there will be a joint (temporary fasteners used during dry run fitting and trimming help identify the areas). I can avoid having to sand there before applying epoxy for bonding.
Building frames
I build my frames on a mold table on which I laid out the body plan when lofting, taking care to mark the waterline and centerline. I use heavy, clear plastic on the table to keep the adhesive off and to let me see my lines. I produce all stringer notches and limber holes at this stage. Then I fasten components together in a dry run, using drywall screws.
Use removable fasteners
I then glue the components together on the loft table, using the screws for clamping pressure after coating them with Stoner™ thermoset mold release E497 for easy removal. I check the assembly with the lines on the table to make sure nothing has moved. After the epoxy has cured, I remove the drywall screws and counterbore all holes with a countersink. Then I bond in plugs made on the drill press with a plug cutter, using the same species of wood. When the epoxy has cured, I trim the plugs with a flush-cutting saw (Figure 2). Why not use permanent fasteners? Exposed endgrain that fastener holes expose is a common source of moisture related problems. Moisture can travel down the fastener via condensation. With everything bonded rigidly, nonferrous fasteners are redundant. They are also expensive (for example, #8 x 1″ are 50 cents each). With plugged holes, all is permanently sealed. However, some high stress situations may require fasteners. These are set in wet epoxy while being installed to improve cross grain strength.
Radius the edges
All edges (except where planking and stringers join) are rounded with a router. I use a 3/8″ radius double flute bit. Corners are vulnerable to damage and are sharp when you bump them. Radius edges coat more easily and leave an uninterrupted coating which accelerated weather testing in the laboratory as well as my firsthand experience with many boats have shown to hold up much better.
Coat and sand
I then coated all surfaces with two coats of WEST SYSTEM 105 Resin/207 Special Coating Hardener. I decided that on most of the interior, this would be my finish. No varnish. Most of the boat interior will not see the light of day and those areas that will see only indirect light. Two even thin coats with no runs or sags is clear and glossy and will hold up great in this application. I also lightly sand any surfaces that will be varnished (with either a satin or a water-based satin varnish), so it won’t have to be done later. This includes the visible interior of the cabin.
Making the daggerboard
One of my design modifications was the centerboard. Sharpies usually carry a drop type of board that is hinged on an axle. Some sharpies have two (tandem) boards, some leeboards. I modified the traditional designs to use a ballasted daggerboard. I chose a daggerboard because the clean exit from the hull and the aspect ratio make it more efficient. Its small slot size reduces lost hull displacement. A daggerboard also takes up less room in the cabin.
I chose a NACA 0010 foil section for the board. I built the daggerboard and ballast component before the case so I could build the case to fit the board. It’s hard to modify a NACA foil section, but you can easily modify the case for a precise fit.
Basically, I followed the procedures outlined in the Gougeon Publication 000-448 How to Build Centerboards and Rudders . However, I modified this method by ripping the strips to specific widths dictated by the template. This saved material and minimized machining. I also sawed a 1/2″ deep slot in the ends of each strip into which thin 1/8″ plywood would fit snugly. Thus, I was able to align the laminate during the gluing operation (Figure 3).
Adding ballast
The daggerboard has lead ballast on the end. I wanted to be able to hoist the board completely, so I needed the lead to be the same foil shape as the board (rather than a bulb shape). The ballast weighs 200 pounds.
I used the “lost foam” process to produce the ballast. I first needed a foam plug the same shape as the board. I glued foil section plywood templates to each end of an oversized block of blue insulation foam. I then wrapped thin piano wire around two wooden dowels and connected the wire with alligator clips to my truck battery. I pulled the hot wire taut and dragged it across the templates, cutting the foam to the exact foil shape in about 30 seconds. I added some peaks to the top of the ballast to key into the board (Figure 4). Then I placed the foam in an oversized hole dug in the yard and filled around the foam with Portland cement, allowing it to cure for a week. I had some buddies come over to melt the lead and do the pour. We built a wood fire, added charcoal, and supercharged it with my shop vac. We melted miscellaneous lead scraps and wheel weights in an iron pot cum crucible. (I was also using bread pans to mold 25 ingots at 35 pounds each for internal ballast.) The foam plug vaporized as we ladled the liquid lead (over 600°F) into the mold. It bubbled, hissed and gurgled for a few minutes, and half an hour later we were digging it out of the ground. Light taps with hammers cracked off the Portland cement, revealing the accurate casting.
Using hardware bonding techniques, I drilled holes in top of the lead ballast, and then bonded in 3/8″ stainless steel threaded rod (Figure 5). We know that you can get about 1,000 lb. per inch of bury into wood as well as lead, so my 12 threaded rods with 2 to 3 inches of bury was overkill. I prefit the ballast to the board (Figure 6), before bonding the two with epoxy thickened with 406 Colloidal Silica Filler.
Making the daggerboard case
Once the daggerboard was completed, I built the daggerboard case wide enough to allow for clearance. My unique approach to constructing the case allowed me to complete all treatment to the interior before closing the case. Of course, once the case is closed, access is severely limited. I bonded the Okoume daggerboard case ends to one plywood side producing a 1″ radius interior fillet. For abrasion resistance, I then applied a layer of 6 oz fiberglass. I also glassed the remaining side that was not yet attached. Next, I applied a thick 1/32″ coat of 425 Copper Additive. I used copper additive for several reasons. First, it is very hard and takes abrasion well—abrasion from potential rubbing from the daggerboard over the years. Also, the copper additive has some antifouling potential so it may aid in preventing marine growth. From experience and testing, we know that it will at least make the surface easier to clean. Once all of the interior surfaces were cured and sanded smooth, I bonded the adjoining side. Then, as with the frames, I prefinished the daggerboard case exterior with WEST SYSTEM 105/207.
Assembling strongback, frames and stringers
At this point, I decided I was ready to commit the shop to assembling the whole boat. Jig construction and frame setup were straightforward. The strongback was a simple 2″ x 4″ ladderlike structure that assured accurate frame placement. I installed the 8″ wide scarfed-to-length keelson first. Then I could use it as a sort of long bench on which to scarf the 6 other stringers (2 clamps and 4 chines) to length.
Installing the daggerboard case
I installed the daggerboard case before any planking or stringers. That way, I didn’t have to duck or negotiate around them. I cut the keelson with a slot that duplicates the daggerboard foil shape. A method for aligning the case that works well is to fasten the case to the keelson with lag screws at each end of the case. The holes through the keelson are made oversize and oblong athwartship. This allows precise alignment and marking in the dry run and when bonding permanently.
Building and prefinishing other parts
Next, I fit the scarfed-to-length chine stringers only. Then, while I still had good access, I produced the bunk and cockpit sole. These horizontal elements are otherwise difficult to fit after the installation of side panels. After fitting, I coated these plywood parts with epoxy and set them aside. Then I installed the chine stringers (Figure 7).
Applying the bottom
The flat bottom of the sharpie is easy to work on and with a subtle rocker is easily bent into position despite the 3/4″ panel thickness. I fit and scarfed together all panels at an 8:1 bevel. I glued them down in one operation, cleaning off all excess adhesive prior to curing (Figure 7). (I will later modify the bottom to a slight 3/4″ arc with lead ballast slabs molded in amidships.) I again used drywall screws sprayed with release for temporary fasteners and then bunged the holes.
Installing the side planking
I never thought I’d put butt blocks in a boat after the poor results with a MICRO project where the butt block areas showed flat spots. This was probably due to the short wide shape of the boat so that the tight, fair curve was interrupted with the localized reinforcement of the flat butt block. On the other hand, some of my oldest projects with butt blocks, including the trimaran ATOM with its long subtle shapes, have looked just fine. (See Epoxyworks 7, Spring 1996 for some comparisons of butt blocks and scarfs.)
So why butt blocks on this boat? The sharpie hull resembles the long shapes of the trimaran more than the short beamy shape with which I’ve had difficulties. I’m building this boat by myself. A complete panel all scarfed together would weigh on the order of 90 pounds. Even if it weighed half that, at 3′ by 30′ it is unwieldy. With wet adhesive on all the contact points, accurate placement would be futile. An alternative would be to scarf in place, but it would be very difficult to align scarfs. Thus, the butt block.
First, I fit all the planking panels, overlapping the adjoining edge slightly. Then I marked this so the edges matched perfectly. At the same time, I marked all stringers and frames. I also prefit all butt blocks. They are plywood, 30% thicker than the planking, placed between the stringers with the face grain running parallel to the planking. After fitting, I removed all panels and coated them with WEST SYSTEM 105/207, sanded and applied a second coat. I didn’t coat the areas where the stringers and frames joined so they would not require sanding before bonding. After one panel was joined to the hull, I screwed and glued the butt block down. The second panel was then simply put in place and similarly glued and screwed to the butt block. Again, I used drywall screws for clamping.
One of the negative aspects of the butt block is the exposed endgrain of the butting panels. To solve this, I used a disc grinder to dish out a generous scoop of material centered over the butt, about 8 times the depth in each direction. Then I bonded in multiple layers of successively smaller strips of biaxial fiberglass to fill the joint and faired it smooth.
Building composite chine reinforcement
My approach to building and installing the chines deviates from traditional plywood construction. Not only did I reinforce the chine with composites, but I also premolded them. The chine is the corner that is formed where the sides and bottom of a boat join. Large buildups of wooden materials for reinforcement at corners (especially chines) are susceptible to dimensional changes that lead to cracking and then moisture ingress. Replacing the wooden chine buildup with a composite reinforcement resolves this situation. Composite chine construction methods have been used successfully for many years. I first used them on a plywood Searunner™ trimaran. Now 25 years old, its chines are perfect, a testimony to the soundness of the concept.
In the sharpie, two trapezoidal shaped stringers run along the chine, one on the side and one on bottom, about 4″ from the planking joint. They form a trough along the interior of the joint into which biaxial fiberglass cloth reinforcement can be laminated. The chine exterior is rounded and covered with several layers of 16 oz fiberglass cloth. As well as eliminating moisture problems, this rounded chine offers hydrodynamic benefits by reducing the drag-causing eddies created around sharp corners as a boat sails.
With the boat upside-down, laminating multiple layers of fiberglass with epoxy overhead poses obvious problems. One option is to roll the hull over, but this is no easy task with an awkward 700 lb hull that may not be as rigid as desired and can stress the glue joints or other components. Instead, I decided to produce the inner chine reinforcement in sections on a mold and install the cured composite parts overhead.
Molding the composite parts
Initially, I had planned to make a mold for the parts using PVC pipe with tangent flats made of blue insulation foam taped in position at the angle of the side and bottom chine joint. However, to get the perfect compound curve, I decided to use the hull as the mold. First, I shaped the radius on the chine exterior, filling and fairing where the sides and bottom joined. Then I marked the stringer and frame locations and covered the area with 6-mil polyethylene to provide a release medium. I had to make the composite reinforcements in 5 sections so that I could install them under the frames (Figure 8). Once they were in place in the boat, I would join them into one continuous piece.
A chine can be subjected to more force than the hull panels, so adequate buildup of the chine reinforcement is important. My laminate was built up from 7 layers of 8″ wide, 15 oz. biaxial/mat fiberglass tape to about 1/4″ thickness. I used one layer at the extreme edge of the tangent and staggered the tape to produce 7 layers at the apex. I tapered the ends of each section. After they are fit in the boat, the sections will be joined together by adding layers of biaxial tape and epoxy. I released the boat from the strongback and raised it so I could get underneath and install the composite sections at a comfortable working height. I installed the sections between each of the frames and the chine stringers in a layer of epoxy thickened with 406 Filler. After all of the composite sections were installed, I reinforced the exterior of the chine with 3 layers of 15 oz. biaxial tape.
Fiberglassing the bottom
The bottom of the hull gets one layer of 6 oz fiberglass cloth for abrasion resistance. To strike the boottop and waterline, I followed the method described by Larry Pardey in Details of Classic Boat Construction. While he doesn’t like epoxy much, I could adapt his procedure to trim the top edge of the fiberglass for my “cut in line”. I applied the cloth down over the chines past the designed waterline about 4″ to 6″ and cut the fiberglass straight and clean with a circular, razor-bladed fabric cutter. The edge that now exists is an excellent “cut” edge for painting.
To apply the fiberglass, I used the dry method described in our manuals. I added 503 Gray Pigment to the last of the coats to fill the weave. I’ve had good success with this approach and the pigmented bottom gives the craft look of continuity.
I glassed the topsides with a layer of 4 oz. fiberglass cloth to the cut line and pigmented it with 501 White Pigment to serve as a sort of primer. The boat was finally ready to leave the shop. Now I can dedicate that space to building the freestanding composite spars.
Be sure to read my follow up article, Building a Wood/Epoxy Sharpie, Phase II .
- ABOUT THIS SITE
- NEWSLETTER SIGNUP
Wednesday, January 15, 2014
Reuel parker egret 31.5 sharpie build blog.

No comments:
Post a comment.
Popular Posts

All Posts by Topic
- wharram catamarans (35)
- boatbuilding (28)
- boat design (20)
- sailing (15)
- voyages (14)
- boat designers (13)
- boat for sale (11)
- kayaking (11)
- boating gear (7)
- book review (7)
- canoeing (6)
- seamanship (6)
- boat buying (5)
- cruising (5)
- launchings (5)
- online resources (5)
- boat camping (4)
- boat refit (4)
- boatbuilding materials (4)
- magazines (4)
- monohulls (4)
- my books (4)
- rivers and swamps (4)
- sailboats (4)
- survival (4)
- Gulf of Mexico (3)
- James Wharram (3)
- boat shows (3)
- sailing fiction (3)
- sharpies (3)
- Cape Dory 27 (2)
- Caribbean (2)
- Carl Alberg (2)
- Kruger Canoes (2)
- Kruger Sea Wind (2)
- Reuel Parker (2)
- boat maintenance (2)
- boat review (2)
- gear review (2)
- marine carpentry (2)
- multihulls (2)
- navigation (2)
- oil spill (2)
- other stuff (2)
- paddling (2)
- projects (2)
- Sailing the Apocalypse (1)
- beachcruising (1)
- book giveaway (1)
- circumnavigation (1)
- cruising destinations (1)
- environment (1)
- expeditions (1)
- great deals (1)
- living aboard (1)
- rowing craft (1)
- the sea (1)
Archive of All Posts by Month
- January (1)
- September (1)
- December (1)
- November (1)
- September (2)
- January (2)
- February (1)
- October (1)
- October (3)
- January (3)
- December (5)
- December (2)
- November (2)
- February (5)
- January (18)

- Plans & Kits
- Plans by type
- Open Sailboats 14' up
Little Egret Plans PDF
Write a review.

- Create New Wish List
Description
Additional information.
Little Egret is an open Sharpie of 18' 10" x 4' 10â³ x 6", with a hull shape reminiscent of the famous 28' Sharpie, Egret , designed by Ralph Middleton Munroe in 1886 for use in the shallow waters of Florida. I have long had a fascination for Egret , and think that her hull cross-section, which is part Sharpie and part Dory, is a superb compromise for a sailing vessel. The seaworthiness of the original Egret is legendary.
I was approached by another Egret enthusiast who wanted a smaller version, and Little Egret is the result. Although she is similar in hull shape to the original, she is in no way a copy. In fact, I made it a condition of the design commission that I be allowed to design her from scratch, without any reference to existing drawings or photos. This was very important to me, as I wanted to be sure that she was all my own work, shape, proportion, rig, and layout. The owner had input into the aesthetics of the project, but the design is original.
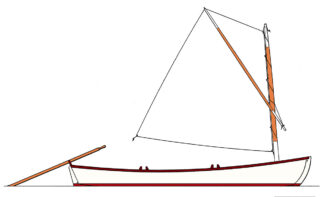
- Designed to be sailed, rowed, sculled with a yuloh, or (if absolutely necessary) powered by a small outboard - preferably electric
- Combination taped-seam (stitch-and-glue) and stringer/frame construction, of the most simple type
- Built-in buoyancy tanks
- Pivoting centreboard and shallow rudder of traditional Sharpie style (but with end plates for improved efficiency)
- Simple sprit-boomed rig, with a third mast location allowing her to be sailed with either of the sails in a single-masted configuration
Plans package includes
- 20 sheets of very detailed A3 sized drawings
- Basic instructions with email back-up. A detailed instruction manual with complete building illustrations will be available in the future, but the construction will be no problem for someone with basic-to-intermediate experience. Extensive building photos available by arrangement.
- Option of Metric or Imperial dimensions
Related Products

16' Egret Runabout Plans

April Love Plans PDF
Irreducible plans pdf.

Oracle Plans PDF
July / August Issue No. 299 Preview Now
A Pacific Northwest Sharpie For The Bahamas
By reuel parker.
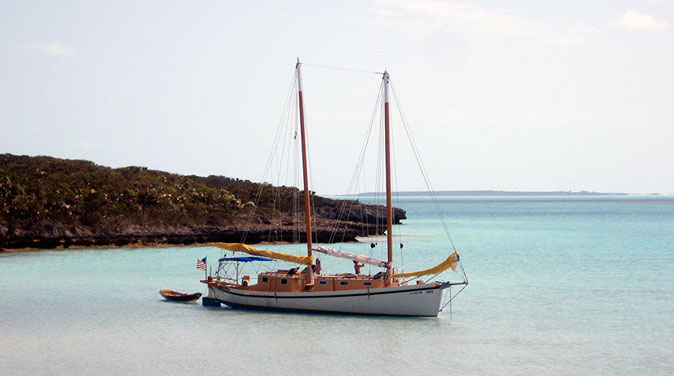
Around 1991, Jon Eaton (my editor at International Marine Publishing) suggested that I write a book about sharpies. He knew I was a fan of the type (inshore fishing/oystering/crabbing boats), and I gladly accepted the assignment.
I researched the history of sharpies in various museums and historical societies on the US East Coast, from Mystic Seaport to Miami. I already owned many books, pamphlets and government papers about sharpies, especially from marine historian Howard Chapelle.
During one hectic summer in Rockport, Maine, I wrote the text and designed (adapted, really) all the examples for The Sharpie Book . I edited through hundreds of my construction photos, and made additional drawings to illustrate the history and construction of the boats—both using traditional methods and contemporary “cold-molded plywood/epoxy” techniques.

The 19 foot sharpie GATO NEGRO sailing in the Florida Keys.
During the years prior to writing the book, I had designed and built several small sharpies. The first sharpie I built for myself—around 1988—was the 19′ Ohio sharpie GATO NEGRO, which I built in my small boatyard in Islamorada, Florida Keys. Although I have continued to design many more sharpies, both large and small, I had never built and owned a large cruising sharpie myself… until starting to build IBIS in December of 2007.
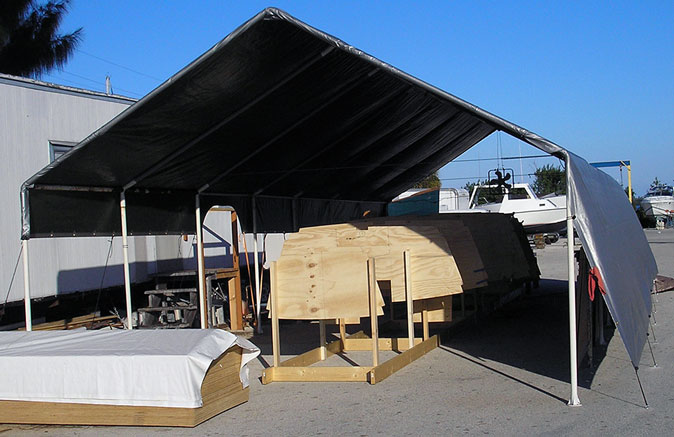
My shop and office trailer for building the 45′ sharpie IBIS in St. Lucie Village, FL.
Because many waterfront marinas and boatyards along the east coast have been bought and converted into condominiums, it has become increasingly difficult to find a slip for a cruising boat without also purchasing a condo. It occurred to me to create a new design series that I called “Maxi-Trailerable Boats”—shoal-draft sail- and power-boats limited in length to about 45′, 10′ beam, and 15,000 lbs maximum displacement. Vessels of that size can be carried on standard 3-axle 40′ trailers (manufactured primarily for the sportfishing industry). This represents the maximum size vessel that can be transported on federal and state highways with a permit, but without requiring escort vehicles. Using a commercial tow truck, an individual permit is not even required. With tabernacled masts, the rig can be taken down or set up in a matter of a few hours. Thus you could take your cruising boat home with you, or transport her to your desired cruising location.
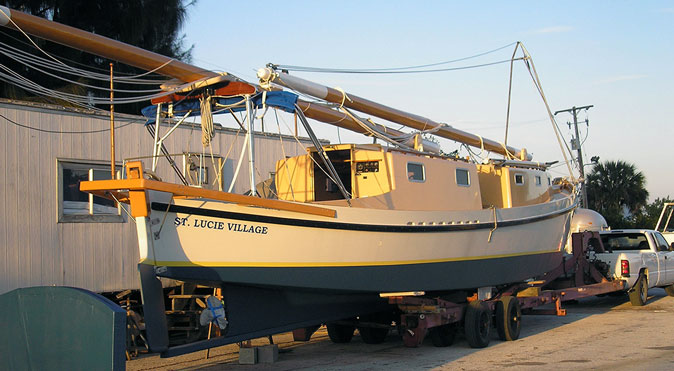
IBIS completed, on the trailer—centerboard to left; tabernacle A-frame on the bow.
My concept was that you could store and maintain your boat at home (or at an inexpensive storage lot inland) and launch/haul her at a local boatyard using a Travel-Lift or crane, or at a launch ramp using a large four-wheel-drive truck. Thus you could eliminate slip rent and boatyard storage fees, saving several thousand dollars per year.
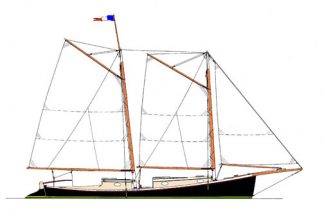
To promote the concept, I decided to build a prototype. I chose the Straits of Juan de Fuca sharpie design for my conceptual “point of departure”, because my design adaptation of the 1880s original (included in The Sharpie Book ), seemed like a good choice. These vessels were halibut fisherman—double-ended, gaff-rigged schooners about 36′ in length. Chapelle considered them to be one of the most seaworthy of all the sharpies. The only other popular double-ended sharpie—Commodore Ralph Munroe’s famous EGRET—was from the same time period and also had a reputation for seaworthiness.
Drawing from these inspirations, I created a 45′ sharpie hull, with 10′ beam and 2′ 6″ draft. The hull employed elements of both designs. A big advantage of the long, narrow, flat bottom was that I could employ enough rocker (fore-and-aft curvature) to achieve standing headroom in the cabins. Also, double-ended hulls are often believed to be more seaworthy than other types, and they are “easily driven”, achieving hull speed with a minimum of energy—either from sails or auxiliary power—due to low wetted-surface.
The result was the schooner IBIS, which I launched in early 2010. IBIS was designed to be a live-aboard cruising sailboat, ideally suited to the shallow waters of the US East Coast, the Florida Keys, and especially: the Bahamas.

IBIS anchored off Lee Stocking Island, Bahamas, in two feet of water (aground at low tide).
Although I have sailed several shoal-draft cruisers extensively in the Bahamas, I had never sailed a true flat-bottomed sharpie there. Indeed, I had never owned or even sailed in a large sharpie at all. Hence, in late winter of 2010, I sailed IBIS down the Florida coast to Key Biscayne, across the Gulf Stream, and down through the islands. That first trip was fraught with problems—the heat exchanger broke; one of my inexperienced crewmembers backed over the dinghy painter and pulled the prop shaft right out of its coupling; the pump-out for the holding tank got plugged up; and we had a personality conflict between two crewmembers which resulted in one of them flying home from George Town, Great Exuma. Nonetheless, we had an overall good cruise, and learned a lot about taking a sharpie out in the open ocean.
IBIS handled 4′ to 6′ seas reasonably well on a beat or close reach (she did pound pretty hard at times), and was fantastic from a beam reach to a run. My tactic for achieving “Easting” in the strong Trade Winds was to motorsail under jib and reefed mains’l (or under reefed fores’l alone), pointing as high on the apparent wind as I could. In winds around 25 knots, and 6′ to 8′ seas, I learned to fall off and slow down to seven knots, making 100 degree tacks under double-reefed fores’l and diesel. In wind and seas beyond that, working to windward became impractical, and we anchored in some protected cove or creek to wait for gentler conditions (which is what most people would do anyway).
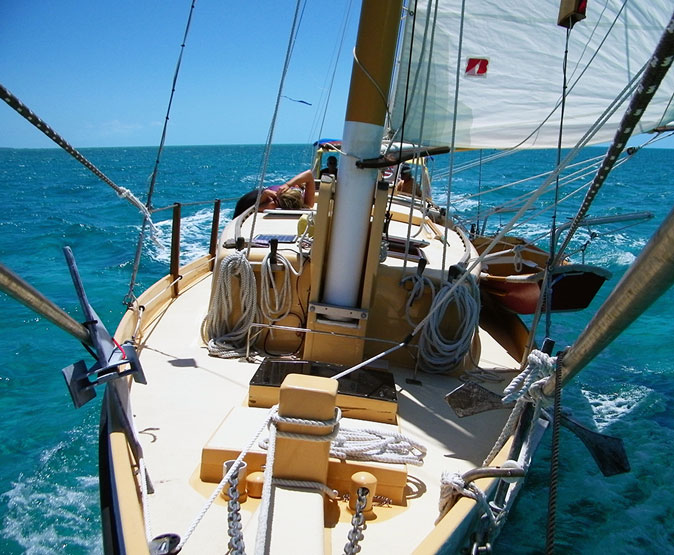
IBIS under full sail in the Trade Winds; note her ground tackle and side davits.
I took IBIS to the Bahamas three times, and sailed her in many conditions. I was very impressed with her abilities, and realistic about her shortcomings. Overall, I am now convinced that a well-designed and –built big sharpie (with self-righting ability) is an excellent choice for cruising the islands. I did not find myself overly restricted—only the really hard-core sailors will beat to windward in seas over 8′, or winds over 25 knots. Patience is always required in cruising. On the other hand, the ability to sail in less than three feet of water really opens up the possibilities for cruising anywhere! But especially, in the Bahamas, we could explore shallow, seldom-visited creeks, cross tidal flats that dry out at low tide, and access hundreds of safe, quiet, remote anchorages that very few other boats could even dream about!
In late 2013, I sold IBIS to a 60-year-old New Jersey surfer. He is presently cruising in the Florida Keys with her, which I never found time to do. She is the perfect boat for it! I miss her badly, as sailing to the Bahamas has been the high point of my life for almost 35 years now—I love it more than words can express. I am going to have to build another boat….
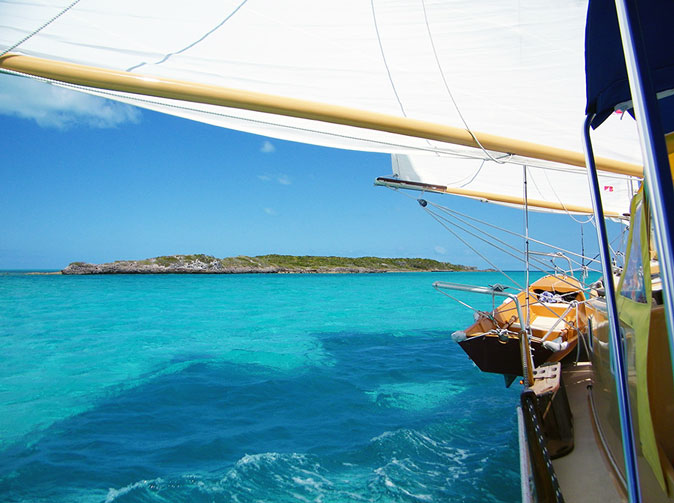
Sailing from the Banks into Exuma Sound at Leaf Cay, Bahamas.
2/20/2014, Saint Lucie Village
ACCESS TO EXPERIENCE
Subscribe today.
Publishing dynamic editorial content on boat design construction, and repair for more than 40 years.
1 YEAR SUBSCRIPTION (6 ISSUES)
Print $39.95, digital $28.00, print+digital $42.95, from online exclusives, extended content.
SURF SCOTER
From the community.
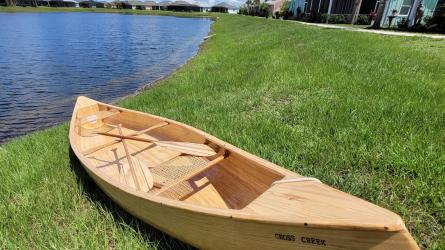
Handmade wooden canoe
Beautiful hand built wooden canoe. Design modeled on the Wabanaki Indian canoes of Maine.
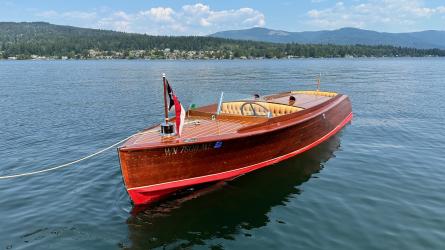
1929 Hacker Craft Runabout 18'
Jimmy Steele Peapod
Good Vintage Boat - Hull Number 66 - Completed In 1989.
Boats Plans and Kits
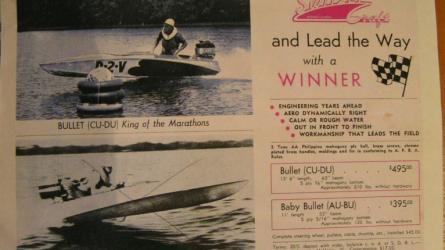
Switzer Bullet 136
- Row boat plans
- Sailboat plans
- Power boat plans
- John's Sharpie
John's Sharpie by Chesapeake Light Craft
A lightweight, fast-sailing sharpie.
| Length overall | ||
|---|---|---|
| Beam | ||
| Draft | ||
| Draft (cb up) | ||
| Weight | ||
| Capacity | ||
| Sail area | ||
| Hull construction | Stich-n-glue | |
URL: http://www.clcboats.com/shop/boats/boat-plans/sailboat-plans/johns-sharpie-wooden-sail-boat-plans.html
Description:
There is certainly no other boat that offers the performance under sail and ease of construction of a sharpie. Developed in southern New England as workboats, their speed, shallow draft, easy handling, and quick construction caused sharpies to quickly spread along the Atlantic Coast.
There have been sharpie designs for homebuilders almost as long as there have been sharpies. John's Sharpie is similar in proportion to the sharpies used around New Haven, Connecticut for oyster tonging in the 19th century. Rendered in modern materials, this 21st century sharpie is fast, light, easy to handle, and easy to build. Renditions of John's Sharpie have been built from CLC kits and plans all over the world, from the 15th floor of an apartment building in South Korea to Coniston Water in the UK.
"It is a tribute to John Harris's successful combination of the various design requirements that none of us felt anything but total satisfaction with the basic overall concept, her sailing performance or elegant appearance on the water," said Water Craft magazine while sailing the Sharpie around Coniston Water. Read the entire review.
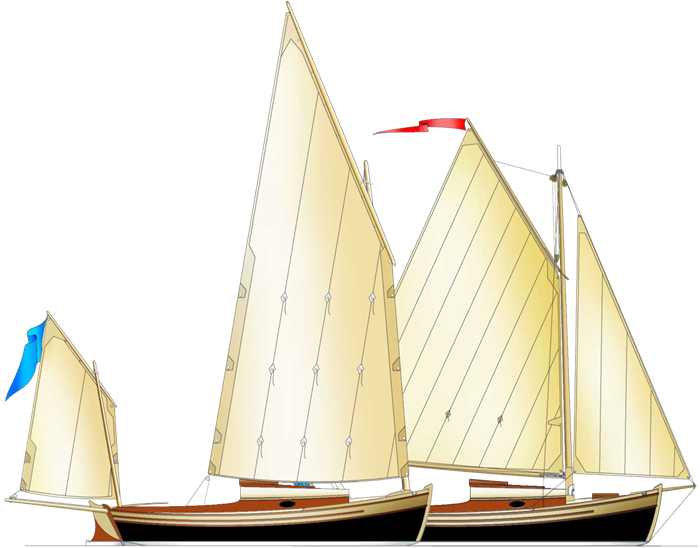
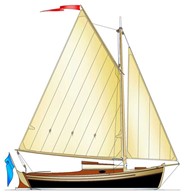
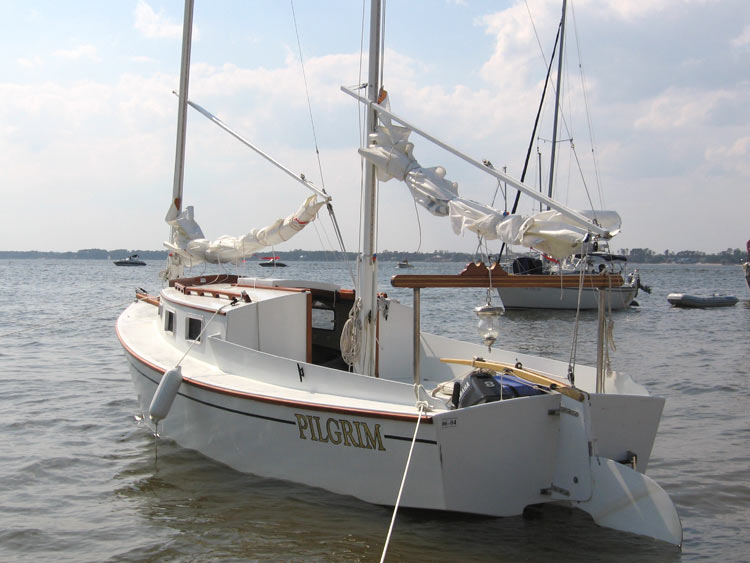
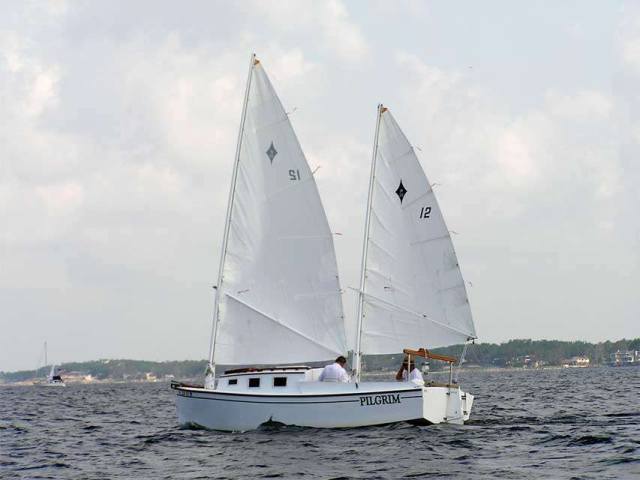
John C. Harris, CLC's CEO and a lifelong sharpie fan, designed the Sharpie for his own use on the Chesapeake Bay. Light weight and clean lines yield a boat capable of high average speeds, dinghy-like handling, and great pointing ability. The unstayed cat-ketch rig is efficient and beautiful, and without a jib there are no sheets to handle when tacking: just put the helm over and you're done. Extremely low wetted surface and a big rig means the Sharpie will whisper along in the lightest of air. Tie in a reef when whitecaps appear if you want to stay reclined inside the cockpit, or hike out on the comfortable side decks if you feel like exploiting the Sharpie 's heavy air speed.
The Sharpie uses a daggerboard to get to windward. It's more efficient than a centerboard, takes up less space, and is easier to build. With the board raised and the rudder kicked up, it's easy to sail the sharpie onto the beach or pull it above the high tide line. With the board halfway up the boat will still point well, allowing you to sail in the shallowest water.
The interior is laid out for leisurely daysailing or overnight camp-cruising. The separate cockpits encourage relaxed sprawling, and are easy to cover with boom tents while camping. Ideal crew is 2-4 adults.
While John's Sharpie is a bigger project than our other small boats, woodworking hobbyists will find construction fast and straightforward. Construction time seems to average about 180 hours. No frames or strongbacks are required; the hull is of 9mm okoume bent around permanent bulkheads, then stitched and glued like a big kayak. The tapered masts are solid spruce or cedar.
Interviewed about this 1996 design in May 2011 on the blog 70.8%, John Harris had this to say about the Sharpie :
"I designed that boat to win the traditional boat race at MASCF. Its beguiling good looks were meant to look right on the St. Michael's waterfront, but conceal the speed and handling of a racing dinghy. I was 23, and it was a good 23-year-old's boat. I like that it's hard to find an angle from which the proportions don't look good. It's got razor-sharp handling upwind and down. Unfortunately, you get the bad with the good - John's Sharpie is wicked fast but also a little cranky. It was a good design lesson, including that two tall masts weigh twice as much as one tall mast. I'm not the only skipper to have capsized one. Many builders soon shipped a pair of sandbags either side of the daggerboard trunk to settle her down."

Boats about same size as John's Sharpie
| / |
| / |
Questions? Suggestions? Contact us at: [email protected]









IMAGES
COMMENTS
How to Build a Sharpie Part II The Most Boat for the Least Cost By EDWIN S. PARKER From the January 1931 issue of Yachting. In the December 1930 issue of Yachting, the plans and directions for building a 15-foot Sharpie were given that carried the work as far as planking the bottom. In the present article the directions for work are continued ...
I built this skiff based loosely on several designs in Raul Parker's Sharpie Book. Chesapeake Oyster Skiff, Mississippi River yawl, and Crab skiff. The sail ...
So why butt blocks on this boat? The sharpie hull resembles the long shapes of the trimaran more than the short beamy shape with which I've had difficulties. I'm building this boat by myself. A complete panel all scarfed together would weigh on the order of 90 pounds. Even if it weighed half that, at 3′ by 30′ it is unwieldy.
John's Sharpie is similar in proportion to the sharpies used around New Haven, Connecticut for oyster tonging in the 19th century. Rendered in modern materials, this 21st century sharpie is fast, light, easy to handle, and easy to build. Renditions of John's Sharpie have been built from CLC kits and plans all over the world, from the 15th floor ...
24′ Chesapeake Bay Hampton FlattieL.O.A.: 24′ 2″L.W.L.: 22′ 8″Beam: 7′ 9″ Draft: 2′ ½″/3′ 9″Sail Area: 263 sq ftWeight: 2,500# (approx)Proportionately, this is the largest sharpie type known, and shows the maximum beam ratio successfully used in the sharpie type. Hence, this is a 'big little boat,' and will make an ...
18' Sharpie. 07-27-2006, 01:46 PM. With the purchase of my new house, I'll have the boat shop, er.. I mean garage that I've always wanted. In it, I'm soon hoping to build "Idie," an 18' Sharpie whose plans are offered from the NC Maritime Museum in Beaufort, NC.
Based on the original 28-footer made famous by Commodore Munroe in Florida, this 31.5-foot version offers much better cruising accommodations, although like all sharpies, still minimal for it's size. Reuel said it was the most boat that could be built for the money and pointed out that it would be quick to build, trailerable and yet capable of ...
Little Egret is an open Sharpie of 18' 10" x 4' 10â ³ x 6", with a hull shape reminiscent of the famous 28' Sharpie, Egret, designed by Ralph Middleton Munroe in 1886 for use in the shallow waters of Florida.I have long had a fascination for Egret, and think that her hull cross-section, which is part Sharpie and part Dory, is a superb compromise for a sailing vessel.
The first sharpie I built for myself—around 1988—was the 19′ Ohio sharpie GATO NEGRO, which I built in my small boatyard in Islamorada, Florida Keys. Although I have continued to design many more sharpies, both large and small, I had never built and owned a large cruising sharpie myself… until starting to build IBIS in December of 2007.
Whatever the case, Chesapeake sharpie skiffs were common, especially in the smaller sizes, because of their easy and cheap construction. Howard I. Chapelle, a naval architect and curator of maritime history, wrote several books on traditional work boats and boat building, some of which include sharpie design and construction. He was a ...
Traditional methods can present you with a more shapely boat, reverse curves, tumble home, dramatic flair, etc. which are difficult to achieve in plywood. In the end, most opt for plywood for a number of reasons. Ease of build, availably of stock, long life of well coated material, light weight frameless construction, and a dry boat to name a few.
John's Sharpie is similar in proportion to the sharpies used around New Haven, Connecticut for oyster tonging in the 19th century. Rendered in modern materials, this 21st century sharpie is fast, light, easy to handle, and easy to build. Renditions of John's Sharpie have been built from CLC kits and plans all over the world, from the 15th floor ...
The sharpie design is believed to have originated along the Long Island Sound in the 1800's as a workboat in the oyster fishery. Sharpies are long, narrow sailboats with flat bottoms, extremely shallow draft, centerboards and straight, flaring sides. They are noted for being relatively easy to build, very fast, stable and had the ability to ...
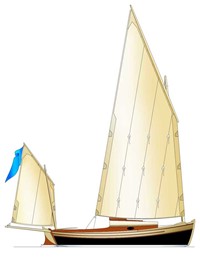
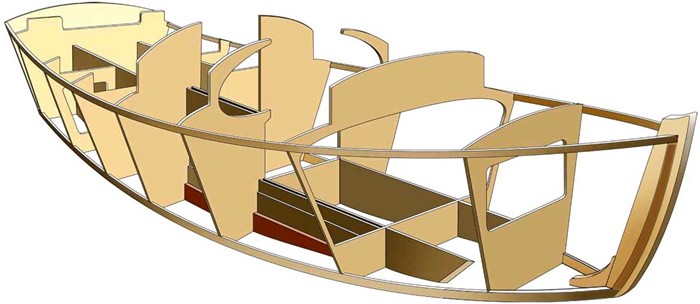
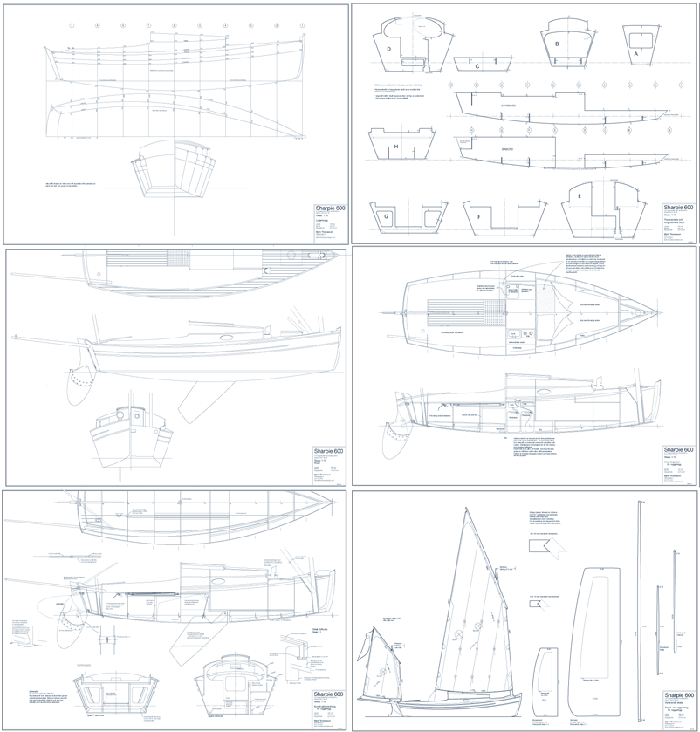
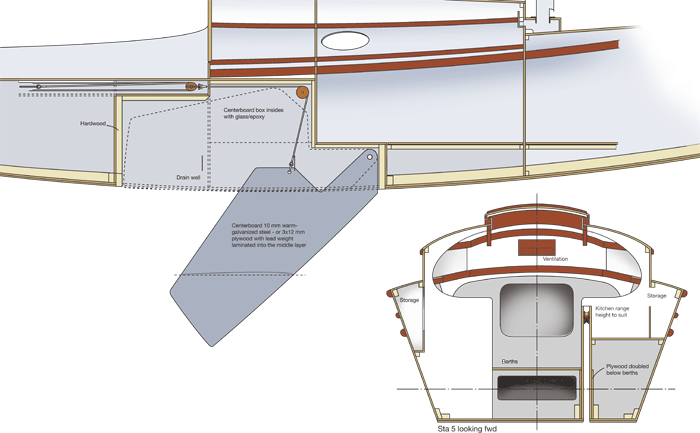
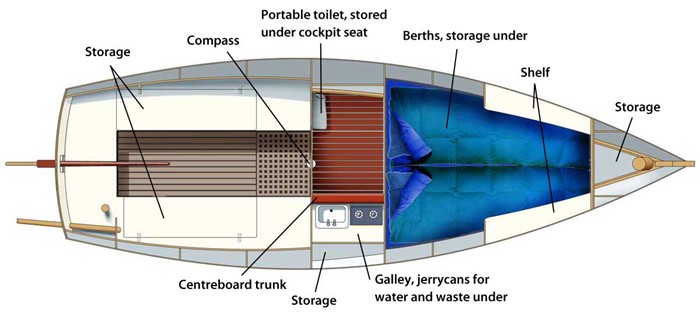
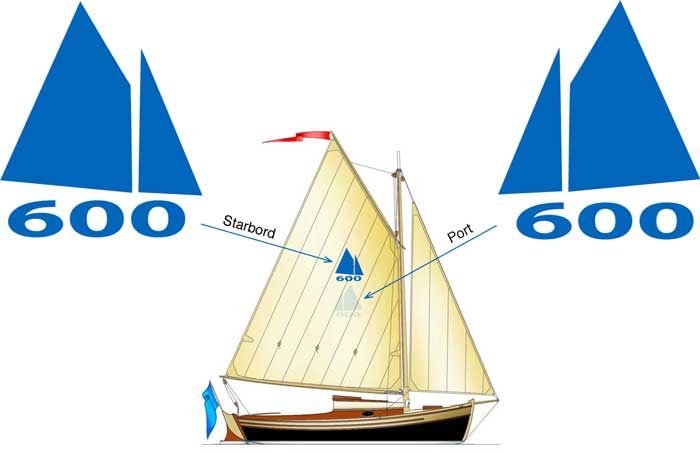
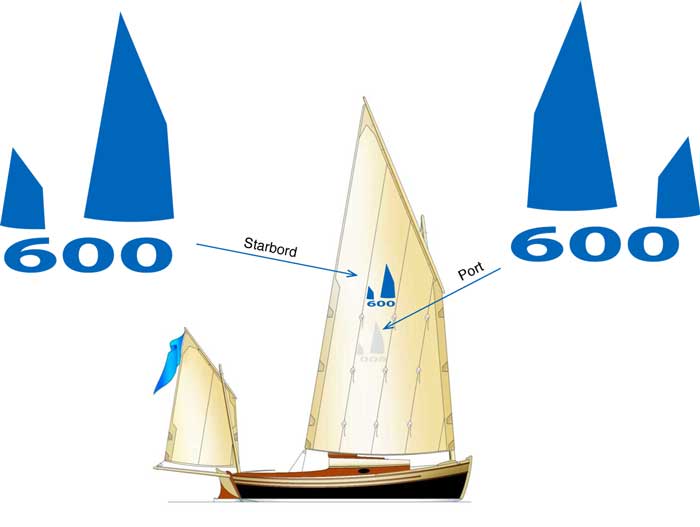
Easy to build: Designed for amateur construction, the Sharpie is built on 7 transverse and 2 longitudinal bulkheads, preassembled like a large jig-saw puzzle. To this, bottom-, planking- and deck panels, sheathed in epoxy/glass are glued. The Sharpie 600 took the third prize in Classic Boat´s design competition in 1996.
A very simple 18'x 5'2'' ply sharpie drawn with a simple unstayed sprit boom rig and a ply centreboard. Ideal for estuary cruising and an excellent 'big' boat for first time construction. In it's basic form 10 sheets of 3/8'' ply and 1 sheet of 1/2'' ply are used. Below is an example of the Drake 18 by Adrian While.
Welcome to Straydog Boatworks, the World of Norwalk Islands Sharpies and Iain Oughtred wooden boats. Designs from the world famous Laser designer, Bruce Kirby and Iain Oughtred. nisboats : Norwalk Islands Sharpies : plans kits building sailing rigging & lots of boat stuff : Bruce Kirby Designs & Straydog Boatworks
The Sharpie Catalogue includes 30 sailing sharpie designs and 3 power sharpies. Construction is plywood/epoxy/fabric of the simplest kind. These vessels are intended to be built by amateurs in the garage or back yard. Most are flat-bottomed; a few are V- or arc-bottomed; all sailboats are centerboarders. The larger sharpies can be built in steel […]
Princess Sharpie 26'. Materials list Picture Album (Princess 22/26) The Princess Sharpie 26 like her little sister, the Princess Sharpie 22, is an easy to build trailerable, beachable vessel. The sharpie hull shape as developed for this has been well proven in the 22. This boat also has the V-bottom to maintain the handling and performance ...
In the middle of forested country with boat wood available locally, you can build a solid-wood, traditional sharpie cheaper than with ply and the boat will also be worth considerably more than a plywood boat when done. Traditional boats take a bit longer to build because of smaller pieces, but are much more fun to build....the old sharpie ...
28 ft. Sharpie boats were popularly used during the 19th and early 20th century. New Haven was considered the "oyster capital of the world" between 1820 and 1910, which prompted the evolution towards a more efficient oyster boat.5 With the resulting Sharpie boat, a 2-person crew could carry up to 175 bushels of oysters.6 During the height ...
A cruising sharpie with multiple roots. - LOA 5.50 m, beam 1.88 m - SA 15 m² - Hasler or fantail sail ... A Sit On Top kayak with a leeboard and sailing option. Plywood epoxy building on a central backbone and light frames. - LOA 4.25 m x beam 0.78 m - Weight 35 kg - Weight max load 190 kg
Boatbuilder Eric Hedberg of Rionholdt Once and Future Boats in Gwynn's Island, Va. recently got an order to build a 14' two-mast sharpie out of PVC materials. The buyer, from Manteo, N.C., had ancestors who had worked a sharpie in the Carolina sounds pound net fishery. ... "This type of boat was particularly well suited to oyster fishing ...
Sailboats. Sailboats embody the mystery of the sea, of going only where the wind is willing to take you. We offer a variety of sailboat sizes, using several construction techniques. We offer sails, hardware and rigging for many of our sailboat designs. This enables you to focus on building your boat, not searching around for all the bits and ...
A flat bottom boat isn't much easier than a V bottom (4 panels) or a 5 panel (flat bottom panel) build and there are many advantages to the multi chine approuch, fixing many of the issues of a flat bottom. Now a 15' jon boat is a pretty easy thing to assemble, compared to a V or 5 panel, but the actual hull build is a fairly small part of the ...